03540598_ed12 19
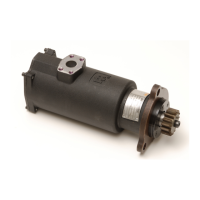
8. Slide the rear bearing retainer convex side rst, onto the Drive
shaft. Press it into position in accordance with the instructions
packaged with the new Retainer.
9. Assemble the Drive Gear Screw (34), Drive Gear Lock Washer (35),
Drive Gear Cup (36) and Drive Gear Screw O-Ring (37).
10. Grasp the Drive shaft (57) in a vise, external splined end down.
Place assembled Drive Shaft Screw Unit into the Drive Shaft,
screwhead down. Lubricate the inside diameter of the Drive Shaft
with Ingersoll Rand No. 28 Lubricant.
11. Slide the Drive Gear Bearing (30) into the Drive Shaft.
12. Lubricate with Ingersoll Rand No. 130 Lubricant and install the
Driving Clutch jaw teeth facing up and Driven Clutch Jaw teeth
facing down into the Drive Shaft.
13. Insert the Clutch Spring (51) into the Drive shaft.
14. Insert the Clutch Spring Cup (50) into the Drive Shaft.
15. Press the inserted parts into the Drive Shaft, and install the Clutch
Spring Cup Retainer (49).
NOTICE
If it is necessary to replace the Drive Housing (40) and drive
components, make sure that the Piston Seal (part
number SS800-272) has been removed from the rear of the
new Piston (54). The piston Seal must be removed to prevent
pressure build-up which will cause movement of the Planet
Gear Frame Shaft Seal (16). If this condition occurs, the
Piston cannot retract and the Drive Pinion (63) will remain
in engagement with the ywheel, causing damage to the
Starter drive train and/or Starter motor. To remove the Piston
Seal, insert a screwdriver inside the lip of the Seal and pry it
loose from the Piston.
16. Install the Piston (54) onto the Drive Shaft until the Rear Drive
Shaft Bearing seats into the Piston.
17. Using a thin, at blade screwdriver to assist in this operation, coil
the Large Drive Shaft Bearing Retainer (53) into the groove of the
Piston to retain the outer race of the Drive Shaft Bearing.
18 Using O-Ring lubricant, lubricate the Piston O-Ring (55) and
install it in the groove of the Piston.
19. Position the Drive Housing in an arbor press, pinion-end down
and install the Drive Housing Seal (43) into the Drive Housing.
Using a pressing sleeve of the proper size, press the Seal into the
Drive Housing so that the lip of the seal faces away from the Drive
Pinion.
20. Using a sleeve that contacts the outer race of the Front Drive
Shaft Bearing (42), press the Bearing into the Drive Housing until
it seats. For “B” and “C” ratio models only, drop the Piston Return
Spring Seat (60) on top of the Front Drive Shaft Bearing.
21. Slide the Piston Return Spring (59) onto the Drive Shaft and snap
it into the front of the Piston so that it is against the Large Drive
Shaft Bearing Retainer (53).
22. Lubricate and insert the assembled Drive Shaft into the Drive
Housing.
23. Using O-Ring lubricant, lubricate and install the Outer Bulkhead
O-Ring (47) and the Inner Bulkhead O-Ring (48) on the
Bulkhead (46).
24. Slide the Bulkhead onto the Piston.
25. With the Drive Housing in the arbor press, press down on the rear
face of the Piston.
NOTICE
Feel the underside of the Drive Housing to make sure the Drive
Shaft passes through the Bearing.
26. Using a screwdriver, install the Bulkhead Retainer (45).
WARNING
Make sure the Bulkhead Retainer is properly seated in the Motor
Housing groove before easing o the arbor press. Failure to
do so will allow improperly retained parts to separate when
removed from the arbor press resulting in injury to personnel.
27. Remove the Drive Housing from the arbor press.
*** Registered trademark of Permabond
28. Using o-ring lubricant, lubricate and install the Drive Housing
O-Ring (41) in the groove of the Drive Housing.
29. Position the assembled Gear Case on a workbench. The
assembled unit must be upright to accept the Drive Housing.
30. Carefully position the assembled Drive Housing (40) onto the
Gear Case so as not to damage the Piston Seal. Align the punch
marks of the Gear Case and Drive Housing.
31. Install the Drive Housing Cap Screw Lock Washers (39) and the
Drive Housing Cap Screws (38) and tighten to 28 ft-lb (38 Nm)
torque.
32. Using an impact wrench with a 5/16” (8 mm) x 8” (203 mm) long
hex inserted into the end of Drive Shaft, tighten the Drive Gear
Screw (34) to 29 ft-lb (39.3 Nm) torque.
33. Lubricate using Ingersoll Rand No. 11 Grease and slide the
Pinion Spring (65) and the Pinion Spring Sleeve (64) over the
Pinion end of the Drive Shaft
34. Lubricate the Pinion end of the Drive Shaft with Ingersoll Rand
No. 11 Grease and install the Drive Pinion (63).
35. Grasp the Drive Pinion in a leather-covered or copper covered
vise with the starter supported on a workbench.
36. Place the Drive Pinion Washer (62) onto Drive Pinion Retaining
Screw (61).
NOTICE
Models ending in R25, R31 and R51 have a lefthand thread;
models ending in L26, L32 and L52 have a right-hand thread.
Install the Drive Pinion Retaining Screw into the end of the Drive
Shaft and tighten it to 80 ft-lb (108.5 Nm) torque for models with
“B” and “C” gear ratios and to 125 ft-lb (169.5 Nm) torque for
models with “D” gear ratio.
Inertia Drive Models:
NOTICE
On models with Inertia Drive, do not lubricate the threaded area
of the Drive Shaft as it could collect dirt and foreign material
which will hinder e cient operation.
Gear Case
1. Install the Rear Drive Gear Bearing (31) and Front Drive Gear
Bearing (30) onto the Drive Gear (29).
2. Install the two Drive Gear keys (37) into the drive gear shaft. Refer
to Dwg. TPD1171.
32
37
36
(Dwg. TPD1171)
3. Slide the Rear Drive Gear Bearing into the Gear Case.
4. Lubricate the Drive Gear with approximately 8 oz. (240 ml) of
Ingersoll Rand No. 130 Grease.
5. Press the Drive Gear Shaft Seal (34) down into the Gear Case
Cover (32). Lip facing upward.
6. Install the Gear Case Cover O-Ring (33) onto the Gear Case Cover.
7. Install the Gear Case Cover into the Gear Case.
8. Slide the Starter Drive (36) onto the drive gear shaft and tighten
the Starter drive locating the ring and screw securely.
9. Press the Drive Housing Bearing (39) into the Drive Housing (38)
and lubricate it with IngersolI Rand No. 130 Grease. See
Dwg. TPD786.
 Loading...