QUICK SETUP GUIDE
Insignia Voice™
Speaker With
Google Assistant
Built in
NSCSPGASPB / NSCSPGASPBC /
NSCSPGASPG
Bluetooth Set-up
This speaker is equipped with Bluetooth to allow wireless
playback from any Bluetooth-enabled phone or tablet.
1 Press and hold - and + buttons for four seconds to enter
Bluetooth pairing mode.
2 Click “NS-CSPGASP” or the device name you entered during
Google Home App setup on your device to pair with the
speaker.
3 After the speaker and your device are paired, you can stream
music from your device to the speaker.
Notes:
• When your speaker is in Bluetooth-pairing mode, the display will
blink bt.
• When your speaker and Bluetooth-device are paired, the display will
show a solid bt.
• You can use voice commands to turn Bluetooth on or o. Try, “Turn
Bluetooth (on/o).”
• Your speaker will remember the last three devices that were
connected to it via Bluetooth and will automatically connect to one of
those devices when Bluetooth is turned on.
TURNING PROXIMITY ON OR OFF
This speaker is equipped with proximity detection that is turned
on by default. When proximity detection is turned on, your
speaker will temporarily decrease the volume of the music or
snooze your alarm when you wave your hand over your
speaker. Turning o proximity detection will only turn o the
volume decrease function.
To turn proximity detection on or o:
1 Hold all three buttons on the top of your speaker for more
than four seconds.
2 Release all three buttons. The display shows Pon or Po to
let you know if proximity is on or o.
SPECIFICATIONS
• Product dimensions (W × D × H): 3.7 × 3.7 × 5.9 in.
(96 × 96 × 151.6 mm)
• Weight: 19.4 oz. (550 g)
• Power input: 12V/2.5A
• USB power out: 5V/1A
• Speaker wattage: 8W
• Power cord length: 4.9 ft. (1.5 m)
• Maximum ambient temperature: 95° F (35° C)
• Android OS: 4.3 or higher
TROUBLESHOOTING
Note: If you try the solutions suggested above and still have
connection or operation issues, reset your speaker by pressing the
Microphone button for 12 seconds.
SETTING UP YOUR SPEAKER
1 Place your speaker in a convenient place.
2 Plug one end of the power adapter into a power outlet,
then plug the other end into your speaker. Your speaker
powers on.
3 Make sure that your Wi-Fi, Location Services (GPS), and
Bluetooth are turned on/enabled on your device.
4 Make sure that the clock on your device is set to the
correct time.
5 Download the Google Home app on a phone or tablet to
set up your speaker.
6 To use Google Assistant, you must sign in to your Google
Account.
For more help, visit g.co/home/setup.
Google Assistant
Just start by saying “Ok Google” or “Hey Google,” then ask it
questions or tell it to do things.
Use these anytime:
• “Play some music”
• “Turn up the volume”
• “What‘s the weather like in Minneapolis?”
Your speaker also has some specic voice commands:
• “Turn screen (on/o)”
• “Turn screen to __ percent”
• “Turn display (on/o)”
• “Turn display to __ percent”
• “(Increase/decrease) volume”
• “Turn the volume (up/down)”
• “Turn volume to __ percent”
The LEDs on the top of your speaker are white while
recording your question.
Learn more about what your Assistant can do at:
http://assistant.google.com/discover/
Note: The volume level increments by 10% when using voice
commands to increase or decrease volume.
Google Chromecast built in
Follow the three steps below to enjoy this feature:
1 Connect a phone or tablet to the same Wi-Fi network as
your speaker using the Google Home App.
2 Cast podcasts, music, and more from 100+
Chromecast-enabled apps.
3 Tap the Cast button in a Chromecast-enabled app to play
music on your speaker.
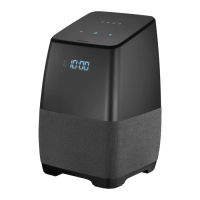
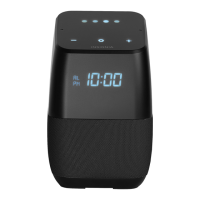
Control panel
Front
9 Do not defeat the safety purpose of the polarized or grounding plug. A polarized
plug has two blades with one wider than the other. A grounding plug has two
blades and a third grounding prong. The wide blade or the third prong is provided
for your safety. If the provided plug does not t into your outlet, consult an
electrician for replacement of the obsolete outlet.
10 Protect the power cord from being walked on or pinched, particularly at the plugs,
outlets, and at the point where they exit from the apparatus.
11 Only use attachments/accessories specied by the manufacturer.
12 Use only with the cart, stand, tripod, bracket, or table
specied by the manufacturer, or sold with the apparatus.
When a cart or rack is used, use caution when moving the
cart/apparatus combination to avoid injury from tip-over.
13 Unplug the apparatus during lightning storms or when
unused for long periods of time.
14 Refer all servicing to qualied personnel. Servicing is
required when the apparatus has been damaged in any way. Examples of
service-requiring damages include power supply cord or plug damage, liquids
being spilled or objects falling onto the apparatus, apparatus not operating
normally, and/or apparatus being dropped.
15 Do not install this equipment in a conned space, such as a book case or similar
unit, and make sure that it is well ventilated. The ventilation should not be impeded
by covering the ventilation openings with items, such as newspaper, table-cloths,
or curtains.
16 WARNING: To reduce the risk of re or electric shock, do not expose this apparatus
to rain or moisture. The apparatus shall not be exposed to dripping or splashing and
objects lled with liquids, such as vases, shall not be placed on apparatus.
17 WARNING: The power adapter is used as a disconnect device. The disconnect
device shall remain readily operable.
18 The equipment shall be used at a maximum of 95° F (35° C) ambient temperature.
19 WARNING: Please refer to the information on the exterior bottom enclosure for
electrical and safety information before installing or operating the apparatus.
FEATURES
Google Assistant features
• Play and control music from your favorite services
• Set alarms, add items to your shopping list, learn about
your commute, and more
• Tap into the power of Google to get real-time answers to
your questions
• Link compatible smart-home products to turn o lights or
enjoy entertainment on your TV
Insignia Voice
TM
features
• Wirelessly stream your music from any Bluetooth-enabled
device to your speaker
• Check the time, alarm, temperature, volume, and mode
with the built-in display
Before using your new product, please read these instructions to prevent any damage.
PACKAGE CONTENTS
• Speaker
• Power adapter
• Quick Setup Guide
IMPORTANT SAFETY INSTRUCTIONS
1 Read these instructions
2 Keep these instructions
3 Heed all warnings
4 Follow all instructions
5 Do not use this apparatus near water, for example, in a wet basement or near a
swimming pool.
6 Clean only with a dry cloth.
7 Do not block any ventilation openings. Install in accordance with the
manufacturer’s instructions.
8 Do not install near any heat sources such as radiators, heat registers, stoves, or
other apparatuses (including ampliers) that produce heat.
V3 ENGLISH 17-0799
FEATURE
Power Input
Microphone
on/o/Factory
reset
USB charge out
DESCRIPTION
Plug in to turn your speaker on. The white LED on the back of your speaker blinks
slowly, then turns on.
• Short press to turn microphone on or o. The orange LEDs on the top of your
speaker light solid when the microphone is muted.
• Press for 12 seconds to reset the product.
Connect to your device to supply 5V/1A charging.
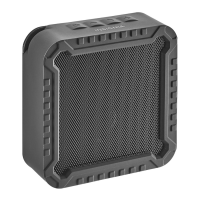
Back
Microphone on/o
Factory reset
Power status light
USB charge out
5V/1A
Power Input
12V/2.5A
LEGAL NOTICES
Warning: Changes or modications to this unit not expressly approved by the party
responsible for compliance could void the user’s authority to operate the equipment.
Note: This equipment has been tested and found to comply with the limits for a Class B digital device,
pursuant to Part 15 of the FCC Rules. These limits are designed to provide reasonable protection against
harmful interference in a residential installation. This equipment generates, uses, and can radiate radio
frequency energy and, if not installed and used in accordance with the instructions, may cause harmful
interference to radio communications.
However, there is no guarantee that interference will not occur in a particular installation. If
this equipment does cause harmful interference to radio or television reception, which can be
determined by turning the equipment o and on, the user is encouraged to try to correct the
interference by one or more of the following measures:
—Reorient or relocate the receiving antenna.
—Increase the separation between the equipment and receiver.
—Connect the equipment into an outlet on a circuit dierent from that to which the receiver
is connected.
—Consult the dealer or an experienced radio/TV technician for help.
This device complies with Part 15 of the FCC Rules. Operation is subject to the following two
conditions: (1) this device may not cause harmful interference, and (2) this device must
accept any interference received, including interference that may cause undesired operation.
RF Exposure Statement
To maintain compliance with FCC’s RF Exposure guidelines, this equipment should be installed
and operated with a minimum distance of 20 centimeters between the radiator and your body.
Industry Canada Compliance
IC Statement
This device complies with Industry Canada licence-exempt RSS standard(s).
Operation is subject to the following two conditions:
(1) this device may not cause interference, and
(2) this device must accept any interference, including interference that may cause undesired
operation of the device.
Le présent appareil est conforme aux CNR d'Industrie Canada applicables aux appareils radio
exempts de licence. L'exploitation est autorisée aux deux conditions suivantes :
(1) l'appareil nedoit pas produire de brouillage, et
(2) l'utilisateur de l'appareil doit accepter tout brouillage radioélectrique subi, même si le
brouillage est susceptible d'en compromettre le fonctionnement.
This equipment complies with IC RF radiation exposure limits set forth for an uncontrolled
environment. This equipment should be installed and operated with a minimum distance of
20 centimeters between the radiator and your body.
Ce matériel est conforme aux limites d'exposition aux rayonnements rf de ic énoncés dans un
autre environnement. ce matériel doit être installé et exploité à une distance minimale de 20
cm entre le radiateur et votre corps.
- This Class B digital apparatus complies with Canadian ICES-003.
- Cet appareil numerique de la classe B est conforme a la norme NMB-003 du Canada.
ONEYEAR LIMITED WARRANTY
Visit www.insigniaproducts.com for details.
CONTACT INSIGNIA:
1-877-467-4289 (U.S. and Canada)
01-800-926-3000 (Mexico)
www.insigniaproducts.com
INSIGNIA is a trademark of Best Buy and its aliated companies. Distributed by Best Buy Purchasing, LLC
7601 Penn Ave South, Richeld, MN 55423 U.S.A. ©2018 Best Buy. All rights reserved. Made in China
Volume + /-
buttons
Play/Pause
button
Google
Assistant /
Microphone
State
Time and
alarm
Temperature /
Volume / Mode
FIND YOUR USER GUIDE ONLINE!
Go to www.insigniaproducts.com, enter
NS-CSPGASP in the search box, then press ENTER.
Next to Features, click Support & Downloads, then
next to User Guide, click the language you want.
BUTTONS
– +
DESCRIPTION
Press to lower your volume. Press and hold to decrease it quickly.
Press to increase your volume. Press and hold to increase it quickly.
• Press quickly to play or pause your audio.
• Hold for four seconds, then release to activate the Google Assistant.
Press to lower your display brightness. Press and hold to lower it quickly.
Note: Use audio controls to completely turn o the display (for example, say
“Hey Google, turn o the display light.”).
Press to raise your display brightness. Press and hold to raise it quickly.
• Hold for four seconds to turn on Bluetooth mode and pair your device.
• Press quickly to turn Bluetooth o.
Hold for more than four seconds, then release to turn proximity on or o.
The display shows Pon or Po to let you know if proximity is on or o.
× × ×
× × ×
× × ×
× × ×
× × ×
× × ×
× × ×
PROBLEM
No power
No sound or low
volume in
Bluetooth Mode
Cannot establish
Bluetooth
connection
My Bluetooth device
keeps unpairing
“NS-CSPGASP” does
not appear on my
Bluetooth device
My device cannot
connect to Wi-Fi
The app cannot nd
the device
SOLUTION
• Make sure that your speaker is plugged in and turned on.
• Make sure that your Bluetooth device is turned on, Bluetooth is
turned on, and NS-CSPGASP or the device name you entered during
Google Home App setup is selected.
• Turn up the volume on your speaker.
• Turn up the volume on your Bluetooth device.
• Make sure that your Bluetooth device is not muted.
• Make sure that your speaker is not paired to another Bluetooth
device.
• Make sure that your Bluetooth device is not paired to another
Bluetooth device.
• Shorten the distance between your speaker and your Bluetooth
device.
• Turn your devices o, then on. Re-pair your speaker and your
Bluetooth device.
• Make sure that your speaker is not paired to another Bluetooth
device.
• Make sure that your speaker and Bluetooth device are both in pairing
mode.
• Make sure that your Bluetooth device supports Bluetooth v4.0 and
below.
• Make sure that your Bluetooth device is not connected to any other
device.
• Make sure that you have selected NS-CSPGASP or the device name
you entered during Google Home App setup.
• Shorten the distance between your speaker and your Bluetooth
device.
• Shorten the distance between your speaker and your Bluetooth
device.
• Put your speaker into pairing mode, then refresh your list of
Bluetooth devices. For more information, see the documentation
that came with your Bluetooth device.
• Check the Wi-Fi settings on your device to make sure that Wi-Fi is
turned on.
• Make sure that you selected the right network and entered the
correct password.
• Make sure that your router/modem is on and that you are within
range of it.
• Turn your device o, then back on.
• Reset your router/modem.
• Make sure that your device has power and is on.
• Make sure that your network is working properly.
• Make sure that your router/modem is on and that you are within
range of it.
• Make sure that the mobile phone has location setting enabled.
FEATURE
Proximity
DESCRIPTION
• Quick hand wave (less than one second): Illuminates your buttons and
lowers the volume/snoozes your alarm
• Hold hand over: Lowers brightness of all buttons
• Touch button: Raises button to full brightness