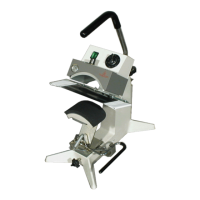
The Insta Graphic Systems Model 414 is a heat seal machine designed for applying transfers or lettering to various substrates, including caps, sleeves, and pant legs. It is intended for operation by a single user and is built for durability and long-term, trouble-free performance.
Function Description:
The Model 414 operates by applying heat and pressure to a substrate, allowing for the transfer of designs. The machine features an upper heating element (platen) and a lower platen, between which the item to be decorated is placed. A handle is used to close the machine, applying pressure, and a timer controls the duration of the heat-sealing cycle. The machine is equipped with a temperature control to set the desired heat for different applications and a pressure adjustment knob to fine-tune the sealing force. For caps, a retainer system helps secure the cap in place and smooth out wrinkles before application.
Important Technical Specifications:
- Electrical:
- 120 Vac, 50/60 Hz, 400 W
- 240 Vac, 50/60 Hz, 400 W
- Weight: 33 Pounds (14.5 KG)
- Temperature Control: The internal thermometer indicates a temperature approximately 15 degrees F (8.3 degrees C) higher than the actual heat platen surface. However, the temperature control is factory calibrated to indicate the TRUE surface temperature of the heat platen. A setting of 8.5 on the temperature dial corresponds to approximately 350°F (177°C).
- Warranty: Insta Graphic Systems (IGS) provides a one-year warranty on parts (with a lifetime warranty on the upper heating element) and 90 days on labor from the invoice date, provided the machine is operated under normal conditions and free from manufacturing defects. This warranty is effective when IGS authorizes the return of the product to the factory, freight prepaid, and the defect is confirmed upon examination. The warranty does not cover misuse, negligence, or accidents.
Usage Features:
- Installation: The machine requires a 15 amp AC circuit. For domestic use, industrial weight extension cords of size 18/3 wire for distances up to 25 feet, or 16/3 for distances up to 50 feet, should be used. For international use, 2.5 mm sq. industrial extension cords are recommended. It is crucial to plug the appliance into a proper receptacle of the correct size and rating, ensuring the line voltage can accommodate the machine and any other appliances on the same circuit.
- Operation Steps:
- Review "How to Apply Instructions" from the Product Catalog before starting.
- Push the ON/OFF switch to the ON position, set the desired temperature, and lift the handle to keep the upper platen arm away from the lower platen.
- Allow the machine to warm up for approximately 30 minutes. The neon lamp on the power switch will cycle on and off once the selected temperature is reached.
- Adjust pressure using the pressure adjust knob on the top-rear of the machine (clockwise to reduce pressure).
- Place the substrate on the lower platen. For caps, pull out the sweatband, place the crown on the lower platen, and lock the cap retainer by pushing the handle to the rear. Smooth out wrinkles.
- Position the transfer or lettering on the substrate or cap.
- Close the machine by pulling the handle down into the locked position.
- Set the timer for the desired cycle duration.
- When the bell rings, indicating the end of the cycle, slowly pull the handle up and move the upper platen handle to its full open position. This technique helps prevent the transfer paper (cover) from being pulled off prematurely due to suction.
- Unlock the cap retainer and remove the substrate.
- Lower Platen Adjustment: The lower platen can be adjusted to accommodate various items like caps, sleeves, or pant legs. This is done by rotating the adjustment knob located on the lower front of the base. Clockwise rotation moves the platen to the rear, while counter-clockwise rotation moves it forward.
- Lower Platen Change: The lower platen can be changed from the standard platen to a special custom platen by tilting the back of the platen up and moving it towards the operator. Installation of an alternate platen is done by reversing this procedure until it locks in place.
Maintenance Features:
The Model 414 is designed to be relatively maintenance-free, but following preventive maintenance steps ensures a long and trouble-free life:
- Heat Platen Care: Avoid heat sealing items with buttons, pins, snaps, or zippers, as these can cut the silicone rubber pad or scratch the Teflon heat platen.
- Cleaning: Periodically clean the Teflon-coated heat platen with a non-abrasive cloth. Stubborn stains can be cleaned with mineral spirits when the platen is cool. The entire exterior machine, including platens, should be wiped periodically with a clean rag to prevent soiling of substrates. For cleaning a cold machine, mineral spirits can be used, but precautions must be taken due to its flammability (keep away from sparks, flame, or hot heat platen).
- Storage: When the heat platen is hot and not in use, it should be kept in the open position (away from the silicone rubber pad).
- Lubrication: Occasionally apply a few drops of heavy machine oil to the moving parts of the cam assemblies and the pressure adjustment screw. Any excess oil or grease should be wiped off.
- Silicone Rubber Pad Replacement:
- Ensure the heat platen is cool.
- Use MPPC006 adhesive to bond the silicone rubber pad to the metal platen, following the instructions on the adhesive tube.
- Ensure the surface of the silicone platen is clean, using a mild solvent like mineral spirits if necessary.
- The pad and metal must be thoroughly dry and clean before bonding.
- Apply adhesive sealant to the metal platen, spreading a thin, even coat. Immediately apply the pad, applying pressure to prevent air entrapment. A serrated blade (like those used for rubber floor tiles) can be helpful.
- Allow to cure overnight under low pressure at normal room temperature.
- Temperature Control Replacement:
- Disconnect the power supply.
- Remove the knob and shroud cover plate.
- Disconnect the wires from the control. Note that the terminal with only one wire is the HOT side of the line; the other terminal has two wires (one from the heating element and one from the lamp).
- Remove the two temperature control mounting screws.
- Reconnect the three wires to the temperature control as described in step 2.
- Insert the two screws that secure the control to the front of the heat platen.
- Turn the control counterclockwise to the minimum temperature position.
- Replace the knob with the pointer indexed to the zero "0" position.
- Tools for Maintenance: While not supplied with the machine, it is recommended to have a regular screwdriver, Phillips head screwdriver, small adjustable wrench, needle-nose pliers with insulated handle, a set of Allen wrenches, and special high-temperature grease (MPPL023) available for most repairs.
- Power Cord Replacement: Power cord replacement should only be performed by the manufacturer, as it requires a specially prepared cord.
Safety Summary:
- Power Cord Damage: Do not attempt to repair or replace a damaged power cord. Contact the manufacturer or local distributor.
- Hot Surfaces: Avoid touching hot surfaces while operating the machine. The temperature adjustment knob can also get very hot during operation, so adjust it only when the machine is cold.
- Machine Placement: During normal operation, the base of the machine must be installed or placed above the wall socket.
- International Symbols: The manual includes international symbols for Power Off, Power On, Hot Surface, Risk of Electrical Shock, Protective Earth Terminal, Ground, and Caution - Warning.