EasyManua.ls Logo

InStep Rocket User Manual

InStep Rocket
12 pages
To Next Page IconTo Next Page
Page #1 background imageLoading...
Page #1 background image
1
Rocket
Bike Trailer and Stroller Owner’s Manual
For use with models: MK550, MK750, SC760, SC761, GT551, and GT751
Please keep this Owner’s Manual for future reference. If you sell or give this product to someone else, please include
this Owner’s Manual, and ask the new owners to read the instructions completely before operating.
PRIOR TO ASSEMBLY
Please read this Owner’s Manual completely before assembling or operating this product.
Assembly of this product should be carried out by an adult.
Do not return this product to the store! If any parts are missing or damaged, please contact one of our
Customer Service Representatives by phone at 1-800-242-6110, or by e-mail at Info@instep.net.
IMPORTANT SAFETY INFORMATION
WARNING Failure to follow these warnings and assembly instructions could result in serious injury or death!
WARNING Immediately discard all plastic bags and plastic wrapping materials!
WARNING Maximum weight capacity for one child is 50 pounds, and for two children is 100 pounds!
WARNING Never use this trailer/stroller if it becomes damaged!
WARNING To avoid serious injury, children should always wear the seat belt and the shoulder straps!
WARNING Never leave children unattended in or around this product!
WARNING Never allow children to assemble, fold, or disassemble this unit!
WARNING Accessories or parcels placed in trailer/stroller may cause it to become unstable!
WARNING Not for use with children under 12 months old! Children must be able to support their own heads!
WARNING Before using, be sure the product is correctly assembled according to the manufacturer’s instructions!
WARNING Inflate tires to within the range shown on the tire sidewall! Check tire pressure before each use!
WARNING Use a foot pump or hand pump to inflate tires! Pressurized air hoses can cause overinflation!
WARNING Periodically re-check all fasteners to make sure they are tight!
WARNING Do not use cleaning solvents! Clean only with mild soap and water!
WARNING To prevent injury, please use extreme care when folding and unfolding this product!
SAFE TOWING TIPS
WARNING Make sure your bike brakes work properly! Braking distance is increased when pulling a trailer!
WARNING This trailer is wide! Allow extra clearance near curbs, signs, parked cars, and other obstacles!
WARNING A bicycle with trailer attached requires a wide turning radius! Do not turn sharply!
WARNING Each child must wear an approved safety helmet when riding in this product in trailer mode!
WARNING Never remove protective canopy when pulling children in the trailer!
WARNING Always use the safety flag when pulling this trailer!
WARNING When pulling one child in the trailer, seat him/her in the center!
WARNING Do not ride over curbs! Avoid bumps and holes! Always signal your turns!
WARNING Use extra caution when turning on uneven pavement, and going downhill!
WARNING Not for use at high speeds! Do not exceed 10 MPH!
WARNING Never ride a bike or pull this trailer at night!
WARNING Install a rearview mirror on your bike to check on children in trailer!
WARNING Be aware of exposure hazards such as windchill and heat exhaustion by less active trailer passengers in
prolonged exposure in colder temperatures, or by extended periods in warmer temperature without adequate ventilation and
hydration!
Question and Answer IconNeed help?

Do you have a question about the InStep Rocket and is the answer not in the manual?

InStep Rocket Specifications

General IconGeneral
TypeJogging Stroller
Number of Wheels3
Weight Capacity50 lbs
Seat ReclineMultiple positions
Wheel TypePneumatic
StorageUnder-seat basket

Summary

Prior to Assembly and Safety Information

Prior to Assembly

Read the manual completely before assembly or operation. Assembly by an adult.

Important Safety Information

Crucial safety warnings regarding injury or death, weight limits, and proper usage.

Safe Towing Tips

Guidelines for safe towing, including braking, clearance, turning, and speed limits.

Parts, Tools, and Modes

Trailer and Stroller Modes

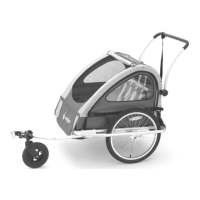
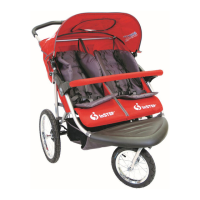
Visual representation of the trailer in both trailer and stroller configurations.

Parts List

List of all included components with quantities for the trailer and stroller.

Tools Required for Assembly

Identifies tools needed for assembly, noting that minimal tools are typically required.

Assembly Instructions

Step 1: Unpack and Check Contents

Compare contents with the parts list to ensure no parts are missing.

Step 2: Open Trailer and Remove Canopy

Lift side cabin frames and remove the canopy from inside the trailer.

Step 3: Link Sling Seat Crossbar

Lift and position the sling seat crossbar, then secure it to the cabin frame joiners.

Step 4: Adjust Sling Seat

Tighten underside straps for child support or loosen them for folding.

Step 5: Attach Canopy (Part 1)

Drape the 2-in-1 rain cover and align snaps on the canopy and cabin frame.

Step 6: Attach Canopy (Part 2)

Pull canopy down, attach hook & loop tape, and secure snaps and side straps.

Step 7: Adjust Window and Rain Shield

Roll up rear window flap and secure; release and roll down front rain shield.

Step 8: Prepare Wheels for Attachment

Lift trailer, remove protective caps, and loosen quick-release levers for wheel attachment.

Step 9: Insert Wheels

Slide wheel into bracket, align axle, tighten nut, and clamp lever to secure.

Step 10: Position Tow Bar

Release latch, rotate tow bar upward, and press into bracket until it engages automatically.

Step 11: Prepare Front Wheel Assembly

Unscrew lock knob and remove washers from carriage bolt of the front wheel assembly.

Step 12: Attach Front Wheel to Tow Bar

Slide carriage bolt through tow bar hole, align bracket, and tighten lock knob.

Step 13: Attach Handlebar (Stroller Mode)

Loosen handlebar clamp lock knobs, slide over tubing, and tighten to secure.

Step 14: Stow Front Wheel (Trailer Mode)

Loosen lock knob, rotate wheel assembly up, and press bracket against tow bar to secure.

Bike Attachment

Step 15: Attach Coupler to Bike (Hub Nuts)

Attach coupler plate to bike axle using hub nut, tab washer, and retaining pin.

Step 16: Attach Tow Bar to Bike (Hub Nuts)

Replace hub nut, tighten, insert tow bar into coupler, and fasten Q/R pin. Attach safety strap.

Step 17: Attach Coupler to Bike (QR Axles)

Slide coupler plate and tab washer onto skewer, ensuring correct orientation.

Step 18: Attach Tow Bar to Bike (QR Axles)

Insert skewer through hub, replace spring/nut, attach tow bar, and fasten Q/R pin. Secure safety strap.

Operation and Maintenance

Step 19: Install Safety Flag

Slide flag pole sections together and insert into canopy slit and flagpole sleeve.

Step 20: Proper Use of 5-Point Harness

Adjust lap, shoulder, and crotch straps for a snug fit at stomach level for one or two children.

Entering and Exiting Compartment

Unclip front panel, fold flap down, and assist children entering or exiting the compartment.

Removal from Bike

Unclip safety strap, remove pin from tow bar coupler, and slide tow bar out.

Storage Instructions

Remove components, fold trailer flat, and store in a dry place, considering temperature.

Prior to Next Use

Check for damage, tighten fasteners, and verify tire pressure before using the product again.

Related product manuals