Do you have a question about the Intamsys FUNMAT HT and is the answer not in the manual?
Details safety precautions for movement, electrical, mechanical, and high-temperature operations.
Lists specific safety alert symbols, warnings, and cautions for safe use.
Details INTAMSYS's history, specialization, and global presence.
Lists contact channels like email, phone, and social media for support.
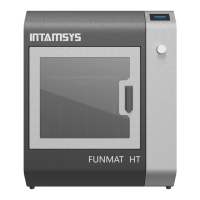
Identifies major external parts like display screen, SD slot, power ports, and locks.
Details internal parts such as cooling fan, nozzle, sensors, and build plate.
Lists all included accessories for using the FUNMAT HT 3D Printer.
Provides step-by-step instructions for safely removing the printer from its packaging.
Guides users through the initial setup, including releasing the printing head and connecting components.
Explains the initial startup screen, logo, and firmware versions.
Describes the main menu with Print, Material, Buildplate, Axis, Settings, and Help icons.
Details the screens for selecting files, monitoring prints, and managing materials.
Covers manual/auto leveling and calibration procedures for the build plate.
Explains axis movement control and system settings like temperature and language.
Guides on accessing the help section for LCD screen icon explanations.
Explains the importance and process of build plate leveling for successful prints.
Provides step-by-step instructions for manual build plate leveling using a card.
Details the process of verifying the auto-leveling sensor and its functionality.
Guides through calibrating the distance between the nozzle and the level sensor.
Explains initiating the automatic build plate leveling process.
Describes selecting materials directly from the pre-defined list.
Covers customizing or creating new material presets for printing.
Instructions for placing the filament spool onto the printer's bracket.
Guides filament through the limit switch and guide tube to the extruder.
Explains selecting material and initiating the 'Load Material' command.
Waiting for the nozzle to reach the required temperature for filament loading.
Details inserting filament into the feed gear and securing the guide tube.
Verifying smooth filament extrusion from the nozzle after loading.
Warning about the hot nozzle during the filament loading process.
Steps for preparing the build plate and selecting the file to print.
Monitoring print progress, time, temperatures, and material usage during printing.
Modifying temperature, speed, flow, and retraction settings while printing.
Steps to pause the print and swap filament materials mid-process.
Procedure for replacing filament when the printer detects it's used up.
Steps for unloading filament after a print job is completed.
Manual control of the printer's X, Y, and Z axes.
Returning the printer's axes to their default home positions.
Manually adjusting the nozzle and build plate positions.
Configuring max retraction length and speed for filament control.
Moving the filament up or down using the extruder controls.
Safely powering down the printer's stepper motors.
Adjusting nozzle, build plate, and chamber temperatures.
Changing language and accessing additional printer parameters.
Guides on accessing the help section for LCD screen icon explanations.
Details the two types of nozzle sets and their applications.
Steps to remove material and power down before changing the nozzle.
Unplugging electrical connectors from the nozzle set.
Connecting the new nozzle set and its electrical components.
Verifying the auto-level sensor function after nozzle replacement.
Steps to clear material from the nozzle before replacement.
Heating the nozzle and using tools to remove the old nozzle.
Installing the new nozzle and reassembling the cover screws.
Procedures for downloading and installing new firmware for the printer.
Steps to clean the build plate to ensure good print adhesion.
How to clean accumulated plastic particles from the material feeder.
Instructions for removing plastic residue from the printer's nozzle.
Guidance on lubricating the X, Y, and Z axes for smooth operation.
Instructions for lubricating the guide pin for auto-level sensor accuracy.
Best practices for storing and handling filament to prevent moisture issues.
Explains warping/leaning issues and solutions like heated beds and checking moving parts.
Discusses layer shifts due to pulleys and pillowing due to cooling fans.
Troubleshoots circularity due to belt tension and stringing from retraction settings.
Addresses first layer adhesion and grinding issues, suggesting leveling and retraction solutions.
Adjusting feeder pressure and addressing under extrusion with filament diameter/flow.
Explains layer separation causes and solutions for nozzle clogging.
Identifies causes of nozzle clogging, including temperature issues and bed distance.
Guides on downloading and installing the INTAM-suite slicing software.
Choosing software components during installation.
Monitoring the software installation progress.
Selecting the printer model and adding it to the software.
Describes screens for file operations, model editing, and viewing modes.
Covers accessing printer settings and help information within the software.
Steps for loading and modifying 3D models using the software.
Selecting print profiles and material settings for slicing the model.
Adjusting detailed print settings in full or expert mode.
Final step of saving the sliced model as a G-Code file.
| Build Volume | 260 x 260 x 260 mm |
|---|---|
| Max Extruder Temperature | 500 °C |
| Max Bed Temperature | 160°C |
| Chamber Temperature | 90°C |
| Layer Resolution | 50 - 300 microns |
| Filament Diameter | 1.75 mm |
| Connectivity | USB, Ethernet |
| Weight | 65 kg |
| Supported Materials | PC, ABS, Nylon, PEEK, PEI |
| Nozzle Diameter | 0.4 mm |
| Power Requirements | 50/60Hz |
| Nozzle Temperature | Up to 500°C |