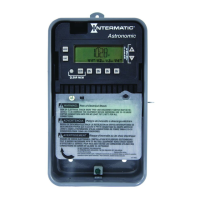
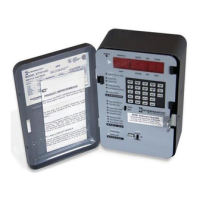
LED DISPLAY
The red LED display prompts and indicates data as it is entered in
SET UP and PROGRAM. The display indicates current time in the
RUN mode. Note the dual captions above and below the display.
RESET
Operation begins with RESET, followed by data entry with the
keypad. Pressing RESET initializes the time switch by testing and
clearing the working memory and turning off all circuit loads.
(Pressing RESET during programming will cause all data just
entered to be lost.) To clear all existing program and setup data,
press and hold the CLEAR key, then press and release RESET.
Continue to hold CLEAR until RESET appears in the display.
RUN/SET
You must have this switch in the SET position to enter, review or
clear data. When you have finished, slide the switch to RUN to
automatically save the data into non-volatile memory. If entering a
large number of set points, you may wish to periodically move the
slide switch to RUN to save your data. Return to SET after SAVE
disappears from the display and continue programming. If a power
outage occurs and you are in SET, all data not saved will be lost.
The data is permanently stored unless the memory is deliberately
erased (by pressing RESET while holding down the CLEAR key).
Data can only be modified by the user. In the event of power
failure the non-volatile memory holds the data even if the battery
backup should fail. When moving this switch to RUN, the
message SAVE briefly appears in the display. When moved to
SET the message RECALL appears briefly.
Data entry falls into the two categories shown on the front panel:
SET UP and PROGRAM.
3
Next Generation
INTRODUCTION
This easy to program microprocessor-based time switch provides
flexible 24-hour, 7 day or full year load control. Its unique
“self-prompting” feature simplifies programming by leading you
through with flashing prompts. The LEDs on the left side flash
and indicators in the digital display light while you are
programming to identify information that needs to be entered.
SET UP information must be entered first, followed by the
PROGRAM information. PROGRAM is used to set the switching
times of the loads controlled by the time switch. Switching times
can be programmed in any combination of:
Fixed–Switch ON times and/or Switch OFF times that are based
on a user-selected time of day and can only be changed by
reprogramming.
Pulse–The same as fixed times except the ON or OFF operation
occurs only for a short duration (1 to 127 sec.) as required for bell
ringing, signal control or the operation of latching relays.
Interval–The same as Pulse times except for a longer duration
(from 1 min. minimum up to 6 days, 23 hrs., 59 min.).
Interval and Pulse also allow programming for a user selectable
override.
Astro–Based on the changing times of sunset and sunrise.
Before proceeding with programming:
• Read the instructions on pgs. 3–17
• Review the programming example on pgs. 17–19
• Complete the charts on pgs. 20–23
• Install time switch, connect ground wire as shown on pgs. 26–28
• Complete wiring by referencing examples on pgs. 29–32
While programming be sure to assign the various switch times to
the appropriate loads with the Enable switch (2 circuit models
only). When you are finished, the REV (Review) key allows you to
check the program before leaving the installation.
2