EasyManua.ls Logo

Intermatic GRASSLIN FM2D50 Series User Manual

Intermatic GRASSLIN FM2D50 Series
14 pages
To Next Page IconTo Next Page
Page #1 background imageLoading...
Page #1 background image
FM2D50 Series
Two Circuit Electronic
24 Hour or 7 Day
Time Switches
APPLICATION
Time based control of lighting, ventilating, heating, cooling or other
electrical loads in commercial and industrial applications. The FM2D50
time switches are programmable for 24-hour or 7-day schedules as well
as a “8th day” or holiday schedule.
The FM2D50 series is intended for either surface or Flush panel
mounting. Din rail mounting is also available by ordering the accessory
model #MB-DIN. The control is completely enclosed in a plastic housing
and includes a terminal cover and sub-base for installation and hard wiring.
It is also supplied with a clear plastic snap-on dust cover.
TECHNICAL DATA
Output – SPDT relay with dry contacts
Switch Rating: -1/2 hp, 120V ac
-1hp, 240V ac
-16A, 277V ac resistive
-12A Ballast, 120V ac
-8A Ballast, 240V ac
-720 VA 240V ac Pilot Duty
-360 VA 120V ac Pilot duty
-1000W Tungsten, 240V ac
-600W Tungsten, 120V ac
3 year battery back-up
Supply voltages: Separate Models – 12VDC, 24VAC/DC, 120VAC,
208/240VAC, all 60Hz (refer to product label)
Shortest switch time: 1 minute
Ambient Temperature Range –20°F to 140°F (–28°C to 60°C)
AM/PM LCD display
Input Draw: 4VA
Screw terminal connections
1/4” quick connects
Accuracy ± 4 minutes per year
Agency Approvals: UL Recognized
Installation
To the installer:
1. Read operating instructions carefully.
2. Check the input and output ratings marked on the unit to make
sure this product is suitable for your power supply and applica-
tion.
3. Disconnect power supply prior to installation to prevent electri-
cal shock.
4. Wire in accordance with National and Local electrical code
requirements.
SURFACE MOUNTING
Remove cover, loosen two screws on opposite corners. Remove the
housing that surrounds the time switch and the terminal cover away from
the base. Remove timer module by pulling straight out.
Place screw through 3 mounting holes in base and screw to back
panel or wall.
Wire in accordance with instructions. Replace terminal cover and
push timer firmly onto base. Now replace housing and secure with
screws.
PANEL MOUNTING
Cut a square hole 2-5/8” x 2-5/8” (66mm x 66mm) in the front of the
panel. Insert the time switch through the opening. With a screwdriver,
A
A
press down and turn outer screws (A) until flanges are in position to fas-
ten the unit in front panel, then release.
Use 1/4” quick connects and make connections in accordance with the
wiring diagram shown and applicable code requirements.
Downloaded from Elcodis.com electronic components distributor
Question and Answer IconNeed help?

Do you have a question about the Intermatic GRASSLIN FM2D50 Series and is the answer not in the manual?

Intermatic GRASSLIN FM2D50 Series Specifications

General IconGeneral
ProgrammableYes
Contact TypeSPDT
Number of Pins3
MaterialPlastic
BrandIntermatic
SeriesGRASSLIN FM2D50 Series
TypeTimer
Frequency60Hz
DisplayDigital
Operating ModesAutomatic, Manual
Time Setting Range1 minute

Summary

Installation Instructions

Surface Mounting

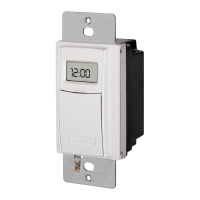
Instructions for mounting the time switch on a surface.

Panel Mounting

Instructions for mounting the time switch into a front panel.

Application Overview

Describes the intended use of the time switch in various applications.

Technical Specifications

Lists the technical specifications, ratings, and approvals.

Installer Guidelines

Important notes and steps for the installer before installation.

Safety Precautions

Qualified Electrician Requirement

Emphasizes that connection and installation must be done by a qualified electrician.

Warranty Voidance

States that interventions or changes void the warranty claim.

Regulatory Compliance

Advises observance of national regulations and safety provisions.

Command Priority

Notes that switch-off commands have priority over switch-on commands.

Display and Button Functions

Display Overview

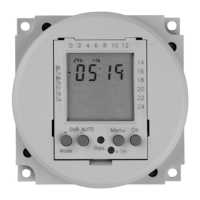
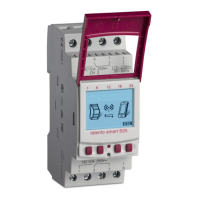
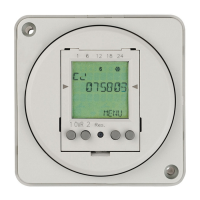
Explains the function displays of the left and right-hand buttons and screen elements.

Button Operations

Details the functions of the MENU, ESC, OK, EDT, NO, YES, and DEL buttons.

Initial Setup and Programming

Initial Start-Up and Language Selection

Guide to selecting the desired menu language during initial setup.

New Program Creation Steps

Shows the structure for creating new programs and selecting channels/days.

New Program Details

Entering ON/OFF Times

Steps to enter the ON and OFF hours and minutes for a program.

Program Saving Confirmation

Confirms program saving and returns to the program selection menu.

Program Management

Editing Existing Programs

Details on scrolling through program steps and editing them using EDT.

Deleting Program Data

Procedure to delete all saved programs or individual program steps.

Date, Time, and Display Settings

Setting Date and Time Values

Instructions for setting the year, month, day, hours, and minutes.

Time Display Format Selection

Selecting between 12-hour (AM/PM) or 24-hour time display format.

Daylight Savings Time Configuration

Automatic DST Setting

Using AUTO setting for automatic recalculation of daylight savings time.

Manual DST Programming

Programming start and end dates/times for manual daylight savings adjustments.

Operating Mode Selection

Manual Override Functions

Using FIX ON and FIX OFF for continuous ON or OFF states.

Return to Automatic Mode

Procedure to return the device to its programmed automatic switching times.

Product Warranty Information

Warranty Coverage and Exclusions

Details on repair/replacement, exclusions, and liability limitations.

Obtaining Warranty Service

Instructions on how to return the product for warranty service.

Related product manuals