MODEL SS7 SERIES
INSTALLATION AND OPERATING
INSTRUCTIONS
Features
•Automaticormanualoperation.Pushtheclearcover/switchtoswitchOnorOffatanytime.
•Programupto6On/Offsettingpairs(12automaticswitchsettings).
•Eachsettingtimecanbeonceaweek,everyday,everyweekday,oronlyonweekends.
•LCDDigitalclockandreadout.
•Randomfeatureautomaticallyvariesswitchingtimesfora“lived-in”look.
•OneAAAAlkalinebatterykeepstime,operatestimer,andkeepstheprogramforupto1
1
/
2
years,evenwithout
utilitypower.
•Canbeusedforflood(PAR)andcompactfluorescentlampsanddimmers.
•Unique“hardcontact”outputswitchallowstimertocontrolmost120VACloads.
Alsocontrolsmanyloads12to277VACand12to28VoltsDC.
Refertoproductlabelformaximumratingsforvariousvoltagesandloadtypes.
Introduction
Thetimercanreplaceyourregularor3-waylightswitch(wheretwoswitchescontrolthesamelight)tocontrol
lightsforsecurity,orcancontrolanoutlettoswitchmost120VACloadsuptothemaximumratingonthetimer
label.Thetimercancontrolincandescentlights,fluorescentlights,floodlights(PARlamps),stereos,orappliances
suchasanairconditioner.Thetimercanalsocontrolmanyloads12to277VACand12to28VoltsDC.Timer
maynotbeusedwithlightedswitches.
YouwillneedtouseaDecoratorstylewallplatewiththistimer(notsupplied).
Theinstallationinstructionsonthispageareforreplacingalightswitch(or3-waylightswitch)withthetimer.See
“OtherInstallations”onthenextpageforwiringdiagramsfornewconstruction,switchingfrom3ormorelocations,
orusingthetimerwithadimmer.
Installation Instructions - Single Switch or 3-way - to replace an existing
switch:
1.TURNOFFPOWERbyREMOVINGFUSEorturning
theCIRCUITBREAKEROFF.
2.Removetheexistingwallswitch.
Preparetheendsofthebuildingwiringasshown.
7/16”
Trimbuildingwiresbareto7/16”.
Programming and Operating Instructions
Introduction to Operation and Programming:
Thetimerisaprogrammableswitch.
Atanytimeyoucanpushtheclearcover/switchtomanuallyturntheswitchONorOFF,unlessselectedmode
isCLKorPGM.
Youcanprogramupto12ON/OFFEVENTS;timeswhenthetimerautomaticallyswitchestheconnectedlights
(orotherelectricaldevices)ONorOFF(upto6ONeventsand6OFFevents).AnEVENTcanbesettoswitch
at:
• anyspecifictime,anddayoftheweek,
• aspecifictimeeveryday,
• aspecifictimeonweekdays,or
• aspecifictimeonweekends.
SeeInstallation Instructionsfirstifyourtimerisnotalreadyinstalled,oriftheAAAlkalinebatteryisnot
installed.
Workslikealightswitch.Pushandreleasetheclearcover/switch
(areaoverbuttons)toswitchONorOFF.OrswitchONandOFF
usingtheremoteswitch(es)inmulti-switchinstallations.
Manual Override
• WorksinAUTO,AUTORANDorMANmodes.
• Youhearamotor/clickingsound.
• ON/OFFdisplaychanges.
• TheprograminAUTOorAUTORANDremains;itauto-
maticallyswitchesONorOFFatnextprogrammedtime.
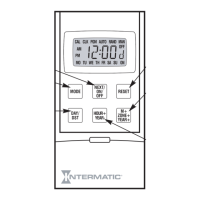
Controls and Displays
Cover/Switch
Theclearcover/switchisthemanualON/OFFcontrol.
1. Pullatnotchattopedgetoremovecoversoyoucanuse
theprogrammingbuttons.
To replace cover/switch:
2. Setbottominfirst.
3. Clickinthetop.
To remove battery:
4.Graspholderatsidebumps
(4a,4b)andpullstraightout.
To re-install battery:
5.Placebatteryinholderwith“+”
endtowardsfrontoftimer.Insert
batteryandholderintotimer.
Pushat(5)soitclicks
intoplace.
Battery Holder
7. Pullatnotchattopedgetoremovetheclear/coverswitchsoyoucanuse
theprogrammingbuttons.
8. TostoptheflashingdisplayandturnswitchtoOFF:PushRESETbutton;
PushMODEsoCLKisdisplayedattheupperleft;pushH+tostopthe
flashingdisplay;pushMODEtwicesoMANisdisplayedattheupper
right;pushON/OFFEVENTsodisplayatupperrightsaysOFF(youmay
hearthetimermotorrunandaclickingsound).
9. Yourtimerisnowreadyforuse.Returnthepowertothecircuitatthe
servicepanel.
RESET button
Recessedsoyoudon’tpushitaccidentally.
Pushandreleasetoreset:
WhenyoupressRESET:
• ThemodeswitchestoMAN.
• TheswitchissettoON.
• TheclockissettoMO12:00AMandflashes.
• AllprogrammedONorOFFtimesaresettonull
(atnull,noswitchingoccurs,clockdisplays-:--).
(AfterpushingRESET,youmustsettheclockthensetthe
ON/OFFtimes.)
• IfNoOpappearsindisplay,pushbatterycoverinuntilyou
hearaclick.Pushresetbuttontocleardisplay.Proceed
withprogramming.
Push Buttons:
MODE
DAY button
Functiondependsonthemode:
CLK mode- Push and release to cycle throughthe daysof the
week:MO,TU,WE,TH,FR,SA,SU.Pushandholdtocyclequickly.
PGM mode - Push and release to cycle through all week,
weekdays,weekend,individualdaysoftheweekandnull:
MOTUWETHFRSASU(alldisplayedatonceisallweek)
MOTUWETHFR(alldisplayedatonceisweekdays)
SASU(displayedisweekend)
MO,TU,WE,TH,FR,SA,andSU(areindividualdays)
-:--(onclockdisplayisthenullsetting)
UsenulltocancelanunwantedONorOFFsetting.TheDAY
buttondoesnothinginAUTO,AUTORANDorMANmodes.
DAY
H+ (hour) button
WorksinCLKandPGMmodes.
Pushandreleasetocycleforwardthroughthehoursoftheday.
Pushandholdtocyclequickly.
AMandPMautomaticallyswitchat12.
Ifyoupassthecorrecthour,pushandholdtocyclearoundagain.
H+
M+ (minute) button
WorksinCLKandPGMmodes.
Pushandreleasetocycleforwardthroughtheminutes.
Pushandholdtocyclequickly.
Ifyou passthecorrect minute,push andhold to cyclearound
again.
M+
ON/OFF/EVENT button
Functiondependsonthemode:
CLK mode-ON/OFFEVENTbuttondoesnothing.
PGM mode-Switchesinorderthroughthe12programmable
events1 on, 1 off, 2 on, 2 off, 3 on, 3 off, 4 on, 4 off, 5 on, 5
off, 6 on,and6 off.
AUTO mode-Manuallyturnsswitchonoroff.
AUTO RAND mode-Manuallyturnsswitchonoroff.
MAN mode-Manuallyturnsswitchonoroff.
How to set or change the clock
1. Removetheclearcover/switch.
2. PushandreleaseMODEbuttonuntilCLKisdisplayed(2a).
3. PushandreleaseDAYbuttonuntilcorrectdayofweekisdisplayed(3a).
4. PushandreleaseH+buttonuntilhourandAM/PMarecorrect(4a).
5. PushandreleaseM+buttonuntilminutesarecorrect(5a).
6. PushandreleaseMODEbuttontochooseAUTO,AUTORANDorMAN.
7.Replaceclearcover/switch.
8.Pushandreleaseclearcover/switchtoswitchloadONorOFFif
necessary.
How to set, change, or review ON/OFF times
1. Removeclearcover/switch.
2. PushandreleaseMODEbuttonuntilPGMisdisplayed(2a).
[atevent1on]
3. Ifnecessary,pushandreleaseON/OFF/EVENTbuttonuntileventtoset/
changeisdisplayed(3a),orpushtheON/OFF/EVENTpushbutton
repeatedlytoreviewalltheON/OFFtimes.
4. PushandreleaseDAYbuttonuntildesireddayorgroupofdaysisdisplayed
(4a),or pushand releasethe DAYbutton until“-:--” isdisplayed, ifyou
wouldliketocancelthisONorOFFtime.
5. PushandreleaseH+buttonuntildesiredeventhourandAM/PMare
displayed(5a).
6. PushandreleaseM+buttonuntildesiredminutesaredisplayed(6a).
7. PushandreleaseON/OFF/EVENTbuttontochoosethenexteventtoset
orchange(7a).
8. Push and release MODE button to choose AUTO, AUTORAND, or
MAN.
9. Replaceclearcover/switch.
10. Pushandreleaseclearcover/switchtoswitchloadONorOFFifnecessary.
BLACKWIRE
BLUEWIRE
REDWIRE
(Capped,NotConnected)
PUSHON/OFF
1
MODE button
Pushandreleasetochangethemode(upperlineofthedisplay).
CLK mode-Tosetorchangethetime.
PGM mode-Toset,revieworchangeprogrammedON/OFFtimes.
AUTO mode-ProgrammedON/OFFtimeswork.Manual
switchingworks.
AUTO RAND mode-ProgrammedON/OFFtimesworkand
arerandomlyoffsetupto15minutes.Manualswitchingworks.
MAN mode-Onlymanualswitchingworks.Programmed
ON/OFFtimesremaininmemory.
TheMode buttonskipstheAUTO modesifthetimeofday
and/ortheON/OFFtimeshavenotbeenset.
WIREFROM
“COMMON”OF
OLDSWITCH
BLACKWIRE
REDWIRE
BLUEWIRE
REMOTE
3-WAY
SWITCH
MOVE
JUMPERWIRE
TOOTHER
TERMINAL
IFTHIS
SWITCH
DOES NOT
TURNLIGHT
ON
COMMON
Single switch:
3.Connectoneofthebuildingwirestotheblackwirefrom
thetimer,usingthetwistonwireconnectorsprovided.
Connecttheotherbuildingwiretothebluewirefrom
thetimer.
THEREDTIMERWIREISNOTUSEDFORSINGLE
SWITCHINSTALLATIONS.Captheredwirewithatwist
onwireconnector.BESURETHATALLTHETWISTON
WIRECONNECTORSARESECURE.
3-way switch: (See “Other Installations” to use a dimmer or if switching from 3 or more locations)
3a.Athreewayswitchhasthreewiresconnectedtoit.Oneofthewiresis“common”(theterminalhasadif-
ferentcoloredscrewortherearemarkingsontheoldswitch).ConnecttheBlackwirefromthetimertothe
commonwire.ConnecttheothertwowirestotheBlueandRedwiresfromthetimer(itdoesn’tmatterwhich
goestowhich.)
3b.Identifythe“common”terminalattheother(remote3-way)switch.Connectthesuppliedjumperwire
fromthecommonterminaltooneoftheothertwoterminalsoftheswitch.
(Ifthelightdoesnotturnonwhenyougettostep9,turnpoweroffatthefuseorcircuitbreakerandswitch
thejumperwiretotheotherterminal.)
4.Tuckthewiresintothewallboxleavingroomforthetimer.
5.Usingthescrewsprovided,mountthetimertothewallboxtheninstallthewallplate.
Battery (If not supplied with unit.)
6.Releasebatteryholderwithflatscrewdriveratnotch(6a)andpullstraightout.UsesastandardAAAalkaline
battery.Setthebatteryinthebatteryholder(+towardsfrontoftimer).Tuckbatteryunderplastictabofholder.
Insertbatteryholdersoitclicksintoplace.
Battery
Holder
3
4a
4b
5
2
2,6
3
4
5
3a
2a
4a
5a
LOAD MAINTENANCE
WARNING1 DO NOT USE THE TIMER TO TURN OFF POWER FOR MAINTENANCE (repairs, removing
broken bulbs, etc.). ALWAYS TURN POWER OFF AT THE SERVICE PANEL BY REMOVING A FUSE OR
SWITCHINGOFFACIRCUITBREAKERBEFOREDOINGANYCIRCUITREPAIRS.
Error Messages
The‘lobAt’messagemeansthebatteryislowandneedstobereplaced.UsesonestandardAAAalkalinebattery.
The display is ‘noOp’ (Meaning no Operation) if the timer fails to operate. This can happen in very cold
temperatures. Normal timeroperation should resume at normaltemperatures. Press any buttonto clear the
message(s).Ifthe‘noOp’remainsatnormaltemperatureswithafreshbattery,timerneedstobereplaced.
2,8
3,7
4
2a
3a
(Example)
5a
4a
6a
7a
5
6
AM
DAY H+
M+
MODE RESET
ON/OFF
EVENT
MO
ON
MAN
CAUTION: This timer should not be used in precision timing applica-
tions where inaccurate timing could have dangerous consequences (i.e., sun
lamps, sauna, etc.)
Battery Replacement
The1.5VOLTalkalinebatteryshouldoperateyourtimerfor1
1
/
2
yearsormoreundertypicalconditions.High
orlowtemperatureorfrequentuseofthemanualpushbuttonorthe3-wayswitchwillreducethebatterylife.
Replacethebatterywhenthedigitaldisplayisdim,themessage‘lobAt’(MeaningLOWBATTERY)isdisplayed,
orifthetimerfailstooperate.Pressanybuttontoclearthe‘lobAt’message.Thetimerhasbuilt-inmemory
protectionprovidingatleast15secondstochangeaweakbatterywithoutlosingyoursettings.Youdonotneed
toturnofftheloadorthepowerinordertoreplacethebattery,however,donotattempttoswitchthetimer
onoroffwhilethebatteryisoutoryoursettingswillbelostandthetimerwillneedtobereset.



 To Next Page
 General