Pub. No. 18-HE122D1-1-EN Numbers in [brackets] are for 50 Hz international systems. 19
Installer’s Guide
Flashing red light indicates
that it is time to clean the
COLLECTION CELLS
Red light indicates that it is
time to clean the PRE-
FILTER
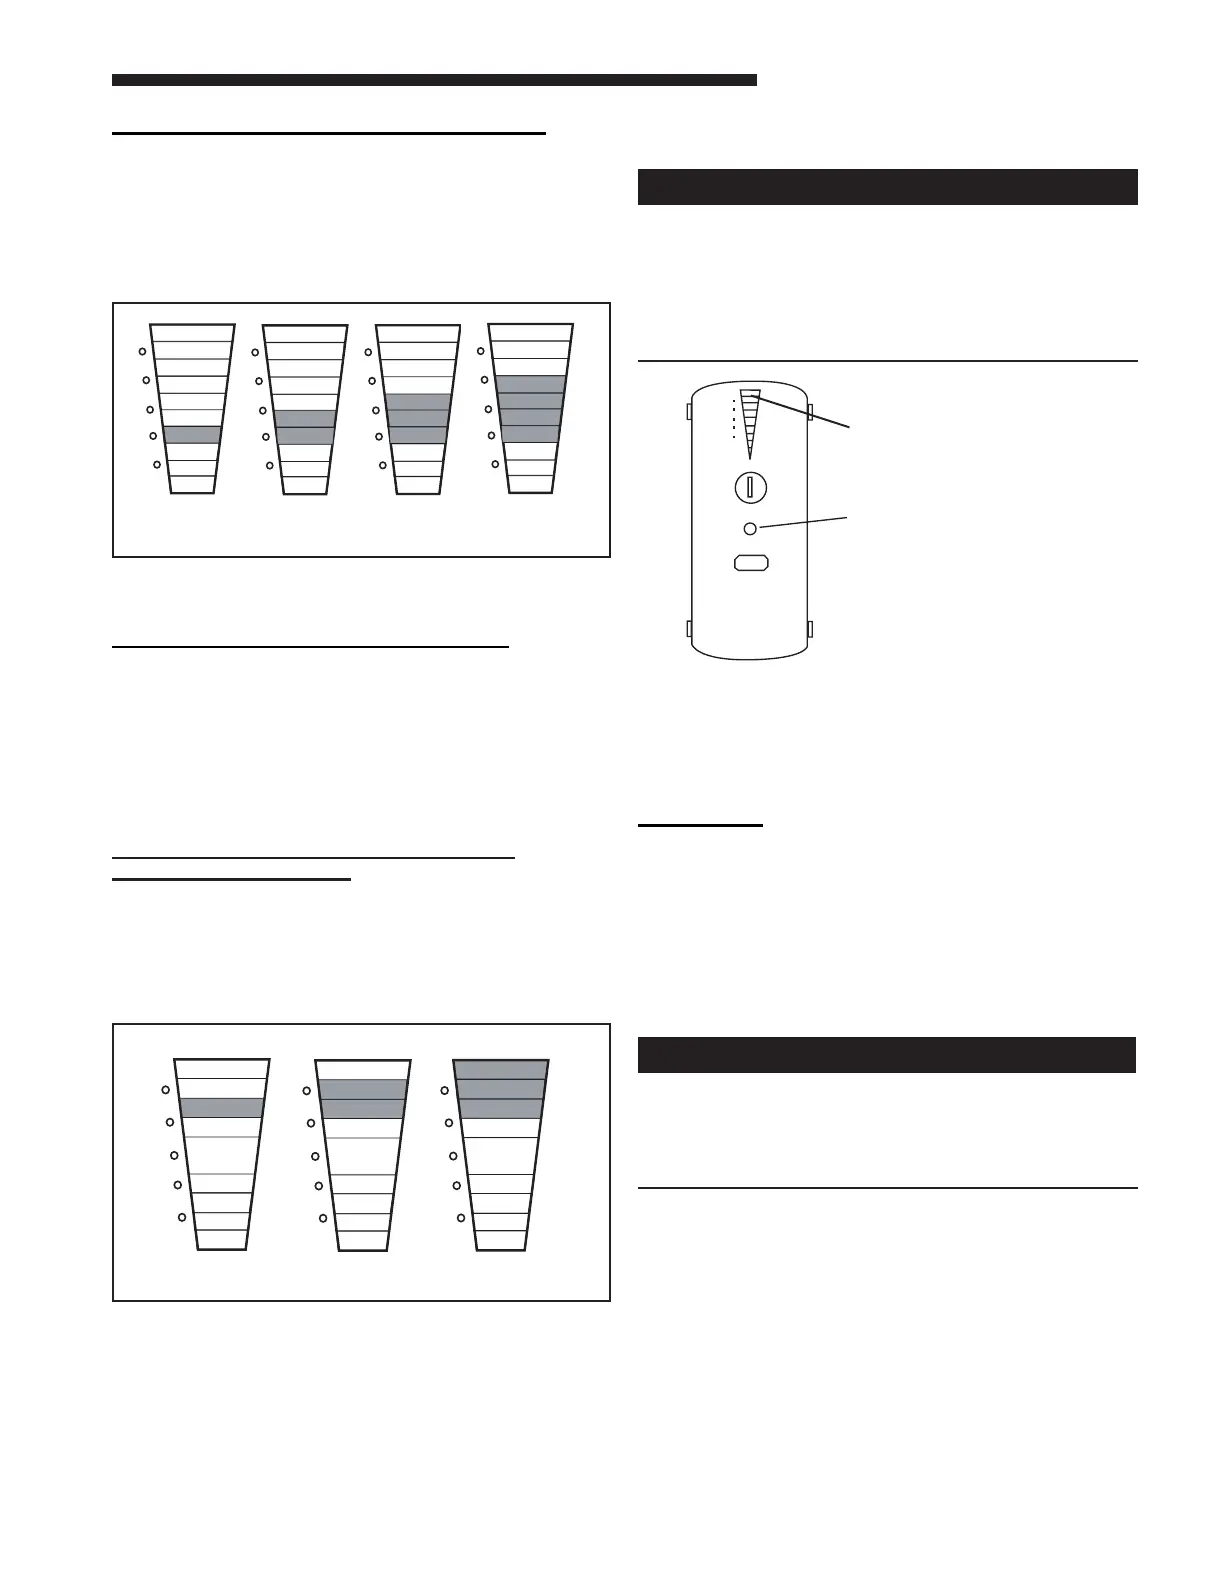
CELL CLEANING SETTING (Figure 25)
One or more of the YELLOW LED’s will come on
indicating the COLLECTION CELL cleaning time setting.
Repeatedly press the RESET button to cycle through
the time options for the COLLECTION CELL cleaning
cycle until the desired setting is displayed. Press the
POWER button once to accept that setting and move to
the Field Charger Power Level Settings.
Figure 25 Yellow LED Collection Cells Settings
*Factory Setting
FIELD CHARGER POWER LEVEL
The RED LED lights are used to set the Power Level
of the FIELD CHARGER for maximum, medium, or
minimum. The number of illuminated RED LED lights
indicates the current setting. The factory setting is for
maximum.
Lower settings will reduce the slight sound emitted by
the unit with minimal loss of air cleaning eciency, if
desired.
H. MAINTENANCE
Before cleaning the coil or ducts in the air handler
or furnace, remove the COLLECTION CELLS, FIELD
CHARGER, and PRE-FILTER from the air cleaner.
Chemicals used during the cleaning of the air
handler, furnace, or ductwork can damage the air
cleaner components and degrade the performance
of the air cleaner.
For maximum eciency, the COLLECTION CELLS
and PRE-FILTER should be inspected and cleaned as
prescribed in this Installer's Guide.
The FIELD CHARGER should only be removed and
cleaned annually by a qualied service professional.
CLEANING
Cleaning Instructions:
The air cleaner utilizes a PRE-FILTER and
COLLECTION CELLS. The purpose of the PRE-FILTER
is to capture large particles before they enter the
COLLECTION CELLS which allows the collection cells
to work more eciently.
1. Turn the air conditioning system o at the Comfort
Control (thermostat).
s
!
High Voltage is present within the air cleaner for
operation. Before removing the Power Door, turn
the power o and wait at least 15 seconds to allow
voltage to discharge. Failure to follow instructions
could result in death or serious personal injury.
2. Turn o power to the air cleaner by pushing and hold-
ing the POWER button for three seconds. The LED’s
will remain on until the voltage has discharged and
it is safe to remove the door. This requires approxi-
mately 15 seconds. Do not remove the door until
all the lights are o.
3. Disconnect the power/control cable.
4. Remove the Door Assembly from Whole Home Air
Cleaner by pulling away from the unit assembly.
Place on the at and clean working surface with inte-
rior components facing up. See Figure 28.
5. Remove the PRE-FILTER (Figure 29) and/or the
COLLECTION CELLS (Figure 30) from the air
cleaner.
G1
G2
G3
Y3
Y4
R1
R2
R3
Y2
CLEAN
DIRTY
G1
G2
G3
Y3
Y4
R1
R2
R3
Y2
CLEAN
DIRTY
Y1
G1
G2
G3
Y3
Y4
R1
R2
R3
Y2
CLEAN
DIRTY
Y1
Y1
G1
G2
G3
Y3
Y4
R1
R2
R3
Y2
CLEAN
DIRTY
Y1
Two Months
[10 Weeks]
Four Months
[20 Weeks]
Six Months*
[31 Weeks]
Nine Months
[46 Weeks]
PRE-FILTER
RESET
CLEAN
PRE-FILTER
Figure 27 Pre-Filter Light
FIELD CHARGER POWER LEVEL
SETTING (Figure 26)
One or more of the RED LED lights will illuminate. To
change the Power Level setting, press the RESET
button until the desired setting is indicated.
To save your new settings and exit the SET-UP mode,
press and hold BOTH the POWER and lter RESET
buttons for a minimum of 5 [6] seconds.
Minimum Medium Maximum*
G1
G2
G3
Y1
Y3
Y4
R1
R2
R3
Y2
CLEAN
DIRTY
G1
G2
G3
Y1
Y3
Y4
R1
R2
R3
Y2
CLEAN
DIRTY
G1
G2
G3
Y1
Y3
Y4
R1
R2
R3
Y2
CLEAN
DIRTY
Figure 26 Red LED Power Level Settings
*Factory Setting