Do you have a question about the Invision HDTV-E and is the answer not in the manual?
Check all items against the parts list and identify necessary tools for installation.
Verify TV VESA measurements, check TV weight, and review safety guidelines before proceeding.
Connect VESA arms to the main TV fixing plate using provided hardware and secure to the TV.
Lift TV assembly, hook onto wall brackets, level, and secure with M6 bolts.
Mark wall for bracket position, noting TV center offset and suitable mounting surfaces.
Drill into wooden studs and secure bracket using specific screws and socket set.
Drill into masonry, insert plugs fully into concrete, and secure bracket with screws.
Ensure fixings penetrate plasterboard to reach brick/concrete for secure mounting.
Route cables along bracket arms, clip on management pieces, and adjust tilt tension.
Loosen M6 bolts to adjust the horizontal screen level.
Contact for fitting advice or compatibility issues; activate 25-year warranty.
This document provides comprehensive instructions for the Invision HDTV-E Single Arm TV Wall Mount, designed to securely hold your television. The mount offers a versatile solution for displaying your TV, allowing for various adjustments to optimize viewing angles and manage cables for a clean aesthetic.
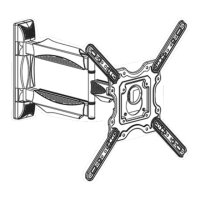
The Invision HDTV-E is a single-arm cantilever TV wall mount engineered to provide a robust and flexible mounting solution for a range of television sizes. Its primary function is to securely attach a television to a wall, offering articulation that allows the TV to be extended, swiveled, and tilted to achieve optimal viewing positions from different areas within a room. The single-arm design contributes to a sleek profile while maintaining strength and stability. Integrated cable management is a key feature, designed to keep power and signal cables neatly organized and out of sight, contributing to a tidy and professional installation. The mount is designed for installation on either fixed wooden studs within traditional plasterboard (drywall) walls or into solid brick or concrete walls, offering flexibility for various home constructions. The design prioritizes ease of installation while emphasizing safety and stability, ensuring the TV remains securely in place once mounted.
The Invision HDTV-E mount is packed with features that enhance its usability and adaptability. Upon unboxing, users are guided to remove plastic covers and straighten the bracket, preparing it for installation. The initial setup involves attaching the TV mounting plate to the back of the television. For TVs with VESA patterns from 100x100mm to 200x200mm, a single plate is used. For larger VESA sizes up to 400x400mm, four VESA arms are attached to the main TV fixing plate, allowing for a wider range of TV compatibility. This modular approach ensures that the mount can accommodate a broad spectrum of television models.
Once the TV is prepared, the wall fixing process begins. For wooden stud installations, users are instructed to locate studs, mark hole positions, and drill pilot holes before securing the bracket with supplied screws. For brick or concrete walls, a masonry drill bit is required, and plastic plugs are inserted into the drilled holes before the screws are tightened. A crucial note for installation is the offset of the TV's center line from the wall fixing center line, which is 127mm (5 inches), a detail important for planning the TV's final position.
After the wall bracket is secured, the TV assembly is carefully lifted and hooked onto the wall bracket's safety securing point. A gentle pull down confirms secure placement, after which M6 securing bolts are tightened to permanently fix the TV to the wall bracket. This two-person task emphasizes safety during the final mounting stage.
A significant usage feature is the mount's articulation. The single arm allows the TV to be extended away from the wall, providing greater flexibility in positioning. The swivel function enables the TV to be rotated horizontally, making it possible to view the screen from different angles within a room without repositioning furniture. Furthermore, the mount offers a tilting mechanism, allowing the TV to be angled vertically to reduce glare or achieve a more comfortable viewing angle. The tilting operation can be adjusted to a desired torque, allowing the TV to tilt freely by hand but remain in position without drifting. Horizontal leveling of the screen can also be fine-tuned by loosening M6 securing bolts located behind the tilting bolts.
Cable management is seamlessly integrated into the design. Cables can be routed along the arms of the bracket, with slack left around the joints to prevent strain during movement. Cable management pieces clip back on, keeping the cables tidy and out of sight, contributing to a clean and organized appearance. This feature is essential for maintaining a minimalist aesthetic and preventing cable clutter.
The instructions also highlight important safety considerations, such as ensuring the wall can support at least three times the total load of the TV bracket, TV, and accessories. Users are advised to wear safety glasses when drilling and to consult a professional installer if they have any doubts. The product is designed for its original purpose only, and caution is advised due to moving parts.
While the Invision HDTV-E is designed for durability and long-term performance, certain aspects contribute to its maintenance and longevity. The robust construction, using quality materials, minimizes the need for frequent maintenance. The secure fastening mechanisms, including bolts and plugs, are designed to hold the TV firmly, reducing the risk of loosening over time.
The ability to adjust the tilting operation and horizontal level of the screen can be considered a maintenance-related feature, as it allows users to fine-tune the TV's position if it shifts slightly over time or if viewing preferences change. The integrated cable management system not only enhances aesthetics but also protects cables from damage, reducing the need for cable replacement.
The manual itself serves as a maintenance guide, providing troubleshooting advice and contact information for assistance. Invision offers a 25-year warranty, indicating confidence in the product's durability and minimizing concerns about potential defects. Should any issues arise with compatibility or fitting, users are encouraged to contact Invision's support team, ensuring that any problems can be addressed effectively. This commitment to customer support and a long warranty period are indirect maintenance features, providing peace of mind and support for the product's lifespan. Regular checks of the securing bolts, especially after initial installation and occasional adjustments, can help ensure the mount remains stable and secure.
| Material | Metal |
|---|---|
| Color | Black |
| Weight Capacity | 80 lbs |
| Adjustability | Tilt |
| Mounting Type | Wall |
| VESA Compatibility | 200x200 mm to 600x400 mm |