Do you have a question about the ion science TIGER LT and is the answer not in the manual?
Read and understand this user manual completely before operating the instrument.
Do not use abrasive detergents; use a damp cloth. Avoid atmospheres adverse to materials.
Do not open instrument in hazardous areas. Service by authorized centers only. Remove battery before servicing.
Charge in Non Hazardous environments. Never replace Alkaline cells in explosive locations. Use only specified batteries.
Perform functional test before hazardous area entry. Ensure USB port is used only in non-hazardous areas.
Improper use may impair protection. Intrinsically safe safety protection.
TIGER® LT instruments detect dangerous gases; users must respond appropriately to alarms.
Always use with a supplied 0.5 micron PTFE Filter Disc. Change filters every 100 hours.
TIGERLT manufactured to ISO9001:2008 for reproducible design and calibration.
Dispose of instrument and batteries according to local/national requirements. lon Science offers take-back.
Ion Science Ltd offers calibration services. Annual return recommended for service and calibration.
Manual information is provided 'as is'. Ion Science Ltd accepts no liability for errors or consequences of use.
Read this manual before first use. Pay attention to 'Statements' and 'Introduction' sections.
Ensure the correct inlet nozzle is fitted. Details for fitting/changing are in 'Maintenance'.
Press the Enter/On/Off key once to turn the TIGERLT on.
Press and hold the Enter/On/Off key for 3 seconds to shut down the instrument.
Ensure the TIGERLT has sufficient charge; check the battery icon for charge level.
Instruments ship fully charged. Recommend charging for seven hours before first use.
An alkaline AA Battery Pack (A3) is also supplied with the TIGERLT.
Instruments ship calibrated on isobutylene with response factor (1.0).
Recommend setting alarm levels to user specifications before first use.
Full functionality requires TIGER PCLT software. Load and set up according to instructions.
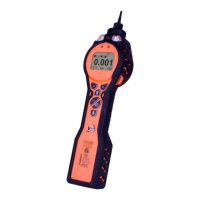
The keypad includes soft keys (A, B), arrow keys, Esc, and Enter/On/Off buttons for operation.
Soft keys A and B display prompts for functionality. Pressing both together toggles the flashlight.
Up and Down arrow keys are used for adjusting settings and navigating menu structures.
Used to accept adjustments, select functions, and turn the instrument on or off.
Used to abort adjustments or exit from menus within the instrument.
The screen is divided into four sections: fixed status icons, main central screen, and soft key areas.
Memory status icon indicates data logging functionality and memory fill level.
USB icon appears when the instrument is connected to a host device.
Battery status icon shows charge level in four segments; border flashes when low.
Light beam lines appear when the instrument's backlight is activated.
Icons indicate sound status; disable lines appear if all sounders are disabled.
Icon shows bell and sound bars flashing to indicate Low or High alarms.
Light beams appear when the instrument's flashlight or torch function is illuminated.
Lock icon appears when instrument configuration is locked via TIGERLT PC software.
Displays readings and units during normal operation; function bar overlays during setup.
Icons appear in soft key areas for options, selected via Up/Down keys. Icons can be reorganized via PC software.
Button A provides access to Information, Single Data Log, and Response Factor options.
Button B provides access to Options, Zeroing, and Zone selection functions.
Press the Enter/On/Off key once to switch the TIGERLT on. Follow startup screens.
Press and hold Enter/On/Off key for 3 seconds to shut down; includes alarm alert.
Select absolute or relative zero using the Zero soft key. Relative zero tracks drift.
Use Zone soft key to display and select zones. Zones are set up via TIGERLT PC software.
Use the Single Data Log soft key to take a single data reading.
Press Options soft key to access adjustable features like Backlight, Sound, Calibration, Alarms.
Configure backlight behavior: Permanently Off/On, On in low light, or Timed.
Configure sound options: keypad beep, alarm, crescendo, and volume level.
Select Factory Calibration (by lon Science) or Custom Calibration (by user).
Factory calibration is performed by lon Science Ltd or distributor. Not for operator use.
Custom calibration is set by the user via TIGERLT PC software. Requires gas cylinder.
Adjust Upper and Lower alarm levels using Up/Down keys and Enter. Lower must be less than Higher.
Use the Information soft key to access various information screens; scroll with Down key.
Displays Response Factor, Low alarm, and High alarm settings.
Shows Date of Factory calibration and Date of Custom calibration.
Displays SPAN 1/2, PID reading, and A/D converter values.
Shows IRN, Firmware version, Bootloader version, and Battery type/voltage.
Displays data log memory availability and current date/time.
The TigerLT PC software is used to set up the instrument and download logged data.
Double click the TIGERLT icon to open PC software and connect the instrument via USB.
The Help screen shows available PC software upgrades and provides technical support contact.
Connect TIGERLT via USB. Software recognizes instrument via IRN. Follow prompts for new hardware.
Click 'Read' to display instrument number and access the Instrument Summary page.
Connect instrument, press 'Read' to process datalogging and view instrument summary.
Option to create a snapshot of the instrument for future recovery. Confirm with 'Yes'.
Displays current instrument status. Option to create a snapshot for recovery.
Use the Configuration screen to set up various instrument parameters.
Configure backlight behavior and timeout period (1-30 seconds).
Enable/disable key press, alarm, and crescendo sounds. Adjust volume using slider.
Set alarm levels (low/high) and select instrument response factor.
Lock the instrument configuration to prevent unauthorized changes. Enable 'Sleep during PC connect'.
Set instrument clock to 24/12 hour format or synchronize with computer time.
Define and name up to 128 separate zones for instrument operation.
Configure custom calibration parameters, including zero on carbon canister and response factor.
Allocate functions to soft buttons by dragging and dropping icons.
Choose between assumed constant zero or tracked zero compensation.
Configure 'Zero at switch on', 'Fixed zero', or 'Zero tracking' for ambient air compensation.
Set 'Log Full' to alarm with bell symbol or overwrite oldest data with recycle symbol.
Enable instrument vibration under alarm conditions by selecting the 'vibrate' symbol.
Define custom calibration parameters for two-point calibration (zero + span).
Enter custom text to be displayed on the instrument's startup screen.
Send configured settings to the TIGERLT. Troubleshoot connection errors if necessary.
Displays current firmware version and provides facility to download updated versions.
Ensure instrument is in Survey mode, not in alarm, and battery is charged before update.
Upgrade process deletes all data. Take a snapshot before proceeding to avoid data loss.
Do not operate TIGERLT during the update process. New version shown on 'Firmware' screen.
Progress bar indicates update status. Instrument flashes LEDs and displays 'verifying file system'.
Connect TIGERLT to PC. Access datalog screen to view and manage logged sessions.
Use menu to print, export, or delete data. CAUTION: Delete function removes all logged data.
Records instrument settings and calibration data at specific times. Lists stored snapshots on PC.
Restore settings by selecting 'Restore'. Be aware this replaces all setup and calibration files.
License effective until terminated. Termination occurs upon failure to comply with license provisions.
SOFTWARE provided 'as is' without warranty. Ion Science Ltd does not warrant use or results.
Warranties for CD/Memory Stick are limited to 90 days for defects in materials and workmanship.
Exclusive remedy for defective media is return for refund or replacement at lon Science Ltd's discretion.
No oral or written information creates a warranty or increases lon Science Ltd's obligations.
Ion Science Ltd not liable for indirect, consequential, or incidental damages arising from software use.
The laws of the United Kingdom govern this Agreement.
Charge TIGER and Lithium ion battery packs only in a Non Hazardous environment.
Never replace Alkaline cells in explosive locations. Use only specified Duracell Procell Alkaline batteries.
Battery packs designed for hazardous atmospheres. Ensure clean connections before use.
Available: Lithium ion rechargeable and Non-rechargeable AA battery packs.
Charge for at least 7 hours. Ensure instrument is switched off during charging.
Use only supplied charger cradle. Keep instrument on charge when not in use.
Ensure TIGERLT is Off. Remove boot, release clip, and slide out the battery pack.
Reverse procedure for installation. Ensure boot fits snugly. Charge new pack for 7 hours.
Never replace Alkaline cells in explosive locations. Use only specified Duracell Procell Alkaline batteries.
Ensure instrument is Off. Remove boot, AA battery pack. Remove cover, replace exhausted batteries with correct polarity.
Incorrect polarity may cause permanent damage. Load batteries only in a safe environment.
Gas flow below 100cc/minute. Check probe/filter for blockages. Clear fault with Esc if resolved.
Instrument shuts down below 2% battery. Recharge or replace battery pack.
PID lamp fails to strike. Turn off instrument and replace the lamp.
Data log memory full. Set 'Log Full' to 'alarm' or 'recycle' in PC configuration.
Indicates corrupted firmware. Contact lon Science Ltd or authorized service center.
Ion Science recommends annual service for traceable calibration. Lamp and detector restored to factory specs.
Two-point calibration (Zero and Span 1) is adequate due to linear PID output.
Factory Calibration is set by lon Science Ltd. Contact distributor for service.
Custom calibration is set by the user via TIGERLT PC software. Requires gas cylinder.
Calibrate in clean air. Ensure all calibration kit parts are ready. Never calibrate zero with span gas.
Select Custom Calibration, use Carbon Filter Assembly for zero, then Span 1 gas with Calibration Adaptor.
Attach Span 1 gas using Calibration Adaptor. Press Enter to start countdown for acceptance.
Inlet Nozzle (880207) from Jan 2016 has a stronger design. Probe upgrade kit available.
Inlet Nozzle (861443) up to Jan 2016. O-Ring ensures seal. Remove for cleaning/replacement.
Change Filter Disc every 100 hours or sooner in dusty/wet environments. Use clean hands.
High humidity may cause readings to increase due to dust/particles. Cleaning can resolve this.
Clean lamp every 100 hours or sooner if used in heavily contaminated environments.
Handle internal components with clean hands/tools. Lamp is fragile; handle with care.
Ensure instrument is off and in a clean environment. Remove Sensor Cover and the sensor.
Replace lamp or install new one. Reverse procedure. Instrument MUST be re-calibrated after replacement.
Fine layer of contamination on detector window may occur. Remove regularly.
Use Kit A-31063 with Aluminium Oxide compound. Follow MSDS for safety.
Polish window with cotton bud and compound. Remove residue with air blast. Re-calibrate instrument.
Diagram and part list for the main instrument body, sensor, boot, and battery packs.
Diagram and part list for filter housing cap, clamp, disc, and inlet nozzle.
Diagram and part list for the new probe, probe seal, and filter clamp.
Includes DC Jack Car Charger Lead and Leather instrument holster/harness.
Includes Inlet probes, seals, filter clamps, probe upgrade kits, and O-rings.
Includes Calibration Adaptor, Carbon Filter, PID Lamp Cleaning Kit, Extension Hoses, Diluter.
Includes Lithium ion/Alkaline battery packs, Accessory Box, Filter Discs, Anti-vibration cradle.
Extend standard warranty to 2 years by registering online within one month of purchase.
Ion Science Ltd offers service options. Recommends annual return for service and factory calibration.
Provides contact details for Ion Science Ltd offices in UK, US, and Italy, and German distributor.
| Brand | ion science |
|---|---|
| Model | TIGER LT |
| Category | Security Sensors |
| Language | English |