Do you have a question about the Ironman4x4 BBR085E and is the answer not in the manual?
Important notes and cautions regarding vehicle preparation and electrical safety before starting installation.
Critical safety warnings related to recovery points, torque specifications, and general safe working practices.
List of all included parts and their quantities for the bull bar installation kit.
List of essential tools needed to perform the bull bar installation correctly and safely.
Torque settings for various bolt sizes ensuring proper tightening and structural integrity during installation.
Instructions for removing the factory bumper, recovery points, and associated hardware.
Steps for fitting the outer brackets, winch cradle, and recovery point mounts.
Detailed guide for removing and refitting parking sensors into the new bull bar.
Instructions for installing light bars, license plate bracket, protection plates, and final bolt tensioning.
Diagrams illustrating the correct wiring connections for fog lights and optional light bars.
Final checks on bolt tension, electrical component operation, and sensor functionality after installation.
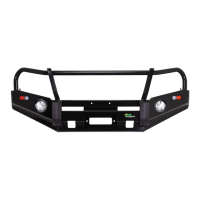
The Ironman 4x4 BBR085E Raid Bull Bar is a robust front-end protection system designed specifically for the Ram DT vehicle. This bull bar is engineered to provide enhanced protection for the vehicle's front end, offering a sturdy barrier against impacts and off-road hazards. Beyond its protective function, the bull bar integrates features that support various off-road accessories, making it a versatile addition for enthusiasts and professionals alike. The installation process is estimated to take approximately 2.5 hours, and it is crucial that it is performed by a qualified person to ensure correct fitment and maintain the product's air bag compatibility.
One of the primary functions of the Raid Bull Bar is to serve as a secure mounting platform for auxiliary lighting. It supports the installation of an optional center light bar, such as the ILBDR002B, and up to four cube lights. Specific part numbers are provided for various cube light options, including 40W Bright Cube Spot Beam (ILED80B), Amber Colour Spot Beam (ILED80BA), Clear Colour Flood Beam (ILED80BF), and Amber Colour Flood Beam (ILED80BFA). The bull bar's design includes dedicated brackets and hardware to ensure these lights are mounted securely and can be adjusted for centralized positioning and optimal vertical aim. Cable ties are recommended for securing the light bar and cube light cables to the inside edge of the bull bar, maintaining a tidy and secure installation. For users not opting for an optional light bar, a mesh infill is supplied, which still requires the light bar support brackets for installation.
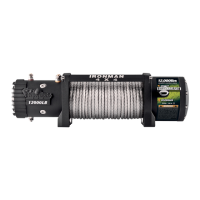
The bull bar also incorporates provisions for a winch, an essential tool for off-road recovery. If a winch is to be installed, specific instructions guide the user through the process, including the use of a provided winch control box mounting plate. It is advised to mount the bracket to the control box first, then install the winch, and finally mount the control box to the cradle. The design ensures that the control box is pushed back towards the rear of the car in its mounting holes for a secure fit. A fairlead can also be fitted if a winch is being installed, further enhancing its recovery capabilities.
Another key feature is the integration of parking sensor compatibility. The bull bar is designed to accommodate the vehicle's existing parking sensors, ensuring their continued functionality after installation. This involves carefully removing the sensors and their wiring from the factory bumper, noting their original location and orientation. Adhesion promoter and double-sided tape are used to secure the sensor holders to the Raid bar, ensuring the sensors are positioned correctly to prevent false alarms. An extension loom is provided to connect the parking sensors wiring to the factory harness, with cabling routed discreetly between brackets.
The Raid Bull Bar includes robust recovery points, which are FEA (Finite Element Analysis) tested and destruction tested to establish Working Load Limits (WLL). These recovery points are designed as a matching pair for vehicle-specific fitment and come with specific mounting hardware to ensure correct and safe installation. It is critical to use an equalizing or bridle strap during recovery to prevent fatigue and bending of the recovery points, which could void the warranty. The recovery points are designed for straight-line pulls, and angled or sideways pulls may reduce the WLL. Warning labels on the recovery points must not be removed.
The installation process involves several steps, starting with the removal of the factory bumper, stone tray/bash plate, and chrome recovery points. The vehicle's aero dame, if fitted, also needs to be removed. Once the factory components are off, the winch cradle and bar brackets are fitted to the vehicle's front. The outer brackets are initially left loose to allow for adjustment once the bull bar is installed. The recovery points are then mounted using factory OEM hardware, with specific bolts and nuts for secure attachment. The winch cradle is bolted up loosely through the inner cradle holes and side brackets, and measurements are taken to ensure the cradle is centered before tightening the bolts.
The bull bar is supplied with Taptite Bolts for certain installations, which do not require a washer or nut to mount. These bolts create their own thread in a 9mm drilled hole, and lock tight is recommended for the thread. The installation also includes fitting protection plates: a center protection plate and two wing protection plates, secured with black M8 bolts.
Electrical connections for fog lights and light bars are detailed with wiring diagrams, providing guidance for both vehicles with and without factory fog lights. It is important to connect the main parking sensor plug if the vehicle is equipped with front sensors. All electrical wiring should be clear of sharp edges and securely fastened.
Maintenance of the bull bar is straightforward. To maintain its finish, regular washing with a PH neutral car wash, hosing off, and chamois drying are recommended. Acidic or alkaline cleaners should be avoided. Plastic components can be maintained with a silicon spray or similar non-acidic or alkaline-based product.
After installation, it is crucial to perform a vehicle pre-trip check, especially before long journeys or every 10,000 km. This check includes visually inspecting the Raid bar and hardware, ensuring all bolts are correctly tensioned, and re-tensioning them if needed. The operation of blinkers, park lights, fog lights, and the winch (if installed) must be verified. If the vehicle is fitted with parking sensors, radars, or front cameras, their correct operation should be checked, as some models may require recalibration at a dealership.
The Ironman 4x4 BBR085E Raid Bull Bar is a comprehensive and well-engineered accessory that enhances the Ram DT's functionality and protection, making it ready for various challenges and adventures.
| Product Type | Bull Bar |
|---|---|
| Model | BBR085E |
| Brand | Ironman 4x4 |
| Material | Steel |
| Finish | Black Powder Coat |
| ADR Compliant | Yes |
| Airbag Compatible | Yes |
| Winch Compatible | Yes |
| Weight | 65 kg |
| Installation | Professional Installation Recommended |
| Mounting Points | aerial mount, light mounts |
| Vehicle Compatibility | Toyota Hilux (2015-2020) |