This document serves as an installation and owner's manual for iSpring Reverse Osmosis Water Filtration Systems, providing comprehensive guidance for setup, operation, and maintenance. The system is designed to provide high-quality drinking water by reducing total dissolved solids (TDS) and other contaminants.
Function Description
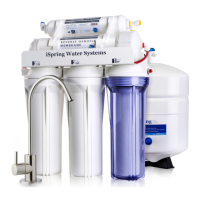
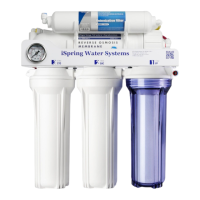
The iSpring Reverse Osmosis Water Filtration System is a multi-stage water purification device that utilizes reverse osmosis technology to produce clean, potable water. The process begins with source water entering the system and passing through a series of pre-filters (stages 1, 2, and 3). These pre-filters are crucial for removing larger particles, chlorine, tastes, and odors, thereby protecting the delicate RO membrane. A Low Pressure Switch, located between the pre-filters, activates the system when the incoming water pressure is 7 PSI or greater.
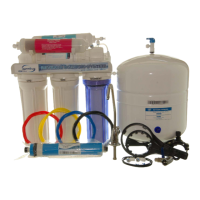
Following pre-filtration, the water proceeds to the Booster Pump, which increases the water pressure to approximately 80 PSI. This elevated pressure is essential for efficient reverse osmosis. The pressurized water then enters the RO membrane housing, where the core purification takes place. The RO membrane, a thin-film composite with microscopic pores (.0001 micron), forces water molecules through while rejecting dissolved solids and other impurities. The system includes a 'wet' RO membrane, vacuum-sealed with pure water, indicating it's ready for immediate use upon installation.
The RO membrane produces two streams: pure water and waste water. The pure water exits through a one-way Check Valve and is routed to a pressurized storage tank. The waste water, containing the rejected contaminants, is directed to the drain line, where a Flow Restrictor limits its outflow to maintain optimal pressure within the system.
The storage tank accumulates purified water. As the tank fills, its internal pressure rises. A High Pressure Switch monitors this pressure, turning on when the tank pressure is below 20 PSI and turning off when it reaches 35 PSI (indicating a full tank). When both the Low Pressure Switch and High Pressure Switch are on, a Feed Water Solenoid Valve opens, allowing water to flow to the Booster Pump, initiating the purification cycle. When the tank is full, the High Pressure Switch turns off, deactivating the booster pump and the entire system.
When the user opens the RO faucet, purified water flows from the storage tank, passes through a post-carbon filter (stage 5, FT15), and is dispensed. The post-carbon filter acts as a final polishing stage, further enhancing the taste and odor of the water. As water is drawn from the tank, the pressure gradually drops, eventually triggering the High Pressure Switch to restart the system and refill the tank.
Optional stages, such as Alkaline, DI, or UV filters, may be pre-installed on some models (6-stage or 7-stage systems). An Auto Flush Solenoid Valve (ASOF7) automatically flushes the RO membrane to preserve its life and efficiency. A Flow Sensor Switch (FSS) is used with UV filters to activate the UV light only when water is flowing, conserving energy and extending bulb life.
Usage Features
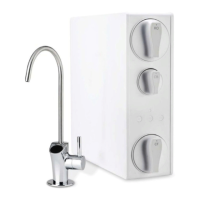
The iSpring RO system is designed for under-sink installation, providing convenient access to purified water directly from a dedicated RO faucet. The system includes a 4-color tubing set for easy identification and connection of different water lines: red for feed water, black for drain water, yellow for the tank, and blue for the RO faucet. Quick-connect fittings simplify tubing connections, requiring a simple push-in and securing with a blue lock clip. Compression fittings are used for connecting PVC tubing to threaded metal inlets, such as refrigerator water inlets.
Installation involves several key steps:
- Feed Water Adapter (AFW43) Installation: Connects the system to the cold water supply line under the sink. The adapter can convert 3/8” compression to ½” NPT.
- RO Faucet Installation: Requires drilling a ½” hole in the sink or countertop if one isn't already available. The faucet stem is secured with a front plate, rubber washers, and a wing nut.
- Drain Saddle Installation: Attaches to the drain pipe to dispose of waste water. A ¼” hole is drilled in the drain pipe, and the black tubing is inserted and secured.
- Vertical Filters (Stages 1, 2, and 3) Installation: Filter cartridges are inserted into their respective housings, ensuring proper O-ring seating and direction. Housings are hand-tightened and then secured with a housing wrench.
- Tank Shut-Off Valve (TSV) Installation: The valve is wrapped with Teflon tape and screwed onto the storage tank, then connected to the yellow tubing.
- Reverse Osmosis Membrane Installation: The 'wet' RO membrane is carefully inserted into its housing, ensuring the O-ring is correctly seated, and the cap is tightened.
- Tubing Hook Up: All colored tubings are connected according to the system diagram, ensuring no kinks.
- System Start Up: Involves flushing the pre-filters, checking for leaks, allowing the tank to fill and drain completely once (the first tank of water should not be consumed), and then allowing it to refill for regular use. For UV models, the UV power is plugged in after initial flushing.
The system is designed to operate within specific conditions: minimum water pressure of 30 PSI, maximum water pressure of 70 PSI (a pressure regulator is recommended if higher), and an operating water temperature range of 40 – 100 °F. It is not designed for hot water. The maximum TDS for source water is 750 ppm.
Maintenance Features
Regular maintenance is crucial for the optimal performance and longevity of the iSpring RO system. The manual provides a filter cartridge replacement schedule and instructions for changing filters and the RO membrane.
Filter Replacement Schedule:
- Stages 1, 2, and 3 Pre-Filters (Sediment #FP15, GAC #FG15, CTO #FC15): Replace every 6 months or sooner, depending on water usage and source water quality. These filters protect the RO membrane from chlorine and other contaminants.
- Stage 4 RO Membrane (#MC7): Replace every 2-3 years or sooner if the TDS level of the purified water increases. Regular monitoring of TDS levels (at least once a month) is recommended to assess membrane performance.
- Stage 5 FT15 Inline Post Carbon Filter (#FT15): Replace every 12 months.
- Stage 6 FA15 Inline Alkaline Filter (#FA15): Replace every 6 months (for models with this stage).
- Stage 7 UV Lamp (#UVB11): Replace every 12 months (for models with this stage).
Filter Change Procedure:
- Shut off the cold water supply valve and tank valve, then open the RO faucet to depressurize the system.
- Place a bucket or towel to catch spills.
- Twist off filter housings counter-clockwise using the provided housing wrench.
- Remove old cartridges, clean housings (optional, with hot water and scent-free dish soap), and insert new cartridges, ensuring proper O-ring seating and direction.
- Hand-tighten housings, then use the wrench for an additional ¼ – ½ turn. Avoid overtightening.
RO Membrane Change Procedure:
- Disconnect the white tube from the quick-connect fitting on the membrane cap.
- Unscrew the membrane housing cap counter-clockwise using the housing wrench.
- Pull out the old membrane (scissors or pliers may be used for leverage).
- Clean the membrane housing.
- Insert the new 'wet' RO membrane, holding it by its packaging to avoid contamination, ensuring the end with two small black O-rings faces the bottom.
- Ensure the O-ring is properly seated on the end of the membrane housing. It is recommended to replace the O-ring every 3 years.
- Place the membrane housing cap back on, hand-tighten, then use the housing wrench for an additional ½ – ¾ turn.
Tank Maintenance:
- It is recommended to fully empty and refill the tank at least once a month to keep the water fresh.
Extended Absence:
- When leaving for an extended period (over a week), shut off the water supply to the system and empty the tank by closing the feed water adapter knob and opening the faucet until it stops running. Filters should be replaced if the system is not used for over a week due to potential stagnant water.
The manual also includes a troubleshooting guide for common issues like zero water output, tank not filling, leaks, low water flow, high TDS in RO water, cloudy water, continuous drain, and pump malfunctions. It emphasizes the importance of verifying tubing connections, O-ring placement, and proper tightening of components. The system is certified by WQA to NSF/ANSI Standard 58 for TDS reduction, and users are encouraged to periodically test TDS levels to ensure proper performance. An included Flood Alarm provides additional peace of mind.