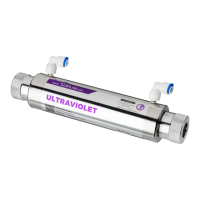
The iSpring Ultraviolet Water Filter (Models: UVF11A, UVF11B, UVF11B-A, UVF11B-E) is an innovative water purification system designed for residential use. This system utilizes ultraviolet (UV) light to purify water, offering a reliable and effective method for improving water quality.
Function Description:
The UVF11 series operates with a flow sensor that automatically turns the UV lamp on and off based on water flow. When water flows through the unit, the UV lamp activates, and when no water is detected, the unit enters standby mode, turning off the indicator lights and conserving energy. This design not only reduces energy consumption but also prolongs the lifespan of the UV lamp.
Water enters the UVF11 series and flows into the annular space between the quartz tube and the inner wall of the stainless steel reactor chamber. The UV lamp then emits UV rays, initiating the purification process. A green LED indicator on the electronic ballast illuminates, signaling that the UV lamp is in operation and functioning correctly, ensuring that all water within the chamber is purified without any "dead corners." Once water exits the UVF11 series, it is ready for use, requiring no further contact time.
The system also incorporates a self-cleaning feature. If the unit remains idle for 24 hours while powered on, it will automatically initiate a 300-second self-cleaning cycle to prevent water in the reactor chamber from deteriorating. In the event of a malfunction, a red LED indicator will flash, and an alarm will sound, alerting the user to a problem.
Important Technical Specifications:
- Lamp Power: 11W
- Rated Voltage: 220V or 110V (depending on the model)
- Operating Pressure: 5 - 115 psi
- Minimum UVT (UV Transmittance): 70%
- Installation Position: Vertical or Horizontal
- Rated Flow: 1 GPM (Gallon Per Minute)
- Rated Service Life of the Lamp: 1 Year
- Flow Sensor Model: FS-7
- Ballast Model: UVT11
- Quartz Tube Model: UVQ11
- Quartz Tube Dimension: 23mm x 245mm
Incoming Water Requirements:
For optimal performance, the incoming water should meet specific quality parameters:
- Temperature: 36 - 104 °F (2 - 40 °C)
- TDS (Total Dissolved Solids): < 10 ppm
- Hardness: < 120 ppm
- Iron: < 0.3 ppm
- Manganese: < 0.05 ppm
- Turbidity: < 1 NTU
- pH: 6.5 - 9.5
It is crucial to note that water quality significantly impacts UV light performance. The UVF11 series is not intended for treating water with obvious contamination or raw sewage, nor is it designed to convert wastewater into safe drinking water.
Usage Features:
The UVF11 series is designed for ease of installation and minimal maintenance. Its dual-chamber heads are removable and can be rotated independently, simplifying installation, maintenance, and retrofitting into existing systems. The quick and easy lamp change process requires no special tools.
Installation Process:
- Remove both the open-end nut and closed-end nut from the reactor chamber.
- Install one O-ring onto the open end of the quartz tube (approximately 5 mm from the opening).
- Insert the quartz tube into the reactor chamber.
- Install the other O-ring onto the closed end of the quartz tube.
- Hand-tighten the closed-end nut onto the reactor chamber (where the closed end of the quartz tube is), being careful not to overtighten.
- Insert the two pins of one end of the UV lamp into the female end of the blue cable.
- Carefully insert the UV lamp and the blue cable into the quartz tube. Hand-tighten the open-end nut onto the reactor chamber.
- Insert the male end of the blue cable into the indented female end of the lamp socket of the ballast.
- Insert the two pins of the other end of the UV lamp into the protruding female end lamp socket of the ballast.
- Carefully insert the UV lamp and the blue cable all the way down into the reactor chamber. Install the black cover cap attached to the ballast onto the open-end nut.
- Install the elbow fittings onto the water inlet and outlet of the reactor chamber: remove one clip from each fitting, push the end of the fitting all the way down into the reactor chamber, and re-install the blue clips to secure the connections. Ensure clips are pushed all the way down.
- Install 1/4" tubings (not included) onto both elbow fittings: remove clips, push tubing all the way (about half an inch) into the fittings, and re-install clips to secure connections.
- Install the flow sensor onto the inlet tubing of the unit, following the flow direction indicated on the sensor. Install blue clips to secure the connection.
- Install the two supporting pieces when needed and place the UVF11 unit in a proper location.
After plumbing connections are complete, slowly turn on the water supply and check for leaks. Allow water to run for a few minutes to clear air or dust from the reactor chamber. Finally, plug in the power to start the system.
Maintenance Features:
For safety, always wear eyewear and turn off the main power before servicing the unit, as servicing with power on can damage the ballast.
A. Cleaning the UV Lamp and Quartz Tube:
The UV lamp and quartz tube should be cleaned at least three times a year if the unit can be easily dismounted. Otherwise, replace the lamp and quartz tube every 1-2 years.
To clean:
- Wear appropriate gloves to avoid contaminating the lamp.
- Unplug the power, shut off both inlet and outlet valves, and remove the entire unit from the waterline.
- Drain the water, remove the black rubber cap with the attached power cord, and remove the lamp from the quartz tube.
- Wipe the lamp with a lint-free cloth moistened with white vinegar.
- Pour vinegar into the water inlet and soak the quartz tube until it is clear, then rinse thoroughly. Handle the quartz tube with extreme care as it is very fragile.
B. Maintaining the UV Lamp:
Regularly inspect the UVF11 unit to ensure the UV lamp is operational. An LED indicator light on the ballast visually confirms lamp operation, though it does not indicate UV intensity or transmission level. Ballasts include a built-in audio alarm for lamp failure.
To ensure proper operation, regular biological testing of your water (e.g., quarterly) by an accredited agency is highly recommended. Additional testing may be necessary after modifications, changes, or additions to the plumbing system, pumps, or well source water to ensure adequate purification under new conditions. Other maintenance includes ensuring grounding wires are secure and replacing any damaged or broken components.
Troubleshooting:
- Ballast not turning on automatically: Check water flow switch connection and direction, power supply connection, voltage range, and ensure water flow rate is ≥ 0.08 GPM.
- Ballast alarms, lamp not lighting up: Verify lamp tube connection, check if the lamp has reached its end of life (replace if necessary), or replace the ballast if the lamp is new and connected correctly.
- Ballast alarms, lamp lights up: The ballast alarm system is damaged; replace the ballast.
- Timer number not changing: Reset the timing mode. A decimal point indicates timing in minutes, counting one minute at a time.
- Leaking from reactor chamber: The O-ring inside the quartz tube might be damaged; replace it.
- Leaking from quartz tube: Replace the quartz tube.
- Leaking at water inlet/outlet of reactor chamber: Wrap plumber's tape on threads and reconnect tubing.
- Lamp not turning on after replacing: Check the lamp connection.
- Lamp turns on, but indicator lights and alarm are abnormal: Indicator lights are broken; replace the ballast.
Warranty and Support:
iSpring offers a 30-day money-back guarantee, a 1-year manufacturer warranty, and lifetime tech support for all products. Customers are encouraged to register their product on 123filter.com under the "Warranty" tab. For questions, comments, or technical support, contact iSpring at support@123filter.com or (678) 261-7611, Monday-Friday 8:30 a.m. - 5:30 p.m. EST.