1.
规格
/SPECIFICATIONS
A
6F
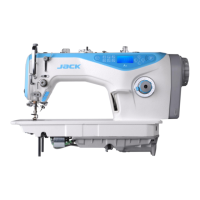
电脑高速平缝机系列
产品使用说明书
使用说明和零件样本下载地址:
PLEASE DOWNLOAD THE MANUAL AND SPARE PARTS FROM THE FOLLOWING WEBSITE:
ÇäÑÌÇÁ Êfåêä ãÊêÈ ÇäÊÙäêåÇÊ èâXÙ ÇäÊÈÏêä åæ ÇäåèâÜ ÇäÊÇäê:
POR FAVOR DESCARGAR EL MANUAL Y LIBRO DE PARTES Y REPUESTOS LO SIGUIENTE EN
SITIO WEB:
Пожалуйста, загрузите инструкцию по эксплуатации и деталировку
( список запасных частей ) со следующего вебсайта:
http://download.chinajack.com
产品标准代号:
QB/T2380-2013
Standard code of the products
:
QB/T2380-2013
杰克缝纫机
JACK SEWING MACHINE
HTTP://WWW.CHINAJACK.COM 2.
缝纫机的安装
/INSTALLATION
杰克缝纫机股份有限公司
JACK SEWING MACHINE CO.,LTD.
● 公司地址(
Address of Company
):
台州市椒江区机场南路十五号
NO.15 Rd Airport South,Jiaojiang District Taizhou City,Zhejiang,P.R.C
邮编:
318000
● 国内销售部(
Domestic Trade Department
):
电话(
TEL
):
0086-0576-881177788 88177789
传真(
FAX
):
0086-0576-881177758
● 国贸部(
International Trade Department
):
电话(
TEL
):
0086-0576-881177782 88177774
传真(
FAX
):
0086-0576-881177787
● 免费售后服务电话:
400-8876858
http://www.chinajack.com
● 资料如有更改,恕不另行通知,以实物为准。
You will be not informed if the file has been revised.Please set sample as standard.
使 用 说 明
Operation Manual
3.
膝动提升高度的调整
/ADJUSTING THE HEIGHT OF THE KNEE LIFTER
6F
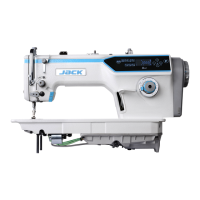
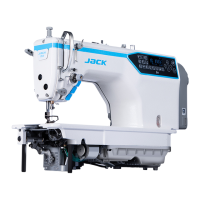
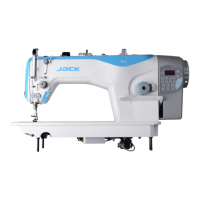
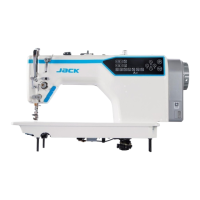
用途 一般布料、薄料、中厚料
缝纫速度 最高
最大针脚长度
机针
DBx1 #9~#18
(
14#
)
压脚高度(自动抬压脚)
9mm
(标准)
12mm
(最大)
使用机油
New Defrix Oil NO.10
机油
6F
Application
General fabrica,light-weight and mdeium-weight materials
Max.Stitch length 4.5mm
Needle DBx1 #9~#18
(
14#
)
(
)
(
)
Noise
Workplace-related noise at sewing speed
N=4,000
1-
:
L
PA
83dB(A)
Noise measurement according to DIN 45635-48-A-1
(1)
油盘托盘安装
1)
将油盘托盘 安装在台板背面。
2)
将机头支架 、、机头座垫 分别安装在台板上。如图所示,安装时确保两个机头支
架 朝向操作者一边,两个将机头座垫 是在有机头连接钩 的那一侧。
3)
先将机头连接钩座 安装在台板上,再将机头连接钩 放入底板孔内,最后将机头放置
于台板上,且机头连接钩 要与台板上的机头连接钩座 相嵌合。
(1)The installation of plastic reservoir
1)Install the plastic reservoir under the stand & table.
2)Put the manchine holder and the machine cushion on the stand & table.As is
shown in the chart,making sure that the manchine holders are pointing to the
operator during the installating and the two machine cushion are on the side
which is with machine head connecting hook .
3)Install the machine head connecting hook base on the stand & table,and then put
machine head connecting hook in the baseplate hole,at last,put the head on the
stand & table,making sure machine head connecting hook is nested in the machine
head connecting hook base which is on the stand & table.
1.
油盘内未加油绝不能开车。
2.
机器运转时,从手轮外侧看转向应为逆时针方向。注意,不能倒转。
3.
确认电控标识上的电压及相位是否正确。
1.Never operate the machine unless its oil reservoir has been filled with oil.
2.After setting up the machine,check the direction of motor rotation.To check it,turn
the handwheel by,hand to bring the needle down,and turn the power switch ON
while obsering the handwheel.(The hand-wheel should turn counteclockwise as
observed from the handwheel side)
3.Confirm that the voltage and phase(single or 3-phase)are correct by checking them
against the ratings shown on the elcectronic identification.
1)
膝动提升的标准高度为
10mm
。
2)
调节膝动提升调节螺丝 可以把压脚高度最大调整到
13mm
。
3)
压脚提升到
10mm
以上时,请注意针杆 的前端下降到最底下,不能碰到压脚 。
1) The standard height of the presser foot lifted using the knee lifter is 10mm.
2) You can adjust the presser foot lifted up to 13mm using knee lifter adjust screw .
3) When you have adjusted the presser foot lift to over 10mm,be sure that the bottom end of
needle bar in its lowest position does not hit presser foot .
1.
接通电源开关或机器运转时,请误将手放到针的下部。
2.
机器运转时,请勿将手指伸入挑线杆护罩内。
3.
机头翻倒时,一定要切断电机开关。
4.
操作者离开机器时,必须切断电源。
5.
机器运转期间,注意不允许任何人的头或手以及任何东西靠近绕线轮和手轮。
6.
装拆防护罩,或者其他保护装置时,请勿开动机器。
7.
不要用香蕉水等油漆稀释液剂擦洗机头表面。
1. Keep your hands away from the needle when you turn the power switch ON or while
the machine is operating.
2. Do not put your finger into the hread take-up cover while the machine is operating.
3. Be sure to.turn the power switch OFF before tilting the machine head.
4. When an operator leaves from the machine ,make sure to turn off the power.
5. During operation,be careful not to allow your or any other person’s head or hands to
come close to the bobbin winder or handwheel.Also,do not piace anything close to
them.Doing so may be dangerous.
6.If your machine is provided with a finger guard or any other protectors,do not
operate your machine with any of them removed.
7. Don’t clean the face of machine head with thinner
运转缝纫机之前,请注入
375mL New Defrix No.10
机油
1
)请保持缝纫机为开机状态,取下机臂上部的橡胶栓,利用漏
斗 进行加油。
2
)加油量请从机器操作面板上 进行观察确认。
当油盒内机油不够正常运行时,操作面板 上加油图标会
闪烁,并有半小时一次的警示音提醒加油。此情况下允许缝
纫机继续运行一段时间,之后机器进入锁定保护状态,无法
运转。加油到最少油量以上后,加油图标熄灭, 此时允许继
续加油,当油盒内油量达到最大油量时,操作面板 上满油
图标亮,并有警示音提醒油量已加满,停止加油。
3
)加油后运转缝纫机,如果润滑正常,可通过油窗 看到油
的
流动。
※油流动量的多少,与油量的多少无关。
开车前的注意事项:
使用注意事项:
—
2
—