16/18
10. Troubleshooting
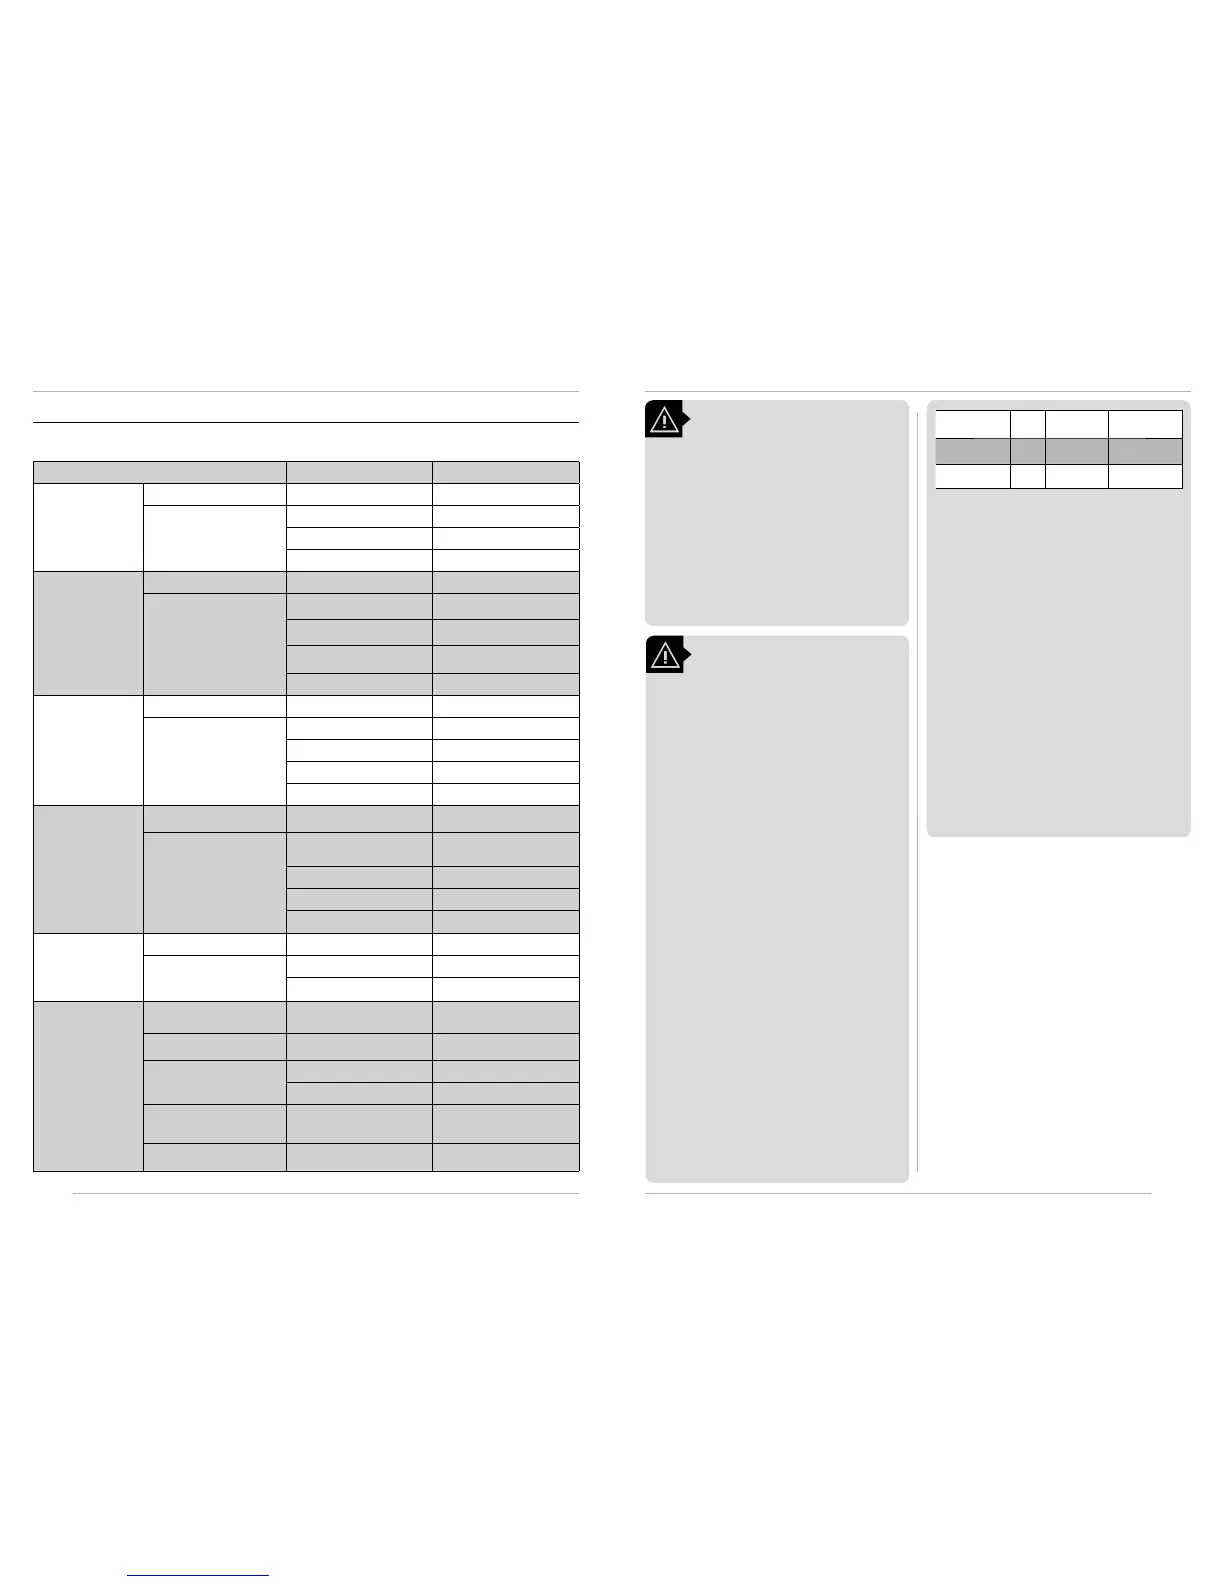
If sprayer is not working as expected, consider the following table before contacting technical assistance.
Malfunction / Status Cause Action
Sprayer interface doesn’t
work
Green button was not pressed The interface is OFF Press green button
Green button was pressed
Battery is fully discharged Recharge battery
Battery is permanently damaged Replace battery
Interface or electronic module is
damaged
Contact technical assistance
Sprayer interface is ON,
but pump is not working
(no audible noise from
pump)
Trigger valve is not released Trigger valve is shut Release trigger valve
Trigger valve is released
Pump electrical connector is
disconnected
Connect pump electrical connector
Nozzle or nozzle lter is blocked Clean or replace nozzle or lter
Pump wiring is broken Contact technical assistance
Pump is damaged Contact technical assistance
Pump is working, but
spray is not coming out
Trigger valve is not released Trigger valve is shut Release trigger valve
Trigger valve is released
Nozzle or nozzle lter is blocked Clean or replace nozzle or lter
Pump suction is blocked (inside
chemical tank)
Contact technical assistance
Suction hose is blocked or discon-
nected
Contact technical assistance
Pump or hoses are leaking Contact technical assistance
Sprayer sprays but is ab-
normal or spray pressure
is weak
Agitation valve is ON
Part of the ow is being used to
agitate chemical tank
Turn o agitation valve
Agitation valve is OFF
Pump suction is partially blocked
(inside chemical tank)
Remove obstruction and circulate
fresh water to clean hoses
Suction hose is partially blocked Circulate fresh water to clean hoses
Pump or hoses are leaking Contact technical assistance
Nozzle or lters are blocked or
damaged
Clean or replace nozzle or lter
Chemical agitation is not
working or is weak
Agitation valve is OFF Agitation is not enabled Turn on agitation valve
Agitation valve is ON
Agitation nozzle or lter is blocked
Clean or replace agitator nozzle
or lter
Agitation hose is blocked or
disconnected
Contact technical assistance
Spraying was normal but
stopped suddenly
Interface shows blinking battery
lights and warning light on
Battery overvoltage Use JACTO original battery
Low battery audible warning was
beeping
Battery is fully discharged Recharge battery
Interface shows warning LED on
and other lights are normal
Pump or motor is damaged Contact technical assistance
Pump wiring is short circuited Contact technical assistance
Green button was pressed
Pump reached maximum pressure,
pressure switch activated
Press green button until pressure is
lower. Clean nozzle and lters
No audible noise from pump
Pump wiring is loose, damaged or
disconnected
Check pump wiring
5/18
WARNING!
• DO NOT attempt to charge the battery
pack with any chargers other than the
ones in this manual.
The charger and
battery pack are specifically designed to
work together.
• These chargers are not intended for any
uses other than charging designated
JACTO lithium rechargeable batteries.
Any other uses may result in risk of fire,
electric shock or electrocution.
• Do not expose charger to rain or snow.
• Pull by plug rather than cord when dis-
connecting charger.
This will reduce risk of
damage to electric plug and cord.
• Make sure that cord is located so that it
will not be stepped on, tripped over, or
otherwise subjected to damage or stress.
• Do not use an extension cord unless it
is absolutely necessary.
Use of improper
extension cord could result in risk of fire,
electric shock, or electrocution.
• An extension cord must have adequate
wire size (AWG or American Wire Gauge)
for safety.
When using more than one
extension to make up the total length, be
sure each individual extension contains at
least the minimum wire size. When using
an extension cord, be sure to use one heavy
enough to carry the current that product will
draw. An undersized cord will cause a drop
in line voltage resulting in loss of power and
overheating. The following table shows the
correct size to use depending on cord length
and nominal current presented in the label of
the charger mentioned in this manual. If in
doubt, use the next heavier gauge.
CAUTION!
• Burn hazard. To reduce the risk of injury,
charge only designated JACTO batteries.
Other types of batteries may burst causing
personal injury and damage.
• Under certain conditions, with the charger
plugged in to the power supply, the charger
can be shorted by foreign material. Foreign
materials of a conductive nature such as, but
not limited to, steel wool, aluminum foil, or
any buildup of metallic particles should be
kept away from charger contacts. Always
unplug the charger from the power supply
when not charging battery. Unplug charger
before attempting to clean.
• Do not mount charger on wall or perma-
nently a x charger to any surface.
The
charger is intended to use on a flat, stable
surface (i.e., table top, bench top).
• Do not operate charger with damaged
cord or plug -
have them replaced imme-
diately.
• Do not operate charger if it has received a
sharp blow, been dropped, or otherwise
damaged in any way.
Take it to an autho-
rized service center.
• Do not disassemble charger;
take it to
an authorized service center when service
or repair is required. Incorrect reassembly
may result in a risk of electric shock, electro-
cution or fire.
• Disconnect the charger from the outlet
before attempting any cleaning.
This will
reduce the risk of electric shock. Removing the
battery pack will not reduce this risk.
• NEVER attempt to connect 2 chargers
together.
• The charger is designed to operate on
standard household electrical power. Do
not attempt to use it on any other voltage.
• Batter y chargers contain electronic par ts.
Dispose of properly.
Extension Cord
Total Length
Up to
50 ft
(15.2 m)
From 50 ft (15.2 m)
and up to 100 ft
(30 m)
More than 100 ft
(30 m)
Wire Size (AWG) 16 14
Not recommended
Wire Size (mm2)
1.5 2.5
Not recommended
5.1. Charging procedure
JACTO charger provided with this sprayer is designed to charge
JACTO battery pack model JB1660 in 4 hours.
1. Remove the battery from the sprayer.
2. Plug the charger into an appropriate outlet before con-
necting the battery pack. Make sure the AC cord is well
attached to the charger.
3. Connect the charger plug to the battery pack connector.
4. The charge light will remain red/orange while charging.
5. When battery pack is fully charged, charge light will
change its color to green.
6. As soon as the battery is fully charged, disconnect the bat-
tery from the charger.
7. Unplug charger cord from outlet.
Recharge discharged batteries as soon as possible or bat-
tery life may be greatly diminished. For longest battery life,
do not discharge batteries fully. It is recommended that the
batteries be recharged after each use.
5.2. Important charging notes