EasyManua.ls Logo

Jacto ARBUS 500 - User Manual

Jacto ARBUS 500
8 pages
Print Icon
To Next Page IconTo Next Page
Loading...
TECHNICAL NOTICE
1
For more information, consult Technical Assistance
Toll free: 1-800-522-8610
E-mail: info@jacto.com
Home page: www.jacto.com
Tower Kit is available for Jacto Arbus 500 and Arbus 200 airblast sprayers.
Follow instructions below for assembly:
ARBUS 500 / ARBUS 200
TOWER KIT
CTI - ??/??/2012
IMP-????
1- Locate left and right deflectors on
the rear of the machine (A).
A
2- Loosen mounting bolts (B) and
remove both right and left deflectors.
B
B
ATTENTION!
With sprayer hitched to the tractor, park on a rm and level
ground free of obstacles. Apply the tractor parking brake.
Wash the machine before assembling Tower Kit.
Question and Answer IconNeed help?

Do you have a question about the Jacto ARBUS 500 and is the answer not in the manual?

Summary

Arbus 500; Arbus 200 Tower Kit Installation

Preparation and Safety Precautions

Park sprayer on firm ground, apply brake, and wash machine before assembly.

Disassembly of Original Sprayer Components

Remove deflectors, nozzle branches, and fan guard screens from the sprayer as instructed.

Tower Kit Assembly Procedures

Connect branch hose to Tower Kit and install nozzle holders with seals onto the nozzle branch.

Mounting the Tower Kit to the Fan Housing

Use spacer bushings and mounting bolts to securely attach the Tower Kit to the sprayer's fan housing.

Final Connections and Verification

Connect the branch hose to the quick fitting and verify the machine with the Tower Kit installed.

Overview

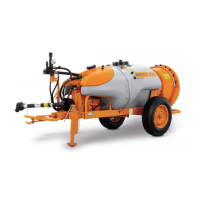
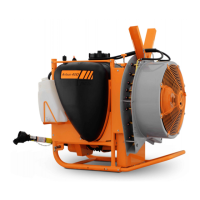
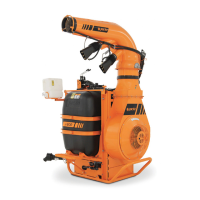
This document describes the assembly and installation of the Tower Kit for Jacto Arbus 500 and Arbus 200 airblast sprayers. The Tower Kit is an accessory designed to modify the sprayer's airblast distribution system, likely to improve spray coverage or adapt the sprayer for specific crop types or canopy structures.

Function Description:

The Tower Kit modifies the airblast sprayer by replacing the standard deflectors and nozzle branches with a vertical tower structure. This tower likely directs the air and spray upwards, allowing for better penetration into taller or denser canopies, such as those found in orchards or vineyards. The assembly process involves removing existing components and installing the new tower, which includes new nozzle holders and a redesigned air outlet.

Usage Features:

The installation process is designed to be performed by the user, following a step-by-step guide. It requires basic tools like a screwdriver and involves handling various components such as deflectors, nozzle branches, spacer bushings, and the main tower structure.

Before starting the assembly, it is crucial to:

  • Hitch the sprayer to a tractor.
  • Park the sprayer on firm, level ground, free of obstacles.
  • Apply the tractor's parking brake for safety.
  • Wash the machine thoroughly to ensure cleanliness during assembly.

The assembly steps are as follows:

  1. Locate Deflectors: Identify the left and right deflectors at the rear of the machine (marked as 'A' in the diagram).
  2. Remove Deflectors: Loosen the mounting bolts (marked as 'B') and remove both the right and left deflectors.
  3. Disconnect Hoses: Pull the clip and remove the quick-fitting clamp (marked as 'C'). Then, disconnect the hose from both the left and right branches.
  4. Remove Nozzle Branches: Loosen the nozzle branch mounting bolts (marked as 'D') and remove both the right and left branches.
  5. Disconnect Branch Hose: Use a screwdriver (marked as 'E') to loosen the hose clamp and disconnect the branch hose.
  6. Remove Fan Guard Screen: Loosen the mounting bolt for the spacer bushing (marked as 'F') and remove the deflector upper fastener (marked as 'G'). After removal, tighten the mounting bolt (F) for the spacer bushing.
  7. Remove Spacer Bushings: Loosen and remove the mounting bolts for the spacer bushings (marked as 'H').
  8. Remove Guard Screens: Remove the spacer bushings (marked as 'I') and guard screens from both the left and right sides.

Important Note: The removed spacer bushings (I) and deflector upper fastening (G) should be kept in a safe place for future use if the Tower Kit is ever removed. New spacer bushings are included with the Tower Kit for its installation.

Once the existing components are removed, the equipment will be ready for Tower Kit installation.

Tower Kit Assembly:

  1. Connect Branch Hose: Connect the branch hose to the Tower Kit (marked as 'J') and tighten the clamp with a screwdriver (marked as 'L').
  2. Install Nozzle Holders: The Tower Kit includes new nozzle holders and associated hardware. Install the nozzle holders with seals (1) onto the Tower Kit nozzle branch (2 and 3). This involves placing the nozzle holder seal (1) into the hole of the Tower Kit nozzle branch and then installing the nozzle holder (3).
  3. Install Spacer Bushings: Use the new spacer bushings included in the kit and install them onto the Tower Kit as shown in the picture.
  4. Install Tower Kit to Fan Housing: Align the spacer bushings on the Tower Kit with the holes on the fan housing and install the Tower Kit.
  5. Secure Tower Kit (Bottom): With the Tower Kit installed, insert mounting bolts into the spacer bushings (marked as 'M') and tighten them.
  6. Secure Tower Kit (Top): With both sides of the Tower Kit installed, locate the two upper mounting holes (marked as 'N' and 'O'). Insert mounting bolts and tighten them.
  7. Connect Branch Hose to Quick Fitting: Connect the branch hose to the quick fitting (on both right and left sides) and attach the quick fitting clamp (marked as 'P').

After these steps, the machine will have the Tower Kit fully installed, as shown in the provided images for both Arbus 500 and Arbus 200 models.

Maintenance Features:

The document implicitly suggests that components like nozzle holders and spacer bushings are replaceable, as new ones are provided with the kit. The instruction to keep removed parts for future use indicates a design that allows for the sprayer to be reverted to its original configuration if needed. Regular cleaning of the machine before assembly is also a good maintenance practice.

Important Technical Specifications (Implicit):

  • Compatibility: Specifically designed for Jacto Arbus 500 and Arbus 200 airblast sprayers.
  • Components: The kit includes new spacer bushings, nozzle holders, seals, mounting bolts, and the main tower structure.
  • Tools Required: Screwdriver.
  • Design: The Tower Kit is designed to be a direct replacement for existing deflectors and nozzle branches, indicating a modular design approach for the sprayer.

For further information, users are directed to consult Jacto Technical Assistance via a toll-free number (1-800-522-8610), email (info@jacto.com), or the company's home page (www.jacto.com).

Jacto ARBUS 500 Specifications

General IconGeneral
BrandJacto
ModelARBUS 500
CategoryPaint Sprayer
LanguageEnglish

Related product manuals