This document is the Instruction & User Manual for the JCB-E460P 457cc Petrol Engine. It provides comprehensive information for safe operation, maintenance, and troubleshooting of the engine.
Function Description
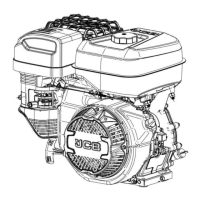
The JCB-E460P is a 457cc petrol engine designed as a replacement engine for various applications. It is intended to provide power for machinery, with its output controlled by adjusting engine speed via a throttle lever. The engine is started using a recoil starter grip and an ignition switch.
Important Technical Specifications
- Model: JCB-E460P
- Displacement: 457cc
- Power @3600rpm: 17.4 hp
- Emission Standard: eUV-2
- Bore x Stroke: 92x69
- Start Method: Recoil
- Fuel Tank Capacity: 6.5 L
- Low Oil Sensor: Yes
- Ignition System: CDI
- Dimensions (LxWxH): 480x420x460 mm
- Packaging Dimensions (LxWxH): 550x450x490 mm
Tightening Settings and Tolerances:
- Inlet Valve Clearance: 0.08–0.12 mm
- Exhaust Valve Clearance: 0.13–0.17 mm
- Big End Bolts: 19–21 Nm
- Valve Rocker Lock Nuts: 8–12 Nm
- Rocker Cover Plate: 8–12 Nm
- Crankcase Bolts: 26–30 Nm
- Carburettor Nuts: 9–11 Nm
- Governor arm Clamp bolt: 9–12 Nm
- Exhaust Manifold: 5–10 Nm
- Head Bolts: 45–50 Nm
- Flywheel Retention Nut: 100–120 Nm
- Sump Plug: 30–40 Nm
Recommended Spark Plugs: F7TC/F7TRC with a gap of 0.7–0.8 mm (0.026–0.031 inch).
Recommended Fuel Type: Standard grade E10 and E5 petrol.
Recommended Engine Oil Type: 4-stroke motor oil meeting or exceeding API service classification SJ, SL, or equivalent. SAE 15W-40 is generally recommended, with other viscosities suitable depending on ambient temperature.
Usage Features
The manual emphasizes safety throughout its usage instructions. Key usage features include:
- Pre-Operation Checks: Before starting, users must check the engine oil level and air filter. The oil level should be between the minimum and maximum marks on the dipstick, and the air filter should be clean and undamaged to prevent rapid engine wear.
- Fueling: Fueling should always be done outdoors in a well-ventilated area, using a funnel to prevent spills. The fuel tank should not be overfilled, leaving about 1/2 inch below the filler neck for expansion. The engine must be off and cool during fueling.
- Starting Procedure:
- Move the fuel valve lever to the ON position.
- For a cold engine, move the choke lever to the CLOSED position; for a warm engine, leave it OPEN.
- Move the throttle lever about 1/3 of the way towards the FAST position from SLOW.
- Turn the ignition switch to the ON position.
- Pull the recoil starter grip briskly until resistance is felt, then return it gently.
- As the engine warms up, gradually move the choke lever to the OPEN position if it was closed.
- Stopping Procedure:
- Move the throttle lever to the SLOW position.
- Turn the ignition switch to the OFF position.
- Turn the fuel valve lever to the OFF position.
- In an emergency, simply turn the ignition switch to the OFF position.
- Throttle Control: Engine output is adjusted by moving the throttle lever. Moving it towards FAST increases output, while moving it towards SLOW decreases output. Some models may have an automatically controlled throttle.
Maintenance Features
The manual provides a detailed maintenance schedule and instructions for various tasks to ensure safe, economical, and trouble-free operation, as well as to reduce air pollution.
Maintenance Schedule (whichever comes first):
- Each use: Check engine oil level, check air cleaner.
- Every 1st month or 20 Hrs: Change engine oil, clean air cleaner.
- Every 3rd month or 50 Hrs: Check/Adjust idle speed.
- Every 6th month or 100 Hrs: Check/Clean spark plug, clean spark arrester.
- Every year or 300 Hrs: Clean combustion chamber, check/adjust valve clearance, clean fuel tank and strainer.
- Every 2 years (replace if necessary): Fuel tube.
Specific Maintenance Procedures:
- Sediment Filter: Regularly clean the fuel sediment cup and O-ring. This involves moving the fuel valve to OFF, removing the cup and O-ring, washing them with non-flammable solvent, reinstalling, and checking for leaks.
- Spark Plug:
- Remove the spark plug cap.
- Loosen and remove the spark plug using a suitable wrench.
- Inspect for visible damage, oil/carbon fouling, or compromised washer health. Replace if necessary.
- Check the electrode gap with a feeler gauge (0.7–0.8 mm).
- Reinstall by hand to avoid cross-threading, then tighten with a spark plug wrench. New spark plugs require a 1/2 turn tight after the washer compresses, while re-used ones require 1/8 to 1/4 turn.
- Oil Servicing:
- Run the engine for a few minutes to warm the oil.
- Place a container below the engine.
- Remove the oil filler cap/dipstick, oil drain plug, and washer.
- Allow the oil to drain completely.
- Reinstall and securely tighten the drain plug and new washer.
- Fill with recommended oil to the upper limit mark on the dipstick.
- Dispose of used oil properly at a recycling center.
Long-Term Storage (Preventing Seizing):
For storage longer than 8 weeks:
- Remove and replace engine oil.
- Remove the spark plug and pour 15ml of fresh engine oil into the spark plug hole.
- Pull the starter grip several times to distribute the oil.
- Reinstall the spark plug.
- Pull the starter cord until resistance is felt to ensure valves are closed, preventing moisture buildup.
- Return the recoil grip gently.
The manual also includes troubleshooting guides for common issues like the engine not starting or lacking power, along with environmental protection guidelines for recycling and disposal of the machine, fuel, oil, and packaging.