5 - 2
Removal
!!
WARNING
Hydraulic Pressure
It is not possible to vent all residual pressure. Loosen the
connection one full turn and allow the pressure to
dissipate. Keep face and hands well clear of pressurised
hydraulic oil and wear protective glasses.
HYD 4-3
!!
WARNING
Make the machine safe before getting beneath it. Park
the machine on level ground. Make sure the engine is
stopped, the parking brake is engaged and the
transmission is in neutral. Disconnect the battery. Chock
all four wheels.
5-3-2-1
!!
WARNING
Lifting Equipment
You can be injured if you use faulty lifting equipment.
Make sure that lifting equipment is in good condition.
Make sure that lifting tackle complies with all local
regulations and is suitable for the job. Make sure that
lifting equipment is strong enough for the job.
INT-1-3-7
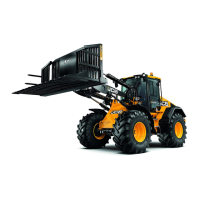
Ensure that all attachments are removed from the machine.
Sling the loader arm as shown in the diagram. Take the
weight of the arm on the lifting equipment. Let all hydraulic
pressure decay from the system or crack the pipe
connections. Disconnect all hydraulic lines to the loader arm
and Quickhitch. Plug and mark all hoses and pipes.
Disconnect the lift ram and compensating ram at A and B. To
do this remove the nut and bolt as shown in diagram X and,
using tool 993/68100, remove the pins. Allow the rams to rest
on the bodywork. Repeat pin removal at Y and Z at the rear
of the machine. The loader arm can now be manoeuvered
from the machine using the lifting tackle. Place the loader
arm on a clean dry surface.
The Quickhitch can be removed if necessary.
Replacement
Replacement is a reversal of the removal procedure. Grease
all pins and securing bolts with JCB Special MPL grease.
Shims are available in two thicknesses (2 mm and 3 mm)
and should be fitted as required on the left hand side of the
loader arm pivot to eliminate end float.
Reconnect all hoses and bleed the hydraulic system.
Section B
Body and Framework
9803/8500
Section B
5 - 2
Issue 2*
Loader Arm
*
*
*
167760A
YY ZZ