Do you have a question about the JJRC H827 and is the answer not in the manual?
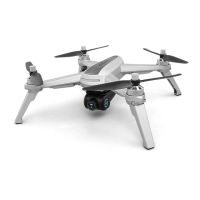
This document provides comprehensive instructions for operating and maintaining the H827 Drone, a high-precision device designed for users aged 14 and above. It covers everything from initial setup and pairing to advanced flight functions and special effects, ensuring a safe and enjoyable user experience.
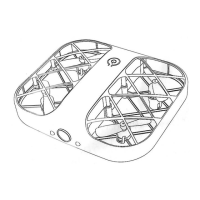
The H827 Drone is controlled via a mobile application and a physical transmitter. To begin, users must install the mobile client by scanning the provided QR code for either iOS or Android devices. Once installed, the drone can be added by powering it on and connecting to its Wi-Fi hotspot, which typically follows the format "KY/HD/Du/******". The mobile app's main interface (Figure 1) includes sections for SETTING, FAQ, and START, providing a user-friendly entry point for operation. The app also displays the various functions of each button, as shown in Figure 2, guiding users through the drone's capabilities.
One of the key features of the H827 Drone is its gesture recognition capability, which allows for hands-free photo and video capture. To activate gesture photo mode, users need to open the icon on the playback interface and select the gesture recognition function. Standing approximately 2 meters in front of the drone's lens, raising one palm flat with the palm forward on the side of the body will initiate a 3-second countdown, after which the drone takes a picture (Figures 4 and 5). It's important to note that there should be a time difference of more than 3 seconds between consecutive identifications, and some models may not support this function, as it could cause picture delay. For gesture video, the user clenches a fist (palm forward) and holds it flat on the side of the body, again about 2 meters from the camera. After recognition, the drone starts recording after a 3-second countdown. Recognizing the fist gesture again during the video will end the recording (Figures 6 and 7). Palm detection is not active during video recording.
The drone also offers several creative features through its mobile app. Music recording allows users to click an icon to enter a music library, select background music, and then return to the control interface with the chosen music playing. Manual focusing is another advanced feature; by pressing and holding the trackball on the leftmost side of the control interface, users can slide to adjust the image focal length, ranging from 1x (default size, focus adjustment off) to 50x digital magnification. During recording, this key can be slid up and down to adjust the focal length. Special effects and filters can be accessed by clicking an icon on the control interface, which then displays various filter options. After selecting a filter, users can click again to exit the filter option and return to the main control interface. It's crucial to remember that only one mobile app can connect to the aircraft at a time.
The physical transmitter, detailed in Section 6.0, provides tactile control over the drone. It features a Power Switch, Left and Right Joysticks, and dedicated buttons for Speed Switch/Circle Fly (long press), One Key Start/Landing, High-Speed Rotation/Headless Mode (long press), and 360° Flip. The transmitter is powered by three AAA batteries (not included), which are installed by opening the battery cover and ensuring correct positive and negative polarity.
The drone's battery installation is straightforward: the battery is pushed into the compartment until it is jammed in place. Removal involves pressing a buckle and pulling the battery back. A firm battery installation is critical for flight safety, as a loose battery can lead to power-cut crashes.
Charging the drone battery is done via a USB charging cable connected to a USB adapter (5V/0.5-2.0A), power bank, or computer USB port. When the drone battery is low, indicator lights blink, and the transmitter beeps continuously, prompting an automatic landing after about 30 seconds. The charging indicator light is red during charging and turns green when fully charged, with an approximate charging time of 50 minutes.
Operation guide (MODE 2, default setting) begins with pairing. Long pressing the drone's Power Switch makes its indicator light flash. The drone should then be placed on a flat, level surface with its head facing forward. Short pressing the transmitter's Power Switch turns it on. Pushing the left joystick up then down pairs the drone, indicated by solid lights on both the drone and transmitter.
Calibrating the gyro is essential for stable flight. This is done by simultaneously pushing both the left and right joysticks to the bottom-left corner. The drone's indicator lights will change from flashing to solid, confirming calibration. It's recommended to calibrate after pairing and after any crash.
Auto takeoff offers two methods. Method 1 involves pressing the One Key Start/Landing button after pairing/calibration, which starts the propellers. Then, pushing the left joystick up takes off the drone, allowing joystick control. Method 2 involves picking up the paired drone, laying it flat on your palm, and gently tossing it into the air for takeoff. For landing, simply press the One Key Start/Landing button during flight, and the drone will land automatically.
The drone features three speed modes (Low, Medium, High), switchable by short pressing the Speed Switch button. A "Di" tone indicates Low Speed (default), "DiDi" for Medium, and "DiDiDi" for High. An Emergency Stop function, activated by simultaneously pressing the Speed Switch and High-Speed Rotation buttons, immediately stops the motors. This should only be used in emergencies to prevent damage or injury, as falls from a height or high-speed impacts can damage the drone.
Trimmer function, accessed by pressing the left joystick, allows for flight adjustments. If the drone drifts forward, pushing the direction joystick down re-balances it; pushing up re-balances for backward drift. Similarly, pushing the direction joystick right re-balances for left drift, and pushing left re-balances for right drift.
High-Speed Rotation is initiated by a short press of the High-Speed Rotation button, causing the transmitter to emit a "Di" sound. The drone will automatically exit this function after 5 seconds, or it can be stopped by pushing the direction joystick in any direction. Circle Fly is activated by a long press of the Circle Fly button, with a "Di" sound from the transmitter. The drone will exit this function automatically after 15 seconds, or by pushing the direction joystick.
For advanced maneuvers, the H827 Drone supports 360° Flips. Once familiar with the drone's functions, and flying at least 6 feet high, a short press of the right joystick enters 360° Flip mode. Pushing the right joystick Forward/Backward or Left/Right will make the drone flip in the corresponding direction. This function performs best with a fully charged battery.
Headless Mode is a crucial feature for new pilots. It's important to familiarize oneself with this mode to avoid losing the drone. After pairing/calibration, a long press of the Headless Mode button on the transmitter activates it, causing the drone's indicator lights to flash continuously and the transmitter to beep. A second long press exits Headless Mode, with a beep and solid indicator lights. In Headless Mode, the forward direction is relative to the drone's orientation at takeoff. To maintain clear direction, the pilot should stay facing the same direction as the drone's head at takeoff. This way, pushing the direction joystick forward makes the drone fly forward, backward makes it fly towards the pilot, and left/right moves it left/right relative to the pilot.
Maintenance is key to the drone's longevity. After each use, the product should be cleaned with a soft cloth. Prolonged exposure to direct sunlight and heat buildup on the drone or batteries should be avoided. The device is not waterproof and must not be submerged or exposed to water, as this will cause permanent damage. Regular checks of the charging plug and other accessories for damage are recommended, and any damaged parts should be serviced before further use or charging.
Regarding battery use, ensure batteries are fitted correctly to avoid short circuits, fire, or explosion. Do not mix new and old batteries. Dispose of used batteries responsibly. Never expose dead batteries to heat or fire. If the device is unused for extended periods, remove batteries to prevent leakage. Only use the provided USB charging cable. Do not connect the battery directly to wall outlets or car cigarette lighters. Do not disassemble or modify the battery. Discontinue use if the battery emits odor, generates heat, or shows discoloration/deformation. Charge batteries on a fireproof surface, away from combustible materials. Keep batteries out of reach of children or pets, and avoid short-circuiting terminals. Lithium-polymer batteries must be disposed of according to local environmental regulations.
The drone and transmitter batteries must be inserted with correct polarity, and supply terminals must not be short-circuited. Regular examination of the transformer or battery charger for damage is necessary, and damaged parts should not be used until repaired. The packaging contains important information and should be kept. The toy is a Class II device. The EU RF Power (EIRP) is <10 dBm (2413MHz ~ 2461 MHz).
| Brand | JJRC |
|---|---|
| Model | H827 |
| Type | Quadcopter |
| Weight | 25g |
| Battery Type | LiPo |
| Category | Drones |
| Dimensions | 9 x 8 x 3cm |
| Control Range | 50m |
| Control Distance | Approx. 100 meters |
| Functions | Headless Mode, One Key Return |