Do you have a question about the JJRC HERON and is the answer not in the manual?
Drone is a hobby-grade model requiring proper assembly and operation. Prioritize safety and fly responsibly.
Fly in safe conditions, maintain distance from drone, avoid heat sources, and respect environmental rules.
Return to Home function requires specific GPS conditions (mode and satellite count) to operate.
Choose spacious, barrier-free areas indoors and sunny, windless weather outdoors. Keep drone in sight.
Check drone and controller charge, propeller condition, and surrounding conditions before flight.
Overview of the drone's frequency, camera, and main functions like GPS, headless mode, and APP control.
Lists and identifies included accessories such as the drone, remote control, screws, and manuals.
Step-by-step guide on how to unfold the drone's arms before flight.
Instructions on how to correctly install or replace drone propellers to ensure proper flight.
Instructions on how to charge the drone's battery using a USB cable and adapter.
Guide on opening the battery compartment and inserting AA batteries into the remote control.
Covers battery risks, proper charging, storage, adapter specifications, and recycling guidelines.
Identifies and describes the buttons, joysticks, and display functions on the remote control.
Details specific functions of buttons like turning on, GPS switching, and emergency stop.
Explains how to use the joysticks for ascending, descending, rotating, and directional movement.
Instructions for achieving hover stability and operating the drone in headless mode.
Explains how to activate Return to Home, its conditions (out of range, low battery), and potential errors.
Step-by-step process for connecting the drone and remote control, including indicator light status.
Guide on manually calibrating the drone's compass for accurate flight, especially after interference.
Instructions on calibrating the drone's gyroscope for stable flight before each use.
Process for the drone to acquire GPS signals, indicated by lights and sounds.
Steps to unlock motors, take off, and land the drone safely.
Describes pairing the drone and remote for indoor flight, including mode switching.
Covers unlocking motors, takeoff/landing, and gyroscope calibration for indoor flight.
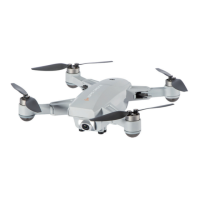
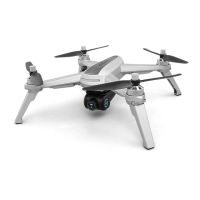
The HERON GPS Brushless Drone with 2.7K HD Camera is a sophisticated aerial device designed for both novice and experienced pilots aged 14 and above. This drone operates on a 2.4GHz frequency, allowing multiple users to fly similar models simultaneously without interference. It is equipped with a 5GHz Wi-Fi FHD 120° wide-angle camera, capable of capturing high-definition photos and videos.
The HERON drone offers a comprehensive suite of flight functions, including basic maneuvers such as flying forward, backward, leftward, rightward, and turning left or right. It features an altitude hold function, which helps maintain a stable height during flight, and an optical flow system for enhanced stability, particularly in indoor environments. For ease of use, it includes a headless mode, eliminating the need to orient the drone relative to the pilot.
Advanced features include one-key calibration of the compass (geomagnetic calibration) and a GPS return-to-home function, which automatically brings the drone back to its takeoff point. The drone also supports gesture control for photo and video recording, adding a layer of convenience for capturing moments. It offers different flight modes, including a beginner mode for new pilots and a GPS mode for outdoor flights, ensuring a tailored experience for various skill levels and environments.
Additional functionalities can be accessed via a mobile application, such as custom flight paths, circling flight, and a "follow me" mode, which allows the drone to automatically track a designated subject. An emergency stop function is also integrated for safety.
Pre-Flight Preparation: Before each flight, it is crucial to ensure the drone and remote controller are fully charged. The propellers must be correctly installed and in good condition, and their functionality should be checked after startup. The surrounding environment should be ideal for safe flight, free from barriers, crowds, or pets indoors, and sunny, windless, or breezy outdoors. Avoid flying in extreme conditions like excessive heat, cold, strong winds, or heavy rain. When flying indoors in optical flow mode, the GPS switch should be turned off. The optical flow fixed-point distance is 5-6 meters, and selecting the correct mode for different locations is recommended.
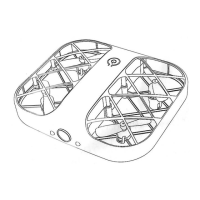
Assembly: The drone's crankshafts are foldable for portability. To unfold, first extend the rear crankshafts, then the front crankshafts near the camera. Reverse these steps to fold them. Propeller installation and replacement require careful attention to the A and B markings on each propeller and corresponding arms to ensure correct orientation, preventing takeoff issues.
Charging: The drone's battery is charged using a USB charging cable connected to a USB charging port or electric adapter. A full charge takes approximately 200 minutes and provides roughly 25 minutes of flight time. The red light flashes and the green light glows constantly when charging, while a solid red light indicates a full charge. The remote control requires three AA batteries (not included), which are inserted into the battery compartment after opening it with a Philips screwdriver, ensuring correct polarity.
Remote Control Operation: The remote control features a display that shows GPS signal strength, flight mode, speed, height, and horizontal distance. Indicator lights on the transmitter provide information on headless mode, return-to-home status, satellite search, and pairing. The left joystick controls ascend/descend and counter-clockwise/clockwise rotation, while the right joystick manages forward/backward and left/right flight.
Takeoff and Landing: To unlock motors, pull both joysticks down-out. For takeoff, slowly push up the throttle joystick. For landing, pull the throttle joystick down until the drone lands, keeping it in the lowest position for 3-5 seconds to stop the motors.
Battery Care: Users must be aware of the risks associated with battery usage, including fire, injury, or property loss. Avoid contact with electrolyte if leakage occurs. Immediately remove the plug if any peculiar smell, noise, or smog is detected. Store batteries between 0°C and 40°C, away from direct sunlight or high temperatures. Remove batteries from the drone if not used for extended periods.
Charging Safety: Use a standard 5V output USB adapter for charging. Do not charge swollen or worn-out batteries, and avoid overcharging. Unplug the charger once the battery is full. Charge batteries away from flammable materials like carpets or wood, and electro-conductive surfaces. Always monitor the battery during charging and ensure it has cooled down before recharging.
Battery Recycling: Dispose of batteries according to local garbage disposal methods and special requirements, rather than as daily rubbish.
Propeller Maintenance: Replace damaged propellers immediately. When installing or dismantling propellers, avoid exerting excessive force to prevent distortion. Propellers are not interchangeable; ensure A and B propellers are matched to their respective arms.
Troubleshooting: The manual provides a comprehensive FAQ section to address common issues such as the remote control beeping (low battery), loss of control (out of range or damaged remote), inability to raise the drone (beginner mode, electronic fence, or low battery), quick falls (motor damage), crashes and veering (wrong propeller installation or motor damage), inability to find drone Wi-Fi (mobile phone incompatibility or unsupported channels), and flickering lights after startup (geomagnetism calibration needed or non-horizontal position).
Warranty and Support: The product comes with a 90-day spare parts warranty. For further assistance or to obtain free extra parts, users can contact customer support via the provided email address.
| Brand | JJRC |
|---|---|
| Model | HERON |
| Category | Drones |
| Type | Quadcopter |
| Charging Time | 120 minutes |
| Battery | 3.7V LiPo |
| Functions | Headless Mode, One Key Takeoff/Landing |
| Control Distance | About 100m |