5
Notes:
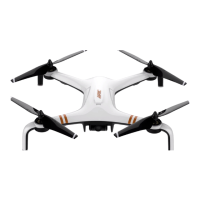
4.Propeller Installation, Replacement
Please replace with new propellers if there’s propeller damaged due to crashes or collisions. Each
propeller is marked with A or B. Please match the marks with A and A and B and B while installing,
otherwise the drone may not takeoff, or get flip/crash on takeoff.
1.Battery Charging for Drone
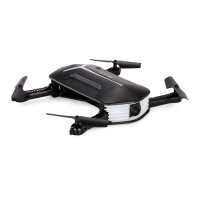
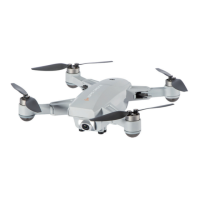
3.Unfolding the Crankshafts
CHARGING FOR DRONE
Notes:
1.The drone should be charged in advance before in first fly. When the battery is not full, the red
light flashes and the green light glows constantly;When the battery is full, the red light stops
flashing and turns to solid.Charging time for each battery is 200 minutes, a fully charged battery
will last for roughly 25 minutes.
2.The power source of the charger shall meet the charging requirements. See the notes for battery
charging on page 7 for details.
Unfold the crankshafts in the following order:
①Unfold the rear crankshafts.
②Then unfold the front crankshafts (near the camera). And follow steps in reverse order to fold the
crankshafts.
①Unscrew the propellers
which need to be replaced.
②Install propeller A/B to
corresponding arms with mark
A/B, and tighten the screws.
B
B
Camera
Unfolded Crankshafts
A.Take the battery out from the
bottom of the drone.
B.Connect one end of the USB charging
cable to the battery, connect the other
end to the USB charging port or
electric adapter for charging.
A
AB
B
A corresponds to A
B corresponds to B
Front
When installing or dismantling the propeller, please do not exert force on the propeller to avoid
distortion.
Propellers vary from one to another!
① ①
② ②
Email: nostech1@hotmail.com
 Loading...