XM Wheeled Dry Chemical Fire Extinguisher
Operation and Maintenance Manual
(Part No. S-50651)
2023-AUG-30 REV. 02 PAGE 17
SERVICE AND REPAIR
SERVICE AND REPAIR
The best assurance against re extinguisher malfunction is proper operation, recharge, inspection, and maintenance. To remedy, as
quickly as possible, any disorder that may occur, the following tables list some of the probable irregularities that may develop and gives
suggestions for corrective action.
Service and Repair: to remedy any disorder detected through periodic inspection or maintenance examinations:
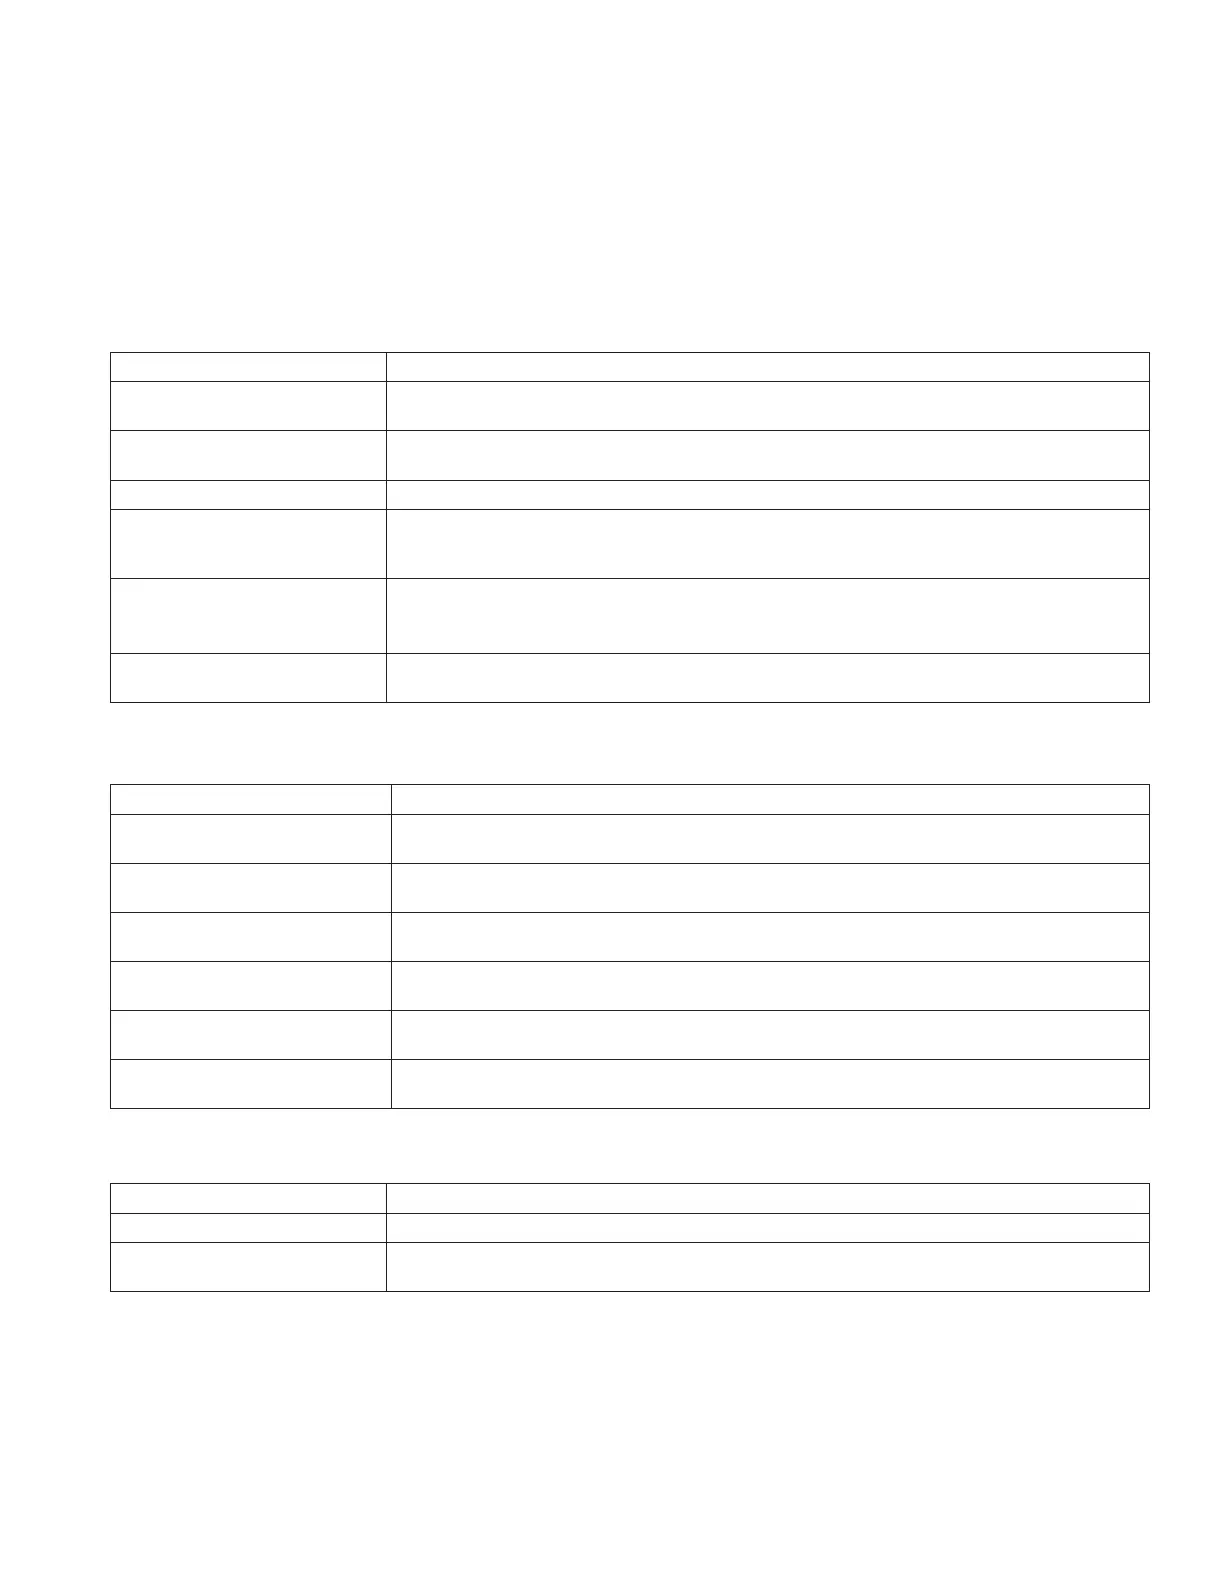
Table 6: Extinguishing agent tank service and repair instructions
Disorder Corrective Action
Dents* or abrasions Hydrostatically test and renish (clean damaged area and repaint, using a primer and nish
coat), or replace tank.
Rust spots, pits and corrosion
deposits
Clean corroded areas with a wire brush, replacing the tank if there is any corrosion penetration;
or repaint, using a primer and nish coat.
Paint peeling Remove loose paint with a wire brush and repaint using a primer and nish coat.
Fill opening threads nicked,
cross-threaded, corroded, or
worn
Clean threads with a stiff bristle brush. Small nicks,
burrs, and rough or feathered edges may be eliminated by careful retapping or ling. If damaged
or worn extensively, the tank should be replaced
Fill opening gasket seating
surface nicked, gouged,
corroded, or bearing dirt deposits
Clean seating surface with a mild abrasive, and lubricate cleaned surface lightly with a good
grade of silicone grease. If surface is sharply nicked or deeply gouged, replace tank.
Seam welds evidencing
discoloration or pin holes
Replace tank or consult product services, Johnson Controls, Marinette, WI 54143-2542.
Table 7: Fill cap service and repair instructions
Disorder Corrective Action
Abraded, cracked, corroded, or
otherwise damaged ll cap
Replace, destroying affected cap to prevent reuse.
Obstructed ll cap Pressure Vent
Hole
Clear vent hole with a stiff unbreakable wire probe of lesser diameter than vent hole.
Threads corroded, nicked,
cross-threaded, or worn
Replace, destroying affected cap to prevent reuse.
Cut, checked deformed, stiff,
brittle, or worn gasket
Replace, coating clean, new gasket lightly with a good grade of silicone grease.
Indicator stem immovable or
operating stiffly
Disassemble and clean, or replace
Plastic indicator housing cracked
or missing
Replace plastic cap
Table 8: Extinguishing agent service and repair instructions
Disorder Corrective Action
Improper ll level Fill tank to rated capacity with extinguishing agent specied on the nameplate(s) only.
**Caked dry chemical Discard agent and rell tank to rated capacity with extinguishing agent specied on nameplate(s)
only.
* Refer to Compressed Gas Association (CGA) Pamphlet C-6.
** The term ‘‘caked’’ applied to dry chemical describes a specific condition that is best identified as dry chemical containing hard lumps. These lumps will render a
dry chemical extinguisher inoperative. The condition usually follows the absorption and later evaporation of an unusual amount of moisture. It is often confused
with ‘‘packing’’ (a condition produced by normal settling, vibration, or impact). A simple procedure to determine which condition exists is the UL test in which
lumps are dropped from 4 in. (102 mm) onto a clean hard surface. If the lumps do not break up into individual particles, caking is present. For additional details,
refer to ANSUL® Technical Bulletin Caking Versus Packing of Dry Chemical Agents (Form No. F-8083, latest revision).
 Loading...