EasyManua.ls Logo

Johnson Hardware 100SD Series User Manual

Default Icon
4 pages
To Next Page IconTo Next Page
Page #1 background imageLoading...
Page #1 background image
SLIDING DOOR
INSTALLATION INSTRUCTIONS
100SD SERIES
FOR 1-3/8” [35mm], 1-3/4” [44mm] or
2-1/4” DOORS WEIGHING UP TO
200LBS. [91kg.] EACH
IN100BYP
L.E. JOHNSON PRODUCTS INC. 2100 STERLING AVENUE, ELKHART, IN 46516 USA
tel. +1 (574) 293-5664 | info@johnsonhardware.com | http://www.johnsonhardware.com
Page 1 of 4
PREPARE OPENING CAREFULLY: MAKE SURE CORNERS ARE SQUARE, HEADER IS LEVEL AND JAMBS ARE STRAIGHT.
PREPARE LA ABERTURA CON CUIDADO: ASEGÚRESE QUE LAS ESQUINAS ESTÉN EN ESCUDRA, QUE LA CABECERA ESTÉ NIVELADA, Y
QUE LAS JAMBAS ESTÉN RECTAS.
PREPAREZ L’OUVERTURE AVEC PRECAUTION : ASSUREZ VOUS QUE LES COIN SONT A ANGLE DROIT, QUE LE LINTEAU EST A NIVEAU
ET QUE LES MONTANTS SONT DROITS.
100
1125
1155
101
2155
1712
30
4 x DOOR WIDTH -2
4 x ANCHO DE LA PUERTA 50mm
4 x LARGEUR DE PORTE 50mm
4 DOOR, PUERTAS, PORTES
3 DOOR, PUERTAS, PORTES
3 x DOOR WIDTH -2”
3 x ANCHO DE LA PUERTA 50mm
3 x LARGEUR DE PORTE 50mm
2 DOOR, PUERTAS, PORTES
2 x DOOR WIDTH -1”
2 x ANCHO DE LA PUERTA 25mm
2 x LARGEUR DE PORTE 25mm
Question and Answer IconNeed help?

Do you have a question about the Johnson Hardware 100SD Series and is the answer not in the manual?

Johnson Hardware 100SD Series Specifications

General IconGeneral
Product TypeSliding Door Hardware
Series100SD
CategoryDoor
FinishZinc Chromate Plated Steel Frame
Track MaterialAluminum
Frame MaterialSteel
MaterialSteel
TypeSliding Door Hardware
Door Thickness1-3/4 inches
ApplicationResidential, Commercial
ThicknessNot Applicable
WidthNot Applicable
HeightNot Applicable
Fire RatingNot Fire Rated
CoreNot Applicable

Summary

Sliding Door Installation Overview

Mount Track and Door Components

Mount Track to Header

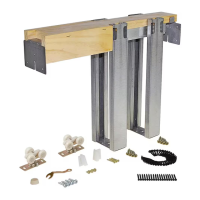
Mount the track to the header using 1-1/4" pan head screws after cutting to size.

Mount Hanger Plates to Door

Attach door plates to the top of the door, 50mm from each edge on the center line.

Drill Holes and Install Pulls

Bore 54mm holes for standard pulls and snap them into place.

Install and Adjust Doors

Hang Doors

Slide pivot pins into sockets on the first track leg and lock with clip.

Attach Door Guide

Place guides between doors, ensuring free movement, and secure to floor.

Adjust Hangers

Adjust hangers as necessary to ensure doors are plumb with the jamb.

Install 2155 Stop

Attach 2155 Stop on rear of front door from jamb edge and top/bottom.

Configure Stops for Multiple Doors

Install 1155 Stops for 3 and 4 Doors

Attach 1155 Stops on the rear track for center or middle door placement.

Related product manuals