EasyManua.ls Logo

Johnson 40-6601 - User Manual

Johnson 40-6601
20 pages
Print Icon
To Next Page IconTo Next Page
Loading...
©2018 Johnson Level & Tool - Rev. 1 1
Self-Leveling Cross-Line Laser
Model Nos. 40-6601, 40-6603, 40-6605
Instruction Manual
Congratulations on your choice of this Self-Leveling Cross-Line Laser. We
suggest you read this instruction manual thoroughly before using the
instrument and save this instruction manual for future use.
This is a Class II laser tool and is manufactured to comply with CRF 21,
parts 1040.10 and 1040.11 as well as international safety rule IEC 285.
2891i-3English_Manuals 6/4/18 10:26 AM Page 1
Question and Answer IconNeed help?

Do you have a question about the Johnson 40-6601 and is the answer not in the manual?

Summary

Features and Functions

Safety Instructions

Laser Hazard Warning (635 nm)

Class II laser product warnings for 635nm wavelength models.

Laser Hazard Warning (520 nm)

Class II laser product warnings for 520nm wavelength models.

Location of Parts and Components

Operating Instructions

Battery Installation

Step-by-step guide for installing batteries in the laser tool.

Self-Leveling Mode Operation

Instructions for using the laser tool in its automatic self-leveling mode.

Tilt (Manual Level) Mode Operation

Instructions for using the laser tool in manual tilt or angle mode.

Checking Accuracy

Troubleshooting Guide

Technical Specifications

Overview

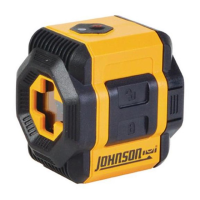
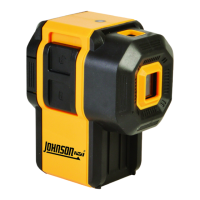
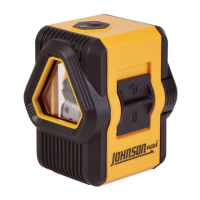
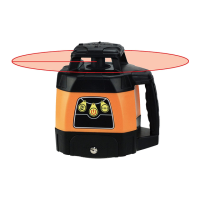
The Johnson Self-Leveling Cross-Line Laser, models 40-6601, 40-6603, and 40-6605, is a Class II laser tool designed for various leveling and alignment tasks. It is manufactured to comply with CRF 21, parts 1040.10 and 1040.11, as well as international safety rule IEC 285.

Function Description:

This self-leveling cross-line laser simultaneously projects two laser beams: one horizontally (level) and one vertically (plumb). This dual projection allows for precise alignment in both planes. The tool incorporates a magnetically dampened compensator system, which quickly and accurately stabilizes the pendulum, ensuring the laser remains level even in environments with nearby jobsite vibration. A status light provides visual feedback, alerting the user when the tool is beyond its leveling range. For protection during transportation, a locking mechanism secures the pendulum. The laser also features a tilt mode, which enables the projection of lines at any desired angle, making it suitable for tasks such as plotting lines for stairs or railings. For enhanced stability and accuracy in tilt mode, the tool is equipped with a 1/4"-20 tripod thread, compatible with most common tripods.

Important Technical Specifications:

  • Laser Wavelength:
    • 635 nm (for models 40-6603 & 40-6605)
    • 520 nm (for model 40-6601)
  • Laser Classification: Class II
  • Maximum Power Output: ≤1mW
  • Self-Leveling Range: ±4°
  • Laser Accuracy: ±3/16″/30′
  • Measuring Range: 0' - 30′
  • Power Supply: 2 “AA” alkaline batteries (included)
  • Battery Life (reported with all beams enabled, tested with lithium AA/Alkaline AA):
    • 36 hours/20 hours (for models 40-6603 & 40-6605)
    • 16 hours/9 hours (for model 40-6601)
  • Operating Temperature Range: 32°F - 104°F
  • Storage Temperature Range: 0°F - 120°F
  • Dimensions: 3" x 3" x 2.37"
  • Weight: 0.53 lbs
  • Tripod Thread: 1/4" - 20
  • IP Rating: IP 50

Usage Features:

Battery Installation:

To install batteries, first ensure the locking compensator/power switch is in the locked position. Remove the battery cover by pressing the release tabs on the left and right sides and pulling it straight out. Insert two “AA” batteries, observing the correct polarity indicated inside the compartment. Replace the battery cover by pressing in the release tabs as it's inserted. Only alkaline batteries should be used. For extended storage (over 3 months), batteries should be removed to prevent deterioration.

Self-Leveling Mode:

To power on in self-leveling mode, slide the locking compensator up to the unlocked position. The status light will illuminate, and the unit will emit two laser beams. The self-leveling feature requires the instrument to be within ±4° of level. If the tool is outside this range, the laser will flash, and the status light will turn red. Once adjusted within the 4° range, the laser will self-level, the status light will turn green, and the laser light will become solid. To power off, slide the locking compensator down to the locked position.

Tilt (Manual Level) Mode:

For projecting laser beams at any angle, such as for stairs or railings, use the tilt mode. This mode is best utilized when the tool is mounted on a tripod. With the locking compensator in the locked position, press the tilt mode button to power on the unit. The status light will illuminate in red, indicating that the tool is not self-leveling. Two perpendicular laser beams will be emitted, but they will not self-level. Press the tilt mode button again to power off.

Increasing Beam Visibility:

In bright conditions or when working near windows or outside walls, beam visibility can be enhanced by working towards the laser, using a freestanding target (sold separately), and wearing laser glasses (sold separately). It's crucial to remember that laser glasses only enhance visibility and should never be used to stare into the beam or as safety glasses, as eye damage may result.

Application Examples:

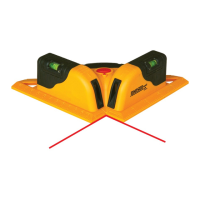
The Johnson Self-Leveling Cross-Line Laser is a versatile tool suitable for numerous applications, including:

  • Plumb layout of studs.
  • Level layout of chair rails, wainscoting, and baseboards.
  • Installing photographs plumb or level.
  • Plumb layout of wallpaper, pinstriping, plumbing, and electrical conduit.
  • As a level reference for setting the slope of drainage piping.
  • In tilt mode, for laying out railings, photographs, and other wall art at any angle.
  • Setting tile or other flooring on walls and floors.
  • Installing partitions, windows, or doorways.
  • Fixing cabinetry.
  • As a measuring reference for checking spacing or the angle of objects.

Maintenance Features:

Care and Handling:

This is a precision tool and must be handled with care. Avoid exposing the unit to shock vibrations and extreme temperatures. Always remove batteries when storing the instrument for extended periods (more than 3 months) to prevent damage from battery deterioration. Keep the unit dry and clean, especially the laser output window, by removing any moisture or dirt with a soft, dry cloth. Do not use harsh chemicals, strong detergents, or cleaning solvents.

Checking Accuracy:

It is the user's responsibility to verify the calibration of the instrument before each use.

  • Plumb Accuracy Check: Can be done by projecting the beam on a flat wall and using a plumb bob, or more accurately by following a detailed procedure involving marking points on the floor and a doorway at specific distances. The tool is properly calibrated if the measured distance between two points on the doorway is less than 1/8" for a 10′ high doorway.
  • Horizontal Line Transverse Accuracy Check: This checks the accuracy of the horizontal laser beam from left to right. It involves setting the instrument on a tripod, marking points on a wall at specific distances, rotating the instrument, and measuring the distance 'e'. The tool is properly calibrated if 'e' is less than 3/16".
  • Horizontal Pitch Accuracy Check: This verifies the accuracy of the laser between the tool and the wall, ensuring the horizontal beam is level. The procedure involves setting up two survey-staffs or walls, marking cross dots at different positions, rotating the instrument, and calculating the vertical distance 'e'. The tool is properly calibrated if 'e' is less than 3/16" at 15′.

Troubleshooting Guide:

  • Will not turn on: Check for missing or depleted batteries, or incorrect battery polarity. Solution: Change batteries, check polarity.
  • Turns off after a short time: Batteries may be depleted. Solution: Change batteries.
  • Laser light is dim: Batteries may be depleted. Solution: Change batteries.
  • Laser light is blinking: The laser is out of its self-leveling range. Solution: Position the laser within 4° of level.
  • Laser will not self-level: The laser is out of its self-leveling range or the compensator is locked. Solution: Position the laser within 4° of level, or unlock the compensator (operating with the compensator locked is for tilt/manual level mode).

Johnson 40-6601 Specifications

General IconGeneral
BrandJohnson
Model40-6601
CategoryLaser Level
LanguageEnglish

Related product manuals