EasyManua.ls Logo

JONATHAN Y JYL6117A - User Manual

Default Icon
2 pages
Print Icon
To Next Page IconTo Next Page
Loading...
WARNING
INSPECT ITEM CAREFULLY BEFORE ATTEMPTING TO INSTALL. IF THERE IS ANY DAMAGE OR
OBVIOUS DEFECT, DO NOT INSTALL. ITEM MAY NOT BE RETURNED ONCE IT HAS BEEN
INSTALLED.
CARE AND MAINTENANCE
Model# JYL6117A
Product Dimensions: 21"Lx10.875"Wx 58.5"H
Unplug lamps before using any cleaning solutions. Dust shades with a feather duster or with an appropriate
vacuum-brush attachment. Wipe with a soft, dry cloth and clean lamp bases with the methods appropriate to
the material. Avoid the use of chemicals and household cleaners as they may damage the finish.
NOTICE& IMPORTANT SAFETY INSTRUCTIONS
* Please make sure that you have all parts indicated before you begin assembly of this item
* This item should be assembled on a soft surface to prevent scratching the finish during assembly
* To reduce the risk of fire, electrical shock or injury to persons or property, please follow the guideline below
for safe use and installation
*The external flexible cable or cord of this lamp cannot be replaced;
If the cord is damaged, the lamp shall be destroyed
**This portable lamp has a polarized plug (one blade is wider than the other) as a safety feature to reduce
the risk of electric shock. this plug will fit in a polarized outlet only one way. if the plug does not fit fully in
the outlet, reverse the plug, if it still does not fit, contact a qualified electrician. Never use with an extension
cord unless the plug can be fully inserted. do not attempt to disregard this safety feature.
Part List and Hardware List
PIECE DESCRIPTION PICTURE QUANTITY PIECE DESCRIPTION PICTURE QUANTITY
A Lamp body 1X
D Tooth washer 1X
E Hexagon nut 1X
B Finial 1X F Bulb 1X
C Lamp base G Wrench 1X
1/2
Question and Answer IconNeed help?

Do you have a question about the JONATHAN Y JYL6117A and is the answer not in the manual?

Summary

General Warnings and Care

Warning

Inspect item carefully before installation. Do not install if damaged. Item cannot be returned if installed.

Care and Maintenance

Unplug lamps before cleaning. Dust shades with a feather duster. Wipe with soft, dry cloth. Avoid chemicals.

Important Safety Instructions

Ensure all parts are present before assembly. Assemble on a soft surface. Follow guidelines for safe use and installation.

Polarized Plug Safety

Portable lamp has a polarized plug for electric shock risk reduction. Fits polarized outlet one way.

Part List and Hardware

Assembly Instructions

Preparation

Ensure all parts are present before assembly. Compare parts with contents list. Do not attempt assembly if parts are missing or damaged.

Step 1: Assembly Steps

Align parts, do not rotate lamp body too hard. Screw finial, lamp body sections, lamp base, tooth washer, and hexagon nut.

Step 2: Bulb Installation

Insert the bulb (F) into the lamp body (A).

Step 3: Stability Check

Place the light on a level surface to check if everything is stable.

Overview

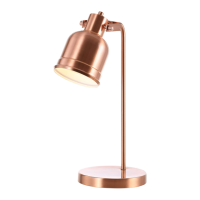
This document outlines the assembly, usage, and maintenance of a floor lamp.

Function Description

The device is a floor lamp designed to provide illumination. It utilizes a specific type of bulb and is intended for indoor use. The lamp features a polarized plug as a safety measure to reduce the risk of electric shock, ensuring it fits into a polarized outlet in only one orientation. If the plug does not fit fully, it should be reversed. If it still does not fit, a qualified electrician should be contacted. The lamp should never be used with an extension cord unless the plug can be fully inserted, and users are advised not to disregard this safety feature. The external flexible cable or cord of this lamp cannot be replaced; if the cord is damaged, the lamp must be destroyed.

Usage Features

Before beginning assembly, users must ensure all parts are present and compare them with the package contents and hardware lists. If any part is missing or damaged, assembly should not be attempted. The estimated assembly time is 15 minutes.

The assembly process involves several steps:

  1. Preparation: All parts should be aligned before assembly. Users are cautioned not to rotate the lamp body too hard to avoid breaking the base screw.
  2. Connecting Components:
    • Screw the Finial (B) onto the top part of the Lamp body (A1).
    • Screw the Lamp body (A2) onto the Lamp body (A1).
    • Screw the Lamp body (A3) onto the Lamp body (A2).
    • Screw the Lamp body (A4) onto the Lamp body (A3).
    • Screw the Lamp body (A5) onto the Lamp body (A4).
    • Screw the Lamp body (A5) onto the Lamp base (C).
    • Screw the Tooth washer (D) onto the Lamp base (C).
    • Screw the Hexagon nut (E) onto the Lamp body (A5) using the Wrench (G), and tighten securely.
  3. Bulb Installation: Insert the Bulb (F) into the lamp body (A).
  4. Stability Check: Place the assembled lamp on a level surface to verify its stability.

The lamp is designed to use an ON/OFF Type "A" bulb with a maximum of 40 watts, or a CFL bulb with a maximum of 13 watts, or an LED bulb with a maximum of 9 watts. A 9-watt LED bulb is included in the box.

Maintenance Features

To ensure the longevity and safe operation of the lamp, specific care and maintenance guidelines should be followed:

  • Initial Inspection: Before attempting to install the lamp, carefully inspect the item for any damage or obvious defects. If any damage or defect is found, do not install the lamp. Once installed, the item may not be returned.
  • Cleaning:
    • Always unplug lamps before using any cleaning solutions.
    • Dust shades with a feather duster or with an appropriate vacuum-brush attachment.
    • Wipe lamp bases with a soft, dry cloth and clean them using methods appropriate to the material of the base.
    • Avoid the use of chemicals and household cleaners, as they may damage the finish of the lamp.
  • Safety Precautions:
    • Assembly should be performed on a soft surface to prevent scratching the finish.
    • To reduce the risk of fire, electrical shock, or injury to persons or property, users must follow the provided guidelines for safe use and installation.
    • The external flexible cable or cord of this lamp cannot be replaced. If the cord is damaged, the lamp must be destroyed to prevent hazards.
    • The polarized plug is a safety feature. If it does not fit fully into an outlet, reverse the plug. If it still does not fit, contact a qualified electrician. Never use an extension cord unless the plug can be fully inserted. Do not attempt to bypass or disregard this safety feature.

JONATHAN Y JYL6117A Specifications

General IconGeneral
StyleModern
Number of Lights1
Bulb TypeLED
Bulb IncludedYes
MaterialMetal
Height12 inches
Width6 inches

Related product manuals