Do you have a question about the JUKI CP-760 and is the answer not in the manual?
Details of the machine head specifications, including speed, width, feed, needle, etc.
Table detailing various stitch patterns, their stitches, zigzag width, and selection keys.
Safety and operational precautions for using the sewing machine, including oiling and maintenance.
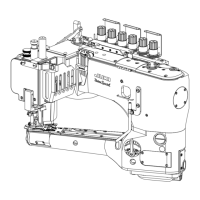
Lists and describes the numbered components of the sewing machine for reference.
Adjusting the height and inclination of the feed dog for optimal sewing.
Procedure for adjusting the feed timing mechanism, including alignment of marks.
How to adjust the feed amount for normal and reverse stitches using specific screws.
Adjusting the feed dog's position, especially concerning clearance with the throat plate.
Procedure for adjusting material slippage by modifying feed dog height and inclination.
Steps for calibrating the origin position of the needle rocking motor.
How to adjust the needle's entry path into the fabric.
Procedure to adjust and eliminate play in the needle bar's longitudinal movement.
Adjusting the needle's entry path in the longitudinal direction.
Adjusting the needle bar connection guide for proper needle movement.
Steps to set the correct height of the needle bar.
Adjusting the timing between needle and hook, and the needle guard for proper sewing.
Adjusting the bobbin case stopper's position to prevent slippage.
Correctly orienting the needle bar thread holder for proper thread flow.
Adjusting vertical and longitudinal positions of the auxiliary thread take-up lever.
Adjusting the thread tension controller's position.
Adjusting longitudinal position and orientation of the pre-tension unit.
Adjusting guard to avoid contact with the tension disk.
Proper installation of the thread take-up guide B.
Procedure for securely installing the thread take-up.
Correctly fitting the presser foot onto the throat plate.
Installing and adjusting the bobbin winder unit for proper operation.
Adjusting the oil level in the hook mechanism for lubrication.
Procedures for adjusting the thread trimming unit components.
Setting the initial position of the moving knife in the thread trimming unit.
Adjusting the timing of the thread trimming cam for correct operation.
Instructions for installing and removing the knife unit.
Setting the needle's final stop position after thread trimming.
Ensuring proper clearance between the handwheel and stator.
Adjusting the position of the reverse stitching magnet for proper function.
Adjusting the thread tension releasing solenoid for proper function.
Procedures for assembling and adjusting the stitch length and condensation dials.
Adjusting the lubrication system, particularly for the hook.
Setting the correct position of the thread draw-out wire.
Adjusting the travel stroke of the thread draw-out wire.
Correct installation of the wiper base.
Adjusting the wiper solenoid for proper operation.
Ensuring correct positioning of the wiper during operation.
Instructions for applying exclusive grease to specific machine parts.
Steps for disassembling, assembling, and adjusting the gear box.
Procedures for replacing the motor and timing belt.
Guidelines for safely removing and installing the gear box cover.
Locations and sizes of screws for attaching machine accessories.
Lists of spare parts for models with/without thread trimmer and grease info.
Addresses issues with oil flow to the face plate, hook, and noisy gears.
Troubleshooting thread breakage, stitch skipping, irregular stitches, and material feed.
Troubleshooting thread skipping, breakage, and cutting problems at sewing start.
Addressing needle breakage and thread cutting failures.
Resolving difficulties with cloth slippage and straight sewing.
Details on supply voltage, frequency, current, and operating environment.
SC-905 box functions, mode change, display, and setting navigation.
Comprehensive list of functions and detailed explanations for key settings.
Diagram showing external connector pin assignments and signal details.
Procedures for initializing panel data and setting the key lock function.
Lists and explains error codes for the PSC box and operation panel.
Instructions for accessing and reviewing past error information.
Wiring diagrams for optional relay cords for standing machines and DC24V.
Block diagram of the system and data sheet for custom pattern needle entry.
Detailed dimensional drawings and specifications of the sewing machine table.
| Brand | JUKI |
|---|---|
| Model | CP-760 |
| Category | Sewing Machine |
| Language | English |