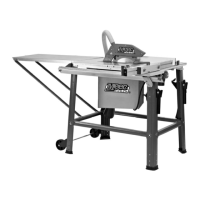
This document describes a JULA table saw, model RTS315E, designed for construction use. It is a 2.2 kW table saw with a 315 mm blade, capable of various cutting operations.
Function Description
The JULA RTS315E table saw is intended for cutting wood and wood-like materials. It is designed for both ripping (longitudinal cuts) and cross-cutting, as well as grooving, bevel cutting, and cutting edges and strips. The saw features adjustable settings for blade height and angle, allowing for versatile use in different woodworking tasks. It is equipped with a dust extraction system to help maintain a cleaner work environment. The saw is primarily for professional use in construction and workshops.
Important Technical Specifications
- Model: RTS315E
- Rated Voltage: 400 V ~ 50 Hz (Three-phase motor) or 230 VAC, 50 Hz (Single-phase motor)
- Output Power: 2200 W
- Operating Form/Duty Factor: S6/20%
- Speed: 2800 rpm
- Motor Guard: Yes
- Undervoltage Protection: Yes
- Saw Blade Diameter: 315 x 30 x 3.6/2 - 24 teeth (for ripping) or 28 teeth (for cross-cutting)
- Height Adjustment 90°/45°: 0-83/0-49 mm
- Angle Adjustment: 90°-45°
- Longitudinal Fence: 590 mm
- Dimensions (L x W x H): 1110 x 600 x 1050 mm
- Saw Bench Dimensions: 800 x 550 mm
- Saw Bench Dimensions with Extension: 950 x 800 mm
- Saw Bench Height with Legs: 800 mm
- Noise Level, Operating LWA: 106.2 dB (A)
- Noise Level at Workplace, Operating LpA: 90.3 dB (A), K=4 dB
- Dust Emission: Less than 2 mg/m3 when using a functioning dust extraction unit with an air velocity of at least 20 m/s.
- Extension Cords: For 230 VAC, 50 Hz, extension cords up to 25 m must have a minimum conductor cross-section of 1.5 mm². Extension cords longer than 25 m must have a minimum conductor cross-section of 2.5 mm². The mains connection must be fused with a 16 A slow-blow fuse. For three-phase motors, the connection must be fused with 3 phase conductors, 1 neutral conductor, and 1 earth conductor.
Usage Features
Assembly and Setup:
The saw requires assembly before use. This involves attaching the legs, power switch, hose holder, side stays, cross stays, and the bench extension. The dust extraction unit needs to be installed on the lower blade guard. Wheels are attached for mobility. The saw bench insert and splitting knife must be installed and correctly adjusted. The longitudinal fence and parallel fence are also installed and adjusted.
Operation:
- Setting up: Ensure the workplace is clean and well-lit. The tool should be placed on a stable, level surface and secured with four screws.
- Transport: Use appropriate lifting equipment (crane, forklift truck, or similar) to transport the tool. Never lift the saw bench by the tool itself.
- Commissioning: Always follow safety instructions. All covers and safety devices must be installed before starting the tool. The dust extraction system must be connected.
- Setting the Mitre Angle: Undo the wing nut and move the saw blade to the desired mitre angle (90°–45°). Always check the angle setting before use. Perform a test cut and adjust the angle with the set screws, if necessary.
- Height Setting of Saw Blade: Undo the wing nut and move the saw blade to the desired height (0–80 mm). The saw blade must be adjusted so that its highest point is slightly higher than the upper edge of the workpiece.
- Cleaving (Ripping): Install the parallel fence. Use the fence with the high edge for cutting widths greater than 120 mm, and the fence with the low edge for cutting widths less than 120 mm. Feed the workpiece with the feeder.
- Mitre Sawing: Install the mitre fence for mitre sawing.
- Cutting Workpieces Wider than 120 mm: Adjust the parallel fence according to the width of the workpiece. Keep hands away from moving parts. Advance the workpiece with the right hand or the feeder. Always use the feeder if narrow parts are being sawn off the workpiece. Move the fence backwards to the middle of the saw bench or use a short auxiliary fence if there is a risk of the workpiece becoming trapped between the saw blade, the splitting knife, and the fence.
- Cutting Workpieces Narrower than 120 mm: Adjust the parallel fence according to the width of the workpiece with both hands. Use the feeder near the saw blade. Advance the workpiece until it has passed the splitting knife. Always use the feeder for short workpieces.
- Cutting Edges and Strips: Install the fence with the low edge or use the auxiliary fence. Advance the workpiece with the feeder until the end of the workpiece reaches the splitting knife. Use the bench extension to prevent long workpieces from falling on completion of sawing.
- Cross Cutting Narrow Workpieces: Adjust the deflector so that the sawn parts of the workpiece do not touch the rear edge of the saw blade. Always use a cross-cutting jig or fence. Never remove sawdust from the area around the workpiece with hands.
- Groove Cutting, Bevel Cutting: During bevel cutting, the workpiece must be turned so that the sawn part is on the other side of the saw blade from the parallel fence. During groove cutting and bevel cutting, the dust extraction cover must be folded up and the splitting knife lowered. Ensure that the workpiece is fed correctly. Lock the rear fence if necessary.
Electrical Connection:
The electric motor is ready for connection and satisfies relevant standards. The mains supply and extension cord must be of the specified type. The motor is fitted with overheating protection and turns off automatically in the event of overheating. The motor may be turned on again once it has cooled.
Maintenance Features
General Maintenance:
- Turn off the tool and disconnect the power cord before performing maintenance and making adjustments.
- Store the manual close to the tool.
- Keep the tool clean.
- Wear eye protection.
Specific Maintenance:
- Cleaning: Do not use aggressive detergents on the saw bench's plastic parts. Use a mild detergent. Do not expose the tool to water.
- Saw Blade: Check the saw blade regularly. Never use saw blades that are blunt, warped, deformed, or damaged in some other way. Only use saw blades that satisfy the requirements in accordance with EN 847-1. Replace the saw bench insert immediately if it is damaged or worn.
- Saw Bench: Keep the saw bench surface free of resin.
- Dust Extraction: Regularly clean the tool's drive unit of sawdust, etc. Keep the air outlet free of sawdust and dust.
Troubleshooting:
The manual provides a troubleshooting guide for common issues:
- Saw blade is loose/motor will not start: Check the lock nut, fuse, extension cord, and connections in the motor or power switch.
- Motor is turned off automatically: The overheating protection has tripped. Install a sharp saw blade.
- Burn marks on the workpiece: The lock nut is not correctly tightened, the saw blade is unsuitable or dull, the longitudinal fence is incorrectly adjusted, or the jig is incorrectly adjusted. Solutions include tightening the lock nut, installing a sharp saw blade (20 or 28 teeth for cleaving), replacing the longitudinal fence, or adjusting the jig.