EN
53
INDEX
1 • INDEX Button .......................................... 墌 pg. 19
•NAVI Button ....................................... 墌 pg. 21, 22
2 NAVI STORE Button ........................... 墌 pg. 21, 22
3 SELECT/SET Button ................................. 墌 pg. 32
4 MENU Button ............................................ 墌 pg. 32
5 • +, – Button ............................................... 墌 pg. 32
• LCD Monitor Brightness Control
[MONITOR BRIGHT +, –] ........................ 墌 pg. 12
6 • E-MAIL Button ......................................... 墌 pg. 22
• INFO Button ............................................ 墌 pg. 19
7 Stop Button [5] ......................................... 墌 pg. 14
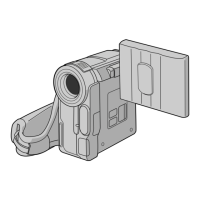
8 MEMORY CARD Cover ............................. 墌 pg. 11
9 Snapshot Button [SNAPSHOT] ........... 墌 pg. 17, 29
0 Power Lamp .................................... 墌 pg. 7, 12, 13
! • Recording Start/Stop Button ................... 墌 pg. 12
• Play/Pause Button [
4
/6] ......................... 墌 pg. 14
@ Power Switch [ , , , OFF] .......... 墌 pg. 13
# • Power Zoom Ring [T/W] .......................... 墌 pg. 13
• SHUTTLE SEARCH Ring [
2
/
3
] ......... 墌 pg. 14
$ Lock Button ............................................... 墌 pg. 13
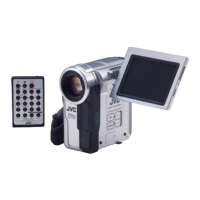
% • Remote Sensor
The transmitted beam’s approximate effective
distance for indoor use is 5m.
The transmitted beam may not be effective or may
cause incorrect operation outdoors or when the
remote sensor is directly exposed to sunlight or
powerful lighting.
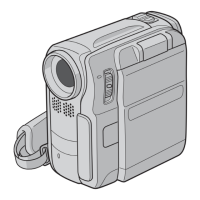
• Camera Sensor
Be careful not to cover this area, a sensor
necessary for shooting is built-in here.
^ Tally Lamp ........................................... 墌 pg. 12, 34
& • S-Video/Audio/Video Input/Output
Connector [S/AV] ......................... 墌 pg. 16, 37, 42
• Edit Connector ........................................ 墌 pg. 42
* DC Input Connector .................................... 墌 pg. 7
( USB (Universal Serial Bus) Connector ...... 墌 pg. 44
) Digital Video Input/Output Connector
[DV] (i.Link*) ......................................... 墌 pg. 38, 44
* i.Link refers to the IEEE1394-1995 industry
specification and extensions thereof. The logo is
used for products compliant with the i.Link
standard.
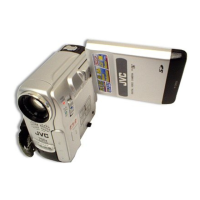
q Flash Sensor
Be careful not to cover this area, as it contains a
sensor required by the flash.
w • BACKLIGHT Button ................................. 墌 pg. 30
• Speaker Volume Control [VOL. –] ............ 墌 pg. 14
e • NIGHT Button .......................................... 墌 pg. 27
• Speaker Volume Control [VOL. +] ............ 墌 pg. 14
r • FOCUS Button ........................................ 墌 pg. 30
• BLANK SEARCH Button ......................... 墌 pg. 15
The connectors & – ) are located beneath a cover.
t VIDEO/MEMORY Switch
[VIDEO, MEMORY] ................................... 墌 pg. 13
y Battery Pack Mount ..................................... 墌 pg. 7
u Grip Belt/Strap Eyelet
i Grip Strap .................................................... 墌 pg. 8
o Dioptre Adjustment Control ......................... 墌 pg. 8
p Tripod Mounting Socket ............................... 墌 pg. 9
Q Monitor Latch [OPEN] ............................... 墌 pg. 12
W Battery Release Button
[BATT. RELEASE] .......................................... 墌 pg. 7
E OPEN/EJECT Switch .................................. 墌 pg. 9
R Infrared Beam Transmitting Window
Transmits the beam signal
T Zoom (W) Button ....................................... 墌 pg. 39
Y Zoom (T) Button ........................................ 墌 pg. 39
U DISPLAY Button ............................ 墌 pg. 16, 37, 41
I SHIFT Button ...................................... 墌 pg. 39, 41
O • SLOW Button [
0
] .................................... 墌 pg. 39
• Right Button ............................................ 墌 pg. 39
P • SLOW Button [
9
] .................................... 墌 pg. 39
• Left Button ............................................... 墌 pg. 39
a REW Button*
s FADE/WIPE Button ................................... 墌 pg. 42
d EFFECT ON/OFF Button .......................... 墌 pg. 39
f EFFECT Button ......................................... 墌 pg. 39
g EDIT IN/OUT Button ................................. 墌 pg. 42
h CANCEL Button ........................................ 墌 pg. 42
j PAUSE IN Connector ................................ 墌 pg. 42
k START/STOP Button*
l MBR SET Button ....................................... 墌 pg. 41
; Snapshot Button* [SNAPSHOT]
A • Up Button ................................................ 墌 pg. 39
• INSERT Button ........................................ 墌 pg. 40
S • Down Button ............................................ 墌 pg. 39
• A. DUB Button ......................................... 墌 pg. 40
D PLAY Button*
F FF Button*
G STOP Button*
H PAUSE Button*
J R.A.EDIT ON/OFF Button ................... 墌 pg. 42, 43
K VCR REC STBY Button ............................ 墌 pg. 43
* Functions the same as each corresponding button on
the camcorder.