4
CAUTION
To reduce the risk of electrical shocks, fire, etc.:
1. Do not remove screws, cover or cabinet.
2. Do not expose this appliance to rain or moisture.
IMPORTANT
1. Installation
● Select a place which is level, dry
and neither too hot nor too cold
(between 0°C and 35°C /32°F and
95°F).
● Keep away from direct sunlight.
● Do not put it too close to a heater.
2. Power cord
● Do not handle the power cord with
wet hands!
● Do not bend the power cord
sharply.
3. Malfunctions, etc.
● There are no serviceable parts
inside. If anything goes wrong,
unplug the power cord and consult
your dealer.
● Do not insert any metallic object.
● Do not allow water to get inside.
CAUTION:
CHARGE ONLY WITH PROVIDED NICKEL-CADMIUM TYPE
BATTERIES. OTHER TYPES OF BATTERIES MAY BURST
CAUSING PERSONAL INJURY AND DAMAGE.
Thank you for purchasing this JVC product.
Before you begin operating this unit, please read the instructions carefully to be
sure you get the best possible performance.
If you have any questions, consult your JVC dealer.
FEATURES
● Frequency modulation system which
allows headphones to be used even in
areas where the transmitter cannot be
seen
● Reception range (up to 100 m (328 ft):
using JVC measurement system)
● Auto Tuning Function: Lock in the
signal at the touch of a button
● Foldable and compact design
● Easy-to-handle light body
● Rechargeable system with Ni-Cd
batteries provided
● Large 40 mm dia. drivers for high-
quality sound
● Automatic Power On/Off transmitter
● Auto-level control circuit that automati-
cally adjusts signals to the appropriate
modulation level
● Single volume control adjusts the
volume level of the left and right
channels simultaneously
● Adaptable to any audio/visual equip-
ment
5
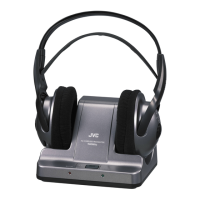
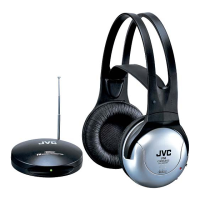
NAMES OF PARTS AND THEIR FUNCTIONS
Transmitter
1
POWER (Indicator)
When an audio signal is input : The
power automatically turns on and the
indicator lights in green.
2
CHARGE (Indicator)
The indicator lights in red while the
battery is being charged.
3
TUNING (Tuning control)
Adjusts the transmission frequency.
4
ANTENNA
5
ANTENNA COVER
Cover the antenna
4
before using
the unit.
6
Audio input cord and plug
2m cord and 3.5mm dia. stereo
miniplug.
7
Charging output cord and plug
8
DC IN (DC 12 V jack)
9
AC adaptor (J46858-001)
Connects to a household AC outlet
(AC 230 V, 50 Hz).
Note :
The provided AC adaptor is exclusively
for use with this unit.
Do not connect to any other equipment.
0
Plug rest hole
While not in use, charging output
cord and plug
7
can be inserted
into this hole.
 Loading...