Do you have a question about the JVC HR-S7500EK and is the answer not in the manual?
Warning about dangerous voltage inside the unit.
Warning to prevent fire or shock hazard from rain or moisture.
Instructions for safe connection to the mains supply in the UK.
Explanation of wire colours for mains lead connection.
Information about S-VHS, VIDEOplus+, and Spatializer trademarks.
Recommends disconnecting power when not using the recorder.
Warning about dangerous voltage and handling signal leads.
LP mode tapes cannot be played back on single-speed recorders.
Precautions regarding recorder placement and environment.
Explanation of moisture condensation and how to prevent damage.
Information about head cleaning and when to contact service.
Read instructions, ensure connections, consult dealer, handle glass carefully.
Avoid operating if damaged, removing covers, or obstructing ventilation.
Never let children insert objects or guess with electrical equipment.
Verify all included items are present in the package.
Instructions for connecting the recorder to the TV.
How to connect to a TV without a SCART connector.
How to connect to a TV with a SCART connector.
Selecting the output signal for AV connection.
Do not plug in power cord until connections are complete.
Steps to connect using S-VIDEO and AUDIO IN connectors.
Notes on S-VHS pictures and stereo sound.
Instruction to proceed to the next setup step.
Auto Set Up sets channels, clock, and program numbers automatically.
Explanation of Video Channel for RF connection.
Ensure aerial cable, power cord, and batteries are connected/installed.
Press the power button to start the Auto Set Up process.
Procedure for Auto Set Up using RF connection only.
Procedure for Auto Set Up using AV or S-Video connection.
Press OK to finish the Auto Set Up procedure.
Information after performing Auto Set Up.
Result when both auto channel and clock set are successful.
Result when auto channel set succeeds but clock set fails.
Result when both auto channel and clock set fail.
How to check if Guide Program numbers were set correctly.
Steps to take after successful Auto Set Up.
Steps to take when clock set failed.
Steps to take when both Auto Set Up steps failed.
Notes on reception conditions and potential issues.
Turn on TV and select the correct video channel.
Instructions for loading a video cassette.
How to find the start point of a recorded program.
How to initiate tape playback.
How to stop playback and eject the cassette.
Information on compatible video cassette types.
Explanation of the on-screen tape position indicator.
How to pause and advance playback frame by frame.
How to activate forward and reverse slow motion playback.
How to activate variable-speed search for tape navigation.
How to activate high-speed search for tape navigation.
Notes on picture distortion in search/still modes.
Turn on TV and select the correct video channel.
Instructions for loading a cassette for recording.
How to select a program for recording.
How to set the tape speed (SP/LP).
How to initiate recording.
How to pause and resume an ongoing recording.
How to stop recording.
How to prevent accidental recording on a cassette.
How the recorder resumes after a power outage.
How to watch a different program while recording.
How to check the exact time of a recording.
Easy method for recording for a set duration.
How to display the remaining tape time.
Ensure clock is set, cassette is inserted, and TV is on.
How to access the Video Plus+ programming screen.
How to enter the program's unique PlusCode number.
How to access the program details screen.
Notes on preset positions and invalid PlusCode numbers.
How to set the tape speed for timer recording.
How to set the Program Delivery Control mode.
How to activate the recorder's timer standby mode.
Notes on changing stop time and programming serials.
Instructions for timer-recording satellite broadcasts.
How to set Guide Program Numbers for stations.
Explanation of the PDC service for accurate timer recording.
Notification about upcoming timer recordings.
Ensure clock is set and cassette is inserted.
How to access the programme details screen.
How to input the desired recording start time.
How to input the desired recording stop time.
How to input the date for the recording.
How to enter the preset position for the broadcast station.
How to set the tape speed for express timer recording.
How to set the Program Delivery Control mode.
How to activate the recorder's timer standby mode.
How to timer-record weekly or daily serial programs.
Explanation of the PDC service for accurate timer recording.
Notification about upcoming timer recordings.
How to deactivate the timer standby mode.
How to view a list of programmed recordings.
How to view detailed information for each programmed recording.
How to cancel or replace a programmed recording.
How to exit program management screens.
Recorder capabilities for S-VHS and VHS recording.
Steps to set the recorder for S-VHS recording.
Steps to set the recorder for VHS recording.
Steps to record VHS on an S-VHS cassette.
How to access the main menu screen.
How to access the mode set screen.
How to select the S-VHS mode (AUTO or OFF).
How to exit the menu system.
Explanation of the B.E.S.T. system for picture quality.
How to turn on the recorder.
How to access the main menu screen.
How to access the mode set screen.
How to set the B.E.S.T. mode to ON or OFF.
How to exit the menu system.
How to start recording, including B.E.S.T. assessment.
Notes on B.E.S.T. system usage during recording.
Warning regarding the delay caused by the B.E.S.T. system.
How to start playback, activating B.E.S.T. tracking.
Notes on B.E.S.T. system effectiveness during playback.
Explanation of automatic and manual tracking control.
How to enable manual tracking.
How to adjust tracking using the TV PROG buttons.
How to re-enable automatic tracking.
How to quickly access recorded index codes.
How to initiate index search.
How to play back the last timer-recorded program.
How to initiate the Instant Review function.
How to skip over unwanted sections during playback.
How to perform a skip search.
Information on receiving NICAM stereo and bilingual broadcasts.
Notes on NICAM audio recording and quality.
How to select soundtracks (Hi-Fi L/R, Normal).
Notes on soundtrack selection and O.S.D. setting.
Expands sound field during playback of stereo sources.
How to activate and cycle through Spatializer® settings.
Notes on Spatializer effectiveness and compatibility.
Records satellite programs automatically via timer.
Settings for AV2 SELECT and AV1 OUT switch.
Refer to satellite receiver instructions for setup.
Ensure satellite receiver is connected and programmed.
How to access the mode set screen.
How to set AV2 SELECT mode to SAT.
How to activate the Auto Satellite Prog Rec mode.
Warning regarding connected appliances and REC LINK button.
Notes on recording capabilities and limitations.
How to control other manufacturer's TVs with the remote.
How to enter the TV's brand code for remote operation.
How to use the remote control to operate the TV.
Note on remote control compatibility with various TVs.
How to switch between VCR, TV, and SAT modes.
How to use extra buttons for TV channel selection.
Operate JVC and other brands' satellite receivers.
How to enter the satellite receiver's brand code.
How to use the remote control for satellite receiver functions.
Note on remote control compatibility with satellite receivers.
Control two recorders independently using A/B codes.
Steps to set the remote control to respond to B code signals.
Notes on TV malfunction and switching back to A code.
How to set 'EDIT' to 'ON' before starting editing.
How to access the main menu screen.
How to access the mode set screen.
How to select the EDIT mode.
How to exit the menu system.
Benefits of S-VHS recorders for editing quality.
How to connect a camcorder for editing.
How to set the recorder's input mode (VIDEO/S-VIDEO).
How to set the edit mode for camcorder editing.
How to start the camcorder in play mode.
How to start the recorder in record mode.
Notes on cables and using another video recorder.
How to connect to another video recorder for editing.
How to set the input mode for the recording deck.
How to set the edit mode for recorder editing.
How to start the source player device.
How to start the recording deck.
Notes on O.S.D. setting and S-Video connections.
Steps to set AV2 SELECT mode based on connected device.
Set AV2 SELECT to VIDEO for regular video signals.
Set AV2 SELECT to S-VIDEO for Y/C signals.
Set AV2 SELECT to SAT for satellite receiver connection.
Default setting and behavior after memory backup expiry.
How to choose whether to show operational indicators.
How to access the main menu screen.
How to access the mode set screen.
How to set the O.S.D. function to ON or OFF.
How to exit the menu system.
Notes on O.S.D. for editing and display disturbances.
Explanation of various on-screen indicators.
Switches tape speed from SP to LP if tape is insufficient.
How to enable the Auto SP→LP Timer feature.
How to access the mode set screen.
How to select the timer mode setting.
Notes on feature availability and tape length limitations.
How the Auto Timer automatically engages and disengages.
How to access the mode set screen.
How to select the Auto Timer mode setting.
Note on safety when Auto Timer is OFF.
How to play back a tape automatically up to 50 times.
How to initiate repeat playback.
How to stop the repeat playback sequence.
Recorder is equipped with NTSC circuitry for playback.
How to start playback of NTSC tapes.
Notes on TV compatibility and picture issues.
How to set automatic power off after tape rewind.
Instructions to connect recorder to a stereo system for sound output.
How to connect audio output to stereo system inputs.
Notes on correct connection and TV volume adjustment.
Cautions regarding audio levels and speaker placement.
Definition of Video Channel (RF Output Channel).
When to perform Video Channel Set manually.
How to set Video Channel for AV or S-Video connections.
How to enter the Video Channel Set mode.
How to set the video channel to off.
How to exit the Video Channel Set mode.
Ensure power is plugged, recorder off, TV on.
How to enter the Video Channel Set mode.
How to set the video channel for RF connection.
Notes on interference and selecting vacant channels.
How to exit the Video Channel Set mode.
When to perform Tuner Set manually.
Recorder memorizes stations automatically.
How to initiate the Auto Channel Set process.
Status indication during the channel search.
How the confirmation screen appears after scan.
How to use remote buttons to view pages.
Guide Program numbers are set automatically.
How to exit the confirmation screen.
How to skip/add presets, enter station names.
Possible issues with station order or names.
Notes on reception conditions affecting storage.
To store channels not found by Auto Set Up.
How to access the main menu.
How to access the manual channel set confirmation screen.
How to select a preset position.
How to enter the channel number.
Importance of Guide Program Number Set after manual storage.
How to enter channel information.
How to exit the confirmation screen.
How to remove a stored channel.
How to select the channel to delete.
How to fine-tune existing stored channels.
How to select the channel to fine-tune.
How to adjust tuning for clarity.
How to change the preset position of a channel.
How to choose a new preset position for a channel.
Importance of Guide Program Number Set after changes.
How to set names for registered stations.
How to select a station to name.
How to set names for unregistered stations.
How to select characters for station names.
How to enter characters for station names.
When to perform Clock Set manually.
How to turn on the recorder.
How to access the initial set screen.
How to access the clock set screen.
Accurate time keeping via automatic adjustments.
Consequences of turning off the Just Clock function.
How to set the recorder's date and time.
How to set the Just Clock feature to ON or OFF.
How to set the preset for clock data source.
How to start the clock operation.
When manual Guide Program Number setting is needed.
How to set Guide Program Numbers manually.
How to access the Guide Program Set screen.
How to enter the Guide Program Number for a station.
How to enter the preset position for a broadcast.
How to exit the Guide Program Set screen.
Definition of Guide Program Number for Video Plus+.
Common questions and answers regarding playback issues.
Common questions and answers regarding recording issues.
Common questions and answers regarding timer recording.
Attention regarding malfunctioning due to external interference.
Solutions for power-related issues.
Solutions for tape transport problems.
Solutions for playback issues.
Solutions for recording issues.
Solutions for timer recording problems.
Solutions for other common operational problems.
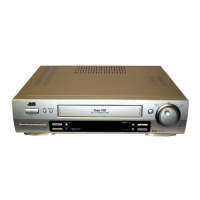
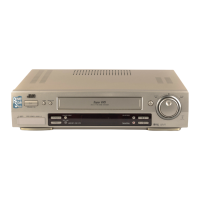
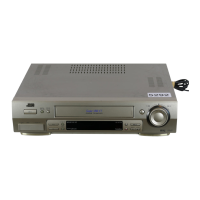
Identification of front panel controls and indicators.
Function of the STANDBY/ON button.
Function of the TIMER button.
Function of the SPATIALIZER button.
Description of the cassette loading slot.
Function of the PLAY button.
Function of the TV PROG Dial.
Function of the JOG Dial.
Function of the SHUTTLE Ring.
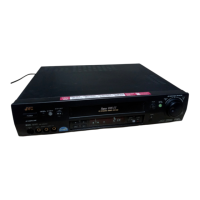
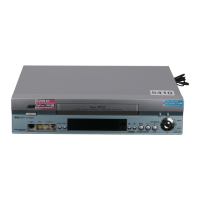
Function of the S-VIDEO Input Connector.
Function of the VIDEO Input Connector.
Function of the AUDIO Input Connector [L].
Function of the AUDIO Input Connector [R].
Function of the TV PROG +/- buttons.
Function of the REC LINK button.
Function of the COUNTER RESET button.
Description of the display panel indicators.
Function of the infrared beam receiving window.
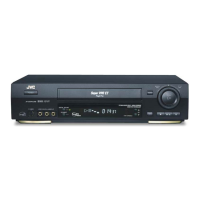
Function of the RECORD button.
Function of the PAUSE button.
Function of the SP/LP button.
Function of the DISPLAY button.
Function of the STOP/EJECT button.
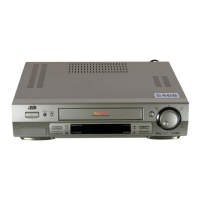
Function of the mains power cord.
Function of the S OUT connector.
Function of the AV1 IN/OUT connector.
Function of the AUDIO OUT connectors.
Function of the ANT. IN connector.
Function of the AV1 OUT switch.
Function of the AV2 IN connector.
Function of the Remote PAUSE connector.
Function of the RF OUT connector.
Description of the display panel indicators.
B.E.S.T. Picture System indicator.
Audio Level indicator.
Programme Time indicators.
Display of various mode indicators.
'Timer' indicator.
Clock display.
S-VHS indicator.
Tape Speed indicators.
Instant REVIEW indicator.
Audio Mode indicator.
Tape Remaining Time indicator.
'Cassette Loaded' mark.
PDC indicator.
Counter display.
Display of remaining tape time.
Alternating display of various readings.
External input mode indicator.
Function of the TV button.
Function of the VCR button.
Function of the TV/VCR button.
Function of the REVIEW button.
Function of the NUMBER keys.
Function of the PDC button.
Function of the X button.
Function of the 0000 button.
Function of the STOP +/- button.
Function of the START +/- button.
Function of the PROG button.
Function of the ? button.
Function of the Rewind button.
Function of the Record button.
Function of the Stop button.
Function of the MENU button.
Function of the △▽ buttons.
Function of the TV PROG +/- buttons.
Function of the SAT button.
Function of the STANDBY/ON button.
Function of the AUDIO button.
Function of the mute button.
Function of the DISPLAY button.
Function of the DAILY button.
Operates recorder, TV, and satellite receiver functions.
Point remote toward sensor window; max distance 8m.
Notes on battery insertion and troubleshooting.
Caution when operating other devices with the remote.
Function of the WEEKLY button.
Function of the AUX button.
Function of the timer standby button.
Function of the DATE +/- button.
Function of the TV PROG +/- button.
Function of the 30 SEC button.
Function of the Auto Tracking button.
Function of the SP/LP button.
Function of the Play button.
Function of the Fast Forward button.
Function of the Pause button.
Function of the OK button.
Function of the ▷ button.
Function of the TV +/- button.
General specifications of the recorder.
Video and audio technical specifications.
Tuner and timer related specifications.
List of provided accessories.