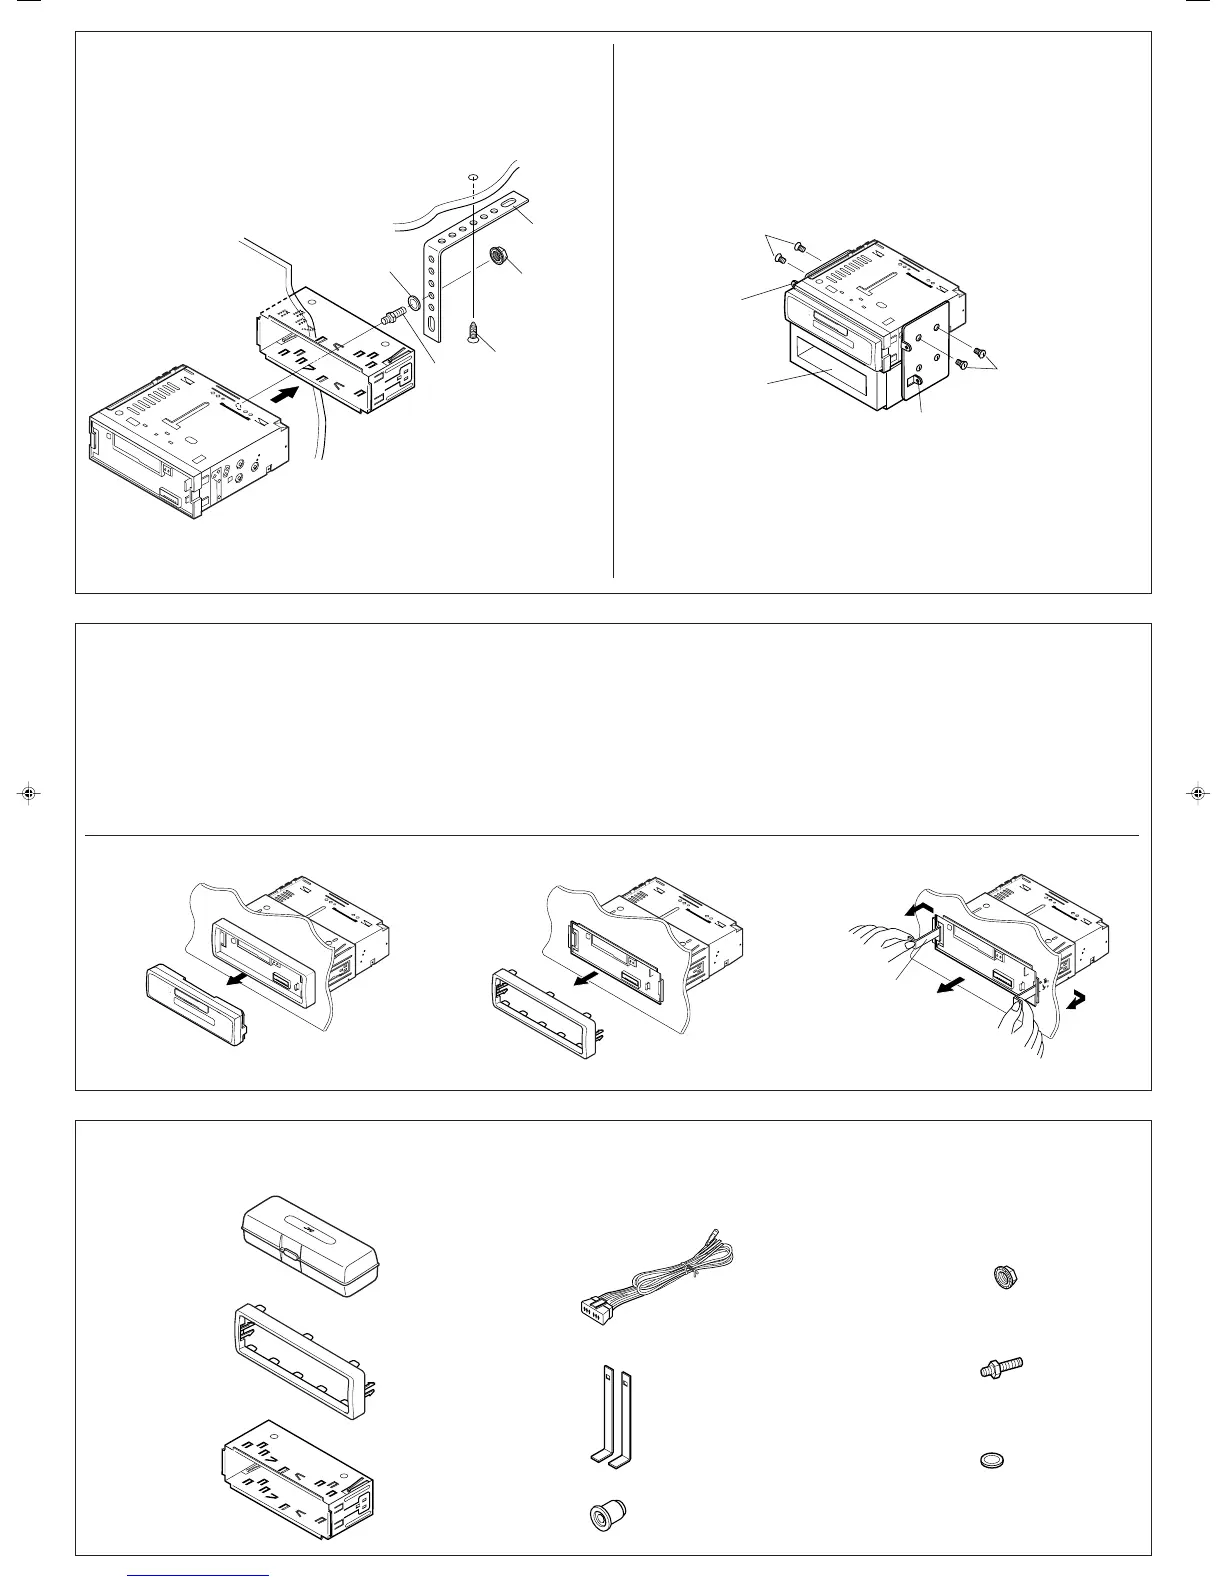
• When using the optional stay
•
XO³¦²K wU{« bM «b²Ý« bMŽXO³¦²K wU{« bM «b²Ý« bMŽ
XO³¦²K wU{« bM «b²Ý« bMŽXO³¦²K wU{« bM «b²Ý« bMŽ
XO³¦²K wU{« bM «b²Ý« bMŽ
Fire wall
s W¹UL(« —«bł
d(«o¹
ŠKIW «ŠJUÂ
«²uOq
• When installing the unit without using the sleeve
In a Toyota for example, first remove the car radio and install the unit in its place.
Note: When installing the unit on the mounting bracket, make sure to use the 6 mm-long screws. If
longer screws are used, they could damage the unit.
∫WEŠö∫WEŠö
∫WEŠö∫WEŠö
∫WEŠödð bMŽ dÐ Âb²Ý« s bQð ¨XO³¦²« WOH² vKŽ “UN'« VOWUŠ w ÆrK ∂ ‰uÞ wž«
dР«b²Ý«Æ“UN'« —d{ Ë« nKð V³¹ Ê« sJ1 p– ÊU ¨rK ∂ s ‰uÞ« wž«
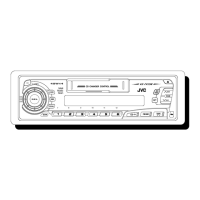
Parts list for installation and connection
The following parts are provided with this unit.
After checking them, please set them correctly.
qOu²«Ë VOd²« ¡«eł« WLzUqOu²«Ë VOd²« ¡«eł« WLzU
qOu²«Ë VOd²« ¡«eł« WLzUqOu²«Ë VOd²« ¡«eł« WLzU
qOu²«Ë VOd²« ¡«eł« WLzU
ełô«Ëe WOU²« ¡«Æ“UN'« l …œ
ełô« Ác¼ h× bFÐd¹ ¨¡«dð vłÆ`O× qJAÐ rN³O
Mounting bolt (M5 x 20 mm)
d²« —UL® VOM5©rK ≤∞ ™
Sleeve
u« qJON«w«
Handles
Washer (ø5)
ÂUJŠ« WIKŠ
©µ dD® qOu²«
Flat type screws (M5 x 6 mm)*
dÐu² wž«® …bŽUI« W¹M5©rK ∂ ™ *
Bracket*
Trim plate
ue« WŠWM¹
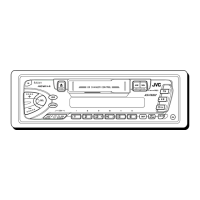
Removing the unit
• Before removing the unit, release the rear section.
1
Remove the control panel.
2
Remove the trim plate.
3
Insert the 2 handles into the slots, as shown. Then, while gently
pulling the handles away from each other, slide out the unit.
(Be sure to keep the handles after installing it.)
…—UO« uKÐUð s “UN'« Ÿe½…—UO« uKÐUð s “UN'« Ÿe½
…—UO« uKÐUð s “UN'« Ÿe½…—UO« uKÐUð s “UN'« Ÿe½
…—UO« uKÐUð s “UN'« Ÿe½
•e'« —dŠ ¨“UN'« Ÿe½ q³ÆwHK)« ¡
±±
±±
±u Ÿe½«ÆrJײ« WŠ
≤≤
≤≤
≤u Ÿe½«e« WŠÆWM¹
≥≥
≥≥
≥
Æq?J?A?« w? 5?³? u?¼ U?L? ¨‚u?I?A?« q?š«œ 5?²U*« qšœ«
u?« «b?O?FÐ WUDKÐ 5²U*« V×Ý ¡UMŁ« ¨p– bFÐsŽ …bŠ«
dšô«Æ×U)« v« “UN'« V×Ý« ¨È
©“UN'« VOdð bFÐ 5²U*UÐ pþUH²Š« s bQ𮩓UN'« VOdð bFÐ 5²U*UÐ pþUH²Š« s bQð®
©“UN'« VOdð bFÐ 5²U*UÐ pþUH²Š« s bQ𮩓UN'« VOdð bFÐ 5²U*UÐ pþUH²Š« s bQð®
©“UN'« VOdð bFÐ 5²U*UÐ pþUH²Š« s bQð®
3
2
1
dÐu² wž«…bŽUI« W¹
®M5©rK ∂ ™
*
WOH²
XO³¦²«
*
Multi
Music
Scan
UU*«
•
w«u« qJON« «b²Ý« ÊËbÐ “UN'« Vdð UbMŽw«u« qJON« «b²Ý« ÊËbÐ “UN'« Vdð UbMŽ
w«u« qJON« «b²Ý« ÊËbÐ “UN'« Vdð UbMŽw«u« qJON« «b²Ý« ÊËbÐ “UN'« Vdð UbMŽ
w«u« qJON« «b²Ý« ÊËbÐ “UN'« Vdð UbMŽ
Flat type screws (M5 x 6 mm)*
Dashboard
—UO« uKÐUð…
Washer
Sleeve
u« qJON«w«
Mounting bolt
d²« —ULVO
Screw (option)
dЩwU{«® wž
Hard case
VK ‚ËbM
Rubber cushion
uA(«WOÞUD*« …
Power cord
dNJ« WUD« pKÝWOzUÐ
Lock nut (M5)
uL® XO³¦²« WM5©
WU*«
Handle
Stay (option)
X³³¦ð bM
©wU{«®
Lock nut
uLXO³¦²« W
ŽKv ݳOq «*¦U‰¨ w ÝOU—« ½uŸ ðu¹uðU¨ «½eŸ —«œ¹u «OU—… «Ëô ÐFb –p —ÒV «'NU“ w JU½tÆ
* Not included with this unit.
*
Ëe dOžÒÆ“UN'« «c¼ l œ
Bracket*
XO³¦²« WOH²*
VOł
Pocket
• !"#
!"
!
!"
!
!
• !"#$%&'($
!"#$%&'()*+,6mm !"#$%&' !"()*+,-#
!TOYOTA !"#$%&'()*+,-.)/012&3456
! (M5 x 6 mm)*
* !"#$
*
*
! (M5 x 6 mm)*
!
• !"#$%&!"'()*+,-.(/012
1
!"#$
2
!"#
3
!"#$%&'()*+,-."/01234$5
!"#$%&'() *+
!"#$%&'()*+,-.
!"
!"#$%&'(
!"#$%&'()
!"#$%&'()*
!
!"#$%&
!"
!"
! (M5)
(ø5)
! (M5 x 20 mm)
Instal.EN.CH.AR.KS-FX201[U] 3/24/05, 9:11 PM2