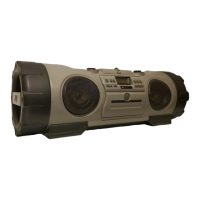
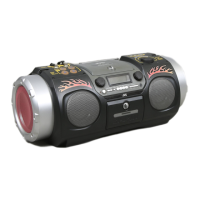
14
SLEEP
CLOCK TIMER
TIMER
ON/OFF
PROGRAM
RANDOM
REPEAT
SOUND
DISPLAY
SUPER WOOFER
VOLUME
REVERSE MODE
MULTI CONTROL
FM MODE
REW
FF
TAPE
TUNER
BAND
C D
DOWN UP SET
AUX
VOLUME
ACS
1
2
3
4
5
6
7
8
9
p
q
w
e
r
AUTO
PRESET
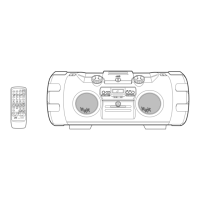
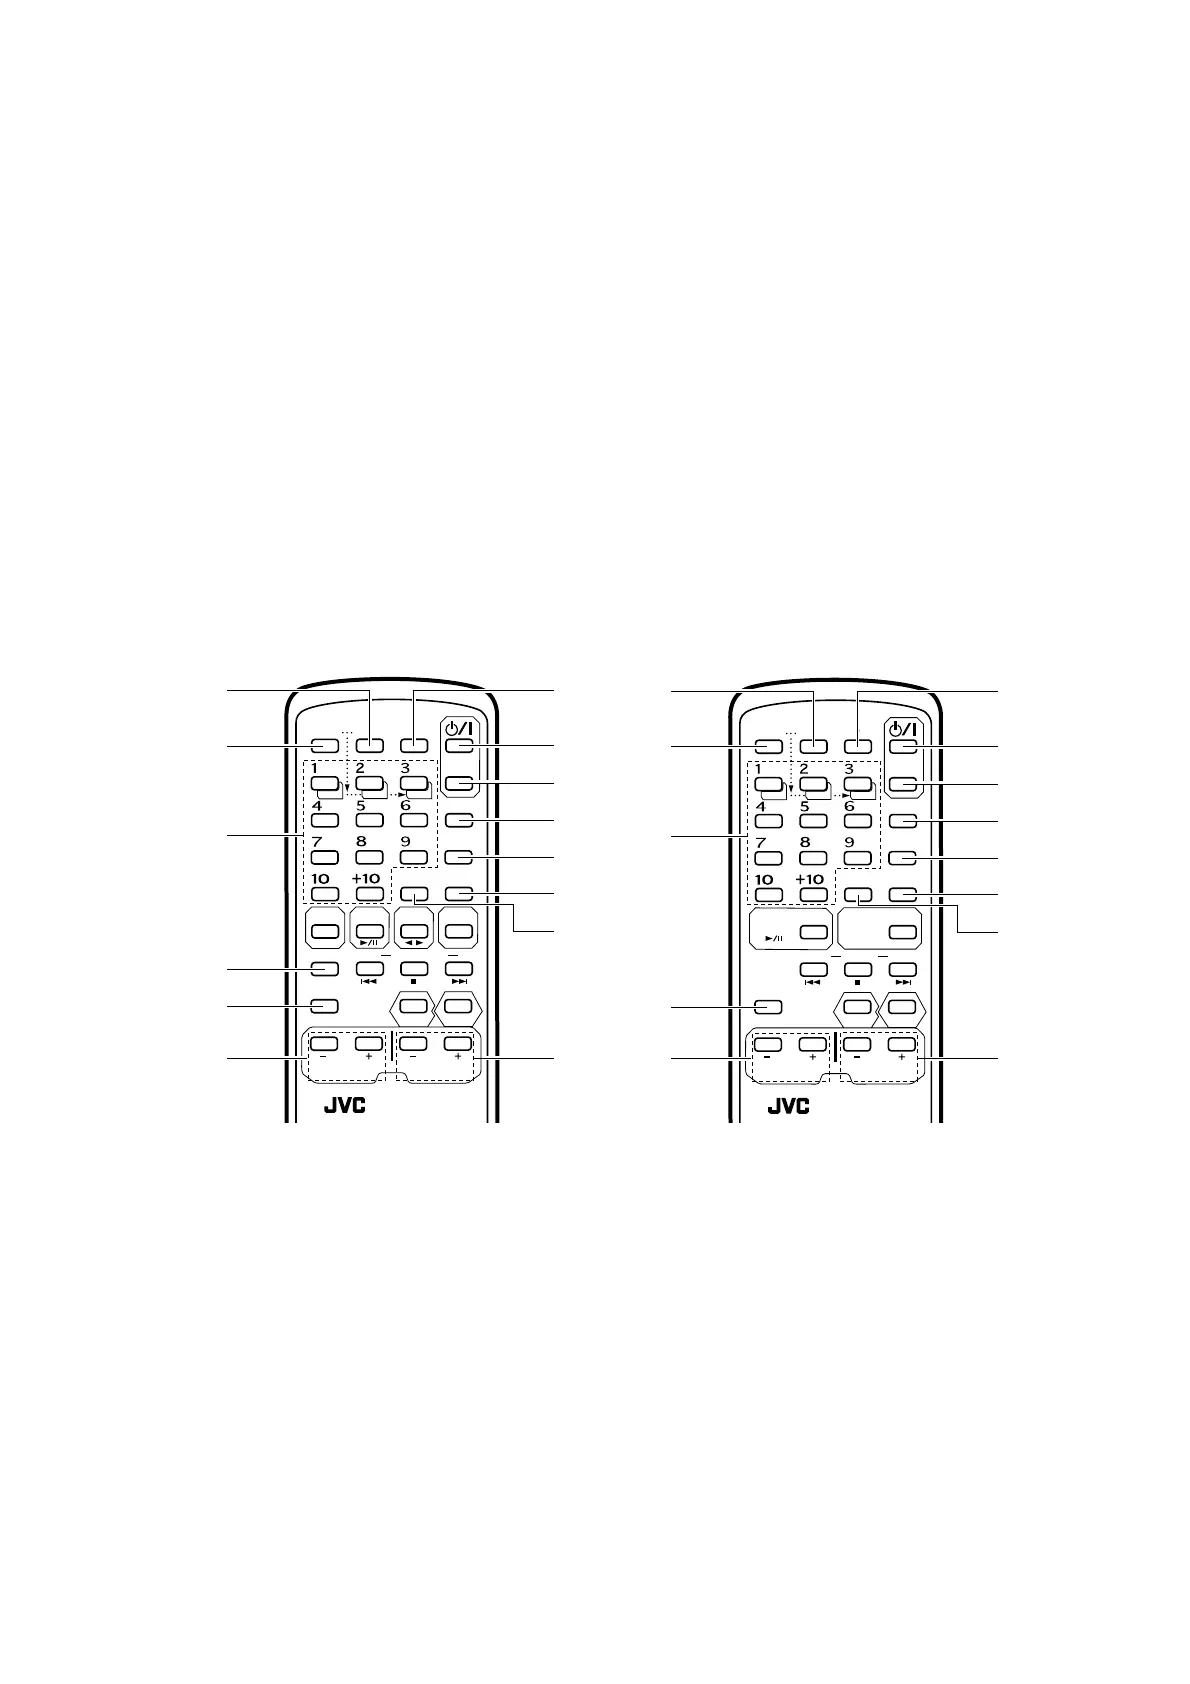
REMOTE CONTROL
SLEEP
CLOCK TIMER
TIMER
ON/OFF
PROGRAM
RANDOM
REPEAT
SOUND
DISPLAY
SUPER WOOFER
VOLUME
TUNING
DOWN
UP
TUNER
BAND/
FM MODE
CD
DOWN UP SET
VOLUME
ACS
1
2
3
5
6
7
8
9
p
q
w
e
r
AUTO
PRESET
REMOTE CONTROL
÷ Reemplazo de las pilas
Cuando el funcionamiento del controlador
remoto se vuelve inestable o la distancia
dentro de la cual actúa se reduce, reemplace
las pilas.
÷ Battery replacement
When the remote control operation becomes
unstable or the distance from which remote
control is possible decreases, replace the
batteries.
÷ Sostituzione batterie
Quando il funzionamento dell’unità di
telecomando è intermittente oppure quando
la distanza utile diminuisce, sostituire le
batterie.
Using the remote control unit
÷ Point at the remote sensor and operate within
about 7 m (approx. 23 ft).
÷ The remote control range is less when the unit
is used at an angle.
÷ Do not expose the remote sensor to strong
direct sunlight or artificial lighting.
÷ Make sure that there are no obstacles
between the remote sensor and the unit.
÷ If the radio reception is noisy, move the remote
control unit away from the main unit.
Utilización de la unidad de control
remoto
÷ Apúntela hacia el sensor remoto y hágala
funcionar dentro de un radio de 7 m. aprox.
÷ El radio de acción del controlador remoto es
menor cuando se lo apunta en ángulo.
÷ No exponga el sensor remoto a la luz directa
del sol o a fuerte iluminación artificial.
÷ Asegúrese de que no hayan obstáculos entre
el sensor remoto y el controlador remoto.
÷ Si la recepción de radio tiene ruido, aleje el
control remoto de la unidad principal.
Uso dell’unità di telecomando
÷
Utilizzare l’unità di telecomando entro una
distanza di circa 7 metri puntandola verso il
sensore di telecomando.
÷
Il campo di funzionamento dell’unità di
telecomando è inferiore se essa viene
utilizzata da una posizione angolare.
÷
Non esporre il sensore di telecomando a luce
naturale o artificiale intensa.
÷
Accertarsi che non vi siano ostacoli tra il
sensore di telecomando e l’unità di
telecomando.
÷
Se la ricezione radio risulta disturbata,
spostare il telecomando lontano
dall’apparecchio.
The following operations can be performed
using the remote control unit.
÷ Check the operation button functions
carefully and operate them correctly.
Las siguientes operaciones deben ser
ejecutadas utilizando la unidad de control
remoto.
÷ Compruebe detalladamente el
funcionamiento de los botones de
operación y opérelos correctamente.
Le operazioni seguenti possono essere
eseguite utilizzando l’unità di telecomando.
÷ Controllare con attenzione le funzioni dei
tasti ed utilizzare quest’ultimi in modo
corretto.
1 TIMER button
Press to change the mode to TIMER.
2 CLOCK button
Press to adjust the clock.
3 Number buttons (1-10, +10)
(When the mode is set to CD)
Press to play specific tracks or to program
tracks.
(When the mode is set to TUNER)
Press to select preset stations.
÷ Buttons 1-3 are also used for clock
adjustment and timer operation (see page
32).
4 REVERSE MODE button
5 DISPLAY button
6 SUPER WOOFER VOLUME buttons (+/–)
1 Botón TIMER
Presione para cambiar el modo a TIMER.
2 Botón CLOCK
Presione para ajustar el reloj.
3 Botones de número (1-10, +10)
(Cuando el modo está ajustado en CD)
Presione para reproducir pistas específicas
o para programar pistas.
(Cuando el modo está ajustado en TUNER)
Presione para seleccionar estaciones
presintonizadas.
÷ Los botones de 1 a 3 también son
empleados para el ajuste del reloj y para
la operación del temporizador (ver
página 32).
4 Botón REVERSE MODE
5 Botón DISPLAY
6 Botones SUPER WOOFER VOLUME (+/–)
1
Tasto del timer (TIMER)
Premerlo per passare alla modalità del TIMER
2
Tasto dell’orologio (CLOCK)
Premerlo per poter regolare l’ora.
3
Tasti numerici (da 1 a 10, e +10)
In caso di modalità disposta su CD, per la
lettura dei dischi:
Agire sui tasti numerici per la lettura di certi
brani specifici, o per la programmazione dei
brani.
In caso di modalità disposta su TUNER, per
la ricezione radio:
Agire sui tasti per selezionare le stazioni
presintonizzate.
÷
I tasti da 1 a 3 sono anche usati per la
regolazione dell’ora ed il funzionamento
del timer (vedere a pag. 32).
4
Tasto di modalità inversa (REVERSE
MODE)
5
Tasto di modifica della visualizzazione del
quadrante (DISPLAY)
6
Tasti per la regolazione del volume del super
woofer (SUPER WOOFER VOLUME, + e –)
Remote control unit for RV-B90
Unidad de control remoto para RV-B90
Telecomando per l'RV-B90
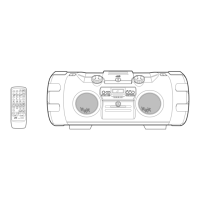
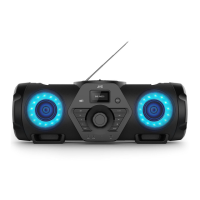
Remote control unit for RV-B70
Unidad de control remoto para RV-B70
Telecomando per l'RV-B70
 Loading...