EasyManua.ls Logo

JVC RV-B90 User Manual

JVC RV-B90
44 pages
To Next Page IconTo Next Page
Page #1 background imageLoading...
Page #1 background image
2
ENGLISH ESPAÑOL PORTUGUÊS
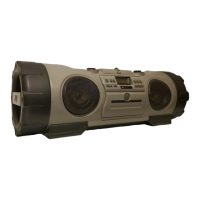
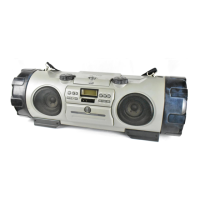
Thank you for purchasing this JVC product.
Please read these instructions carefully before
starting operation to be sure to obtain optimum
performance and a longer service life from the
unit.
Le agradecemos la adquisición de este producto
de JVC. Por favor lea detenidamente las
instrucciones antes de comenzar la operación
para obtener de esta unidad un rendimiento
óptimo y una vida de servicio más larga.
INDICE ÍNDICE
Características .................................... 3
Precauciones de seguridad ............... 4
Precauciones de manipulación ......... 5
Colocación/extracción de la correa
para el hombro .................................... 7
Conexiones.......................................... 8
Alimentación........................................ 8
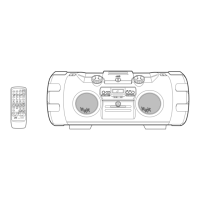
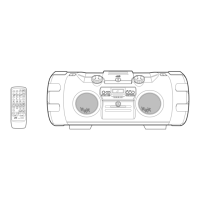
Nombres de las partes y sus
funciones ........................................... 12
Unidad de control remoto ................ 14
Conexión/desconexión de la
alimentación ...................................... 16
Volumen, modo de sonido y otros
controles ............................................ 17
Manipulación de CD.......................... 19
Reproducción de CD......................... 20
Manipulación de cassettes de cinta 24
Reproducción de cassettes ............. 25
Empleo de otra unidad de audio...... 26
Radiorrecepción................................ 26
Grabación .......................................... 30
Mezcla de micrófonos (RV-B90U/
UB/US/UT/UX exclusivamente) ........ 33
Ajuste del reloj .................................. 34
Operaciones por temporizador........ 35
Mantenimiento................................... 40
Detección de problemas................... 41
Especificaciones ............................... 42
Features ............................................... 3
Safety precautions .............................. 4
Handling precautions ......................... 5
Shoulder strap attachment/
detachment .......................................... 7
Connections ........................................ 8
Power supply....................................... 8
Names of parts and their functions. 12
Remote control unit .......................... 14
Switching the power on/off .............. 16
Volume, sound mode and other
controls .............................................. 17
Handling CDs..................................... 19
Playing CDs ....................................... 20
Handling cassette tapes. .................. 24
Cassette playback............................. 25
Using with another audio unit.......... 26
Radio reception ................................. 26
Recording .......................................... 30
Microphone mixing (RV-B90U/UB/
US/UT/UX only).................................. 33
Clock adjustment .............................. 34
Timer operations ...............................35
Maintenance ...................................... 40
Troubleshooting ................................ 41
Specifications.................................... 42
A JVC do Brasil agradece pela compra do
RV-B90. Aconselhamos que leia atentamente
este manual de instruções antes de utilizar o
aparelho para ter a certeza de obter o seu
melhor desempenho possível e prolongar a sua
vida útil.
CONTENTS
CUIDADO:
PARA REDUZIR O RISCO DE INCÊNDIO
OU CHOQUE ELÉTRICO, NÃO
EXPONHA ESTE APARELHO À CHUVA
OU UMIDADE.
WARNING:
TO REDUCE THE RISK OF FIRE OR
ELECTRIC SHOCK, DO NOT EXPOSE
THIS APPLIANCE TO RAIN OR
MOISTURE.
CAUTION
RISK OF ELECTRIC SHOCK
DO NOT OPEN
CAUTION: TO REDUCE THE RISK OF ELECTRIC SHOCK.
DO NOT REMOVE COVER (OR BACK).
NO USER-SERVICEABLE PARTS INSIDE.
REFER SERVICING TO QUALIFIED SERVICE PERSONNEL.
The lightning flash with arrowhead symbol, within an
equilateral triangle, is intended to alert the user to the
presence of uninsulated "dangerous voltage" within the
product's enclosure that may be of sufficient magnitude
to constitute a risk of electric shock to persons.
The exclamation point within an equilateral triangle is
intended to alert the user to the presence of important
operating and maintenance (servicing) instructions in
the literature accompanying the appliance.
ADVERTENCIA:
PARA REDUCIR EL RIESGO DE
INCENDIO O DE CHOQUES
ELECTRICOS, NO EXPONGA ESTE
APARATO A LA LLUVIA O A LA
HUMEDAD.
Características .................................... 3
Precauções .......................................... 4
Cuidados com relação
ao manuseio ........................................ 5
Colocação/retirada da alça
de ombro.............................................. 7
Conexões ............................................. 8
Alimentação......................................... 8
Controles e funções.......................... 12
Controle remoto ................................ 14
Como ligar/desligar........................... 16
Volume, Sound Mode e
outros controles................................ 17
Manuseio de CDs .............................. 19
Reprodução de CDs.......................... 20
Manuseio de fitas cassete................ 25
Reprodução de fitas.......................... 26
Uso com outros aparelhos
conectados ........................................ 26
Recepção de FM, AM e SW .............. 26
Gravação............................................ 30
Mixagem de microfone ..................... 33
Ajuste do relógio............................... 34
Operações com timer ....................... 35
Manutenção ....................................... 40
Identificação e correção
de problemas..................................... 41
Especificações .................................. 42
CUIDADO
RISCO DE CHOQUE ELÉTRICO.
NÃO ABRA
CUIDADO: PARA REDUZIR O RISCO DE CHOQUE ELÉTRICO,
NÃO RETIRE A TAMPA (OU A PARTE TRASEIRA). NÃO HÁ
PEÇAS QUE POSSAM SER CONSERTADAS PELO USUÁRIO
NO INTERIOR DO GABINETE. ENCAMINHE OS CONSERTOS
A UM POSTO AUTORIZADO DE ASSISTÊNCIA TÉCNICA.
O símbolo do raio com ponta em forma de flecha dentro de um
triângulo equilátero destina-se a alertar o usuário sobre a
presença de "tensões perigosas" e sem isolamento dentro do
gabinete do produto, que podem ser de magnitude suficiente
para representar um risco de choque elétrico para as pessoas.
O ponto de exclamação dentro de um triângulo equilátero
destina-se a alertar o usuário sobre a existência de instruções
de operação e manutenção (assistência técnica) importantes
na literatura que acompanha o produto.

Table of Contents

Questions and Answers:

JVC RV-B90 Specifications

General IconGeneral
BrandJVC
ModelRV-B90
CategoryStereo System
LanguageEnglish

Summary

Important Laser Product Information

Laser Product Precautions

Safety precautions for Class 1 laser products, emphasizing avoiding direct beam exposure.

Identification and Certification Label

Details about the product's identification and certification labels.

Product Features

Safety Precautions

Electric Shock, Fire, and Damage Prevention

Detailed instructions to prevent electric shocks, fire hazards, and damage to the unit.

Power Cord Handling Guidelines

Guidelines for safely handling the power cord, including avoiding wet hands and proper unplugging.

Internal Unit Safety Precautions

Precautions regarding internal access, metallic objects, ventilation holes, and lightning.

Proper Ventilation and Placement

Ventilation Requirements

Ensuring adequate spacing around the unit for heat dissipation and proper operation.

Handling Precautions

Abnormal Operation Procedures

Steps to take when the unit exhibits abnormal operation, involving power and battery reset.

Installation Location Precautions

Guidance on avoiding installation in places with vibrations, humidity, or magnetic interference.

Dust and Lens Care

Advice on closing the CD door to prevent dust on the lens and general lens care.

Handling Precautions Continued

Condensation and Temperature Management

Managing condensation issues and avoiding extreme temperatures for unit longevity.

Volume and Safety Mechanism Guidance

Proper volume adjustment for CDs and understanding the safety interlock mechanism.

Magnetic Interference and TV Proximity Warnings

Keeping tapes away from speakers due to magnets and avoiding TV picture distortion.

Cleaning, Headphone Use, and General Handling

Cabinet cleaning, safe headphone listening, and general handling advice.

Carrying and Shoulder Strap Usage

Carrying Handle Guidelines

Instructions for safely using the unit's carrying handles to prevent damage.

Shoulder Strap Attachment and Detachment

Step-by-step guide for attaching and detaching the shoulder strap.

Remote Control Unit Storage

Information on where the remote control unit can be stored.

Connections and Power Supply

External Unit Connections

How to connect external audio units, turntables, or MD players using the AUX IN jack.

AC Power Cord Connection and Voltage Selection

Connecting the AC power cord, including voltage selector usage and plug adapter.

Notes on TV Proximity Interference

Warning about potential TV picture distortion when the unit is placed near a television.

Battery Installation and Operation

Memory Back-up Battery Installation

Installing AA batteries to maintain memory backup during power failures.

Battery Replacement Notes and Main Operation

Notes on AA battery power, consumption, replacement, and using D-size batteries.

Battery Management and Cautions

Battery Replacement Symptoms and Guidelines

Identifying symptoms of low batteries and general cautions for correct battery usage.

Battery Leakage and Safety Precautions

Safety measures regarding battery chemical leakage, skin contact, and cleaning.

Car Operation Precautions

Car Battery Usage and Safety Guidelines

Using the specified car adapter, vehicle safety, and engine operation during car battery use.

Car Transport and Environmental Protection

Proper transport methods and protecting the unit from water and dust when left in a car.

CD Player Control Panel Overview

CD Player/General Section Controls

Identification and function of the main controls and indicators for the CD player section.

Tuner and Cassette Deck Control Panel Overview

Tuner/Deck Section Controls

Identification and function of the controls for the tuner and cassette deck sections.

Rear Panel and Remote Control Unit

Rear Panel Connections and Features

Details of the rear panel connections, including DC IN, headphone jack, and antenna.

Remote Control Unit Setup and Maintenance

Instructions for installing batteries and replacing them in the remote control unit.

Using the Remote Control Unit

Remote Control Operation Guidelines

Tips for effective remote control operation, including range, lighting, and obstacles.

Remote Control Button Functions

Explanation of the functions of each button on the remote control unit.

Powering On/Off and COMPU PLAY

Power On/Off Operations

How to switch the unit's power on and off, including standby mode.

COMPU PLAY One-Touch Operation

Using the COMPU PLAY function for one-touch source selection and playback.

Volume and Sound Controls

Main Volume Control

Adjusting the main volume level using the unit's knob or remote control.

Super Woofer Volume and Bass Adjustment

Adjusting the super woofer volume to enhance bass sound reproduction.

Active Clear Sound (ACS) Function

Using the ACS button to improve sound quality by emphasizing high frequencies.

Sound Mode Selection and Usage

Selecting Sound Modes

How to select different sound modes (BEAT, POP, CLEAR, FLAT) to enhance music playback.

Sound Mode Descriptions and Applications

Explanation of each sound mode's purpose and when to use it for different music genres.

CD Handling and Cleaning Procedures

Usable CDs and Handling Guidelines

Guidelines for using compatible CDs and proper handling to prevent damage.

CD Storage and Cleaning Methods

Proper storage methods for CDs and instructions on cleaning CDs with a soft cloth.

CD Shape Compatibility Note

Note regarding the incompatibility of specially shaped CDs like heart or flower shapes.

Playing CDs - Basic Operations

Playing an Entire CD

Step-by-step guide to playing an entire CD, including loading and volume adjustment.

Stopping and Pausing CD Playback

How to stop CD playback mid-play or temporarily pause it.

CD Playback Error Indications

Information on error indications that may appear due to CD condition or loading.

Advanced CD Playback Functions

Temperature and Handling Precautions for CD Play

Avoiding damage by using the unit within specified temperature ranges and preventing shocks.

Skip and Search Playback Functions

Using skip play to move between tracks and search play for locating specific positions on a CD.

Direct Access Playback Operation

Playing specific tracks directly using track number buttons on the remote control.

Programmed and Repeat Playback

Programmed Playback Setup Guide

How to program up to 20 tracks for playback in a desired order.

Repeat Playback Mode Selection

Selecting modes for repeating a single track or all tracks on a CD.

Random Playback Functionality

Activating random playback for playing tracks in a shuffled order.

Program Confirmation and Playback Control

Confirming and Clearing Programmed Tracks

How to view programmed track details and clear the program.

Repeat and Random Playback Usage

Detailed explanation of repeat and random playback functions with the remote.

Program Playback Confirmation and Notes

Notes on programmed playback, including time limits and potential playback issues.

Cassette Tape Handling and Loading

Cassette Tape Usage and Precautions

Proper handling of cassette tapes, including tightening loose tape and precautions against accidental erasure.

Cassette Loading and Auto Select Mechanism

Steps for loading cassette tapes and how the auto tape select mechanism distinguishes tape types.

Cassette Tape Notes

Important notes regarding tape playback and the auto tape select mechanism.

Cassette Playback Operations

Basic Cassette Playback Procedure

Step-by-step guide for playing a cassette tape, including loading and volume adjustment.

Reverse Modes and Tape Control

Understanding different tape reverse modes and how the tape stops automatically.

Fast Winding and Rewinding Tapes

Instructions for fast-forwarding and rewinding cassette tapes.

External Audio Input and Radio Reception

Connecting and Using External Audio Sources

How to connect and use external audio sources like turntables or MD players via the AUX IN jack.

Radio Reception Basics and Tuning

General steps for tuning into radio broadcasts using the TUNER BAND button.

FM Stereo and Mono Reception Modes

Selecting FM stereo or mono reception for optimal sound quality based on broadcast signal.

Tuning Methods and Station Presets

Seek and Manual Tuning Procedures

Using seek tuning for automatic station finding and manual tuning for precise frequency selection.

Auto Preset Tuning Functionality

Automatically scanning and storing the first 15 radio stations found in memory.

Manual Station Presetting Guide

Manually programming desired radio stations into memory using preset buttons.

Preset Station Tuning and Management

Tuning and Receiving Preset Stations

How to select and listen to previously preset radio stations.

Preset Station Storage and Notes

Information on how preset stations are stored and notes on potential data loss.

Memory Back-up for Preset Stations

Ensuring preset station data is retained during power interruptions using back-up batteries.

Antenna Usage and Channel Interval Adjustment

Antenna Adjustment for Optimal Reception

Optimizing reception by adjusting telescopic and ferrite core antennas.

Antenna Interference Warning

Warning about potential interference to AM/SW reception from nearby televisions.

Channel Interval Adjustment Procedure

Adjusting channel intervals for AM and FM frequencies, especially for North/South America.

Recording Operations Overview

Automatic Recording Level Control (ALC)

Explanation of the ALC circuit and checks for cassette safety tabs.

Synchronized CD to Cassette Recording Process

Step-by-step guide for synchronized recording from a CD to a cassette tape.

Recording Setup and Notes

Setting up for synchronized recording, including source selection and handling of non-recorded sections.

Advanced Recording Functions

Recording Direction and Interruption Handling

Handling recording direction changes and interrupting recording.

Full CD Recording Functionality

Using the synchro recording mode for full CD recording, including reverse side recording.

Recording Without Interruption

Techniques for recording without non-recorded gaps between tracks or tunes.

Tape Rewinding and Recording Sources

Tape Rewinding Instructions

Steps for rewinding a cassette tape using the TAPE and REW buttons.

Recording from Radio or AUX Input

How to record broadcasts from the radio or audio from external sources connected to AUX IN.

BEAT CUT Button Functionality

Using the BEAT CUT button to eliminate beats during AM broadcast recording.

Erasing Tapes and Microphone Mixing

Erasing Recorded Tape Material

Methods for erasing recorded material from a tape to record new content.

Microphone Mixing Setup and Operation

Connecting and operating the microphone for mixing with other audio sources and recording.

Clock Adjustment Using Remote Control

Remote Control Clock Section Overview

Identification and functions of the controls on the remote for clock and timer adjustments.

Setting the Current Time on the Unit

Step-by-step guide to setting the current time on the unit using the remote control.

Confirming Time and Second Setting

Methods for confirming the set time and adjusting to the nearest second using TV/radio signals.

Timer Operations Setup and Prerequisites

Timer Operation Prerequisites

Essential prerequisites for timer operations, including setting the current time and battery status.

Setting Timer Start and Stop Times

Procedure for setting the desired start and stop times for timer recording or playback.

Timer Mode Selection and Volume Adjustment

Selecting Timer Modes for Sources

How to select the desired source mode (TUNER, CD, TAPE) for timer operations.

Setting Timer Playback Volume

Adjusting the volume level for timer playback and understanding 'VOL -' setting.

Confirming Timer Settings

Steps to confirm that the timer settings have been completed correctly.

Timer Recording of Broadcasts

Broadcast Timer Recording Setup

Steps to set up timer recording for radio broadcasts, including tuning and standby mode.

Timer Recording Operations and Repetition

How timer recording starts, stops, and can be repeated daily.

Cancelling Timer Operation

Procedure to cancel timer recording or playback operations.

Timer Playback Operations

Timer Playback Overview and Sources

Overview of timer playback capabilities for tapes, broadcasts, and CDs.

Setting Up Timer Playback and Standby

Steps to set the timer, select the source, and put the unit in standby for timer playback.

Timer Playback Behavior and Cancellation

Details on how timer playback starts, indicators, fade-in, and how to cancel the operation.

Sleep Timer Operations

Using Sleep Timer for Listening Comfort

Using the sleep timer to automatically turn off the unit after a set time while listening to audio.

Sleep Timer Settings, Verification, and Cancellation

Setting sleep times, verifying remaining time, and canceling the sleep timer operation.

Sleep Timer for Morning Playback

Using sleep timer for listening and setting up timer playback for the next morning.

Maintenance and Cleaning Procedures

Importance of Cleaning Tape Path Components

Explanation of why regular cleaning of heads, capstan, and pinch roller is crucial for sound quality.

Cleaning Heads, Capstan, and Pinch Roller

Detailed steps for cleaning tape path components and recommendations for cleaning kits.

Head Magnetization and Cleaning Cautions

Precautions to avoid head magnetization and using appropriate cleaning agents like alcohol.

CD Lens Cleaning Instructions

Instructions for cleaning the CD player lens using a blower or cotton swab to ensure proper playback.

Troubleshooting Common Issues

Power and Sound Troubleshooting

Solutions for common problems like the unit not turning on or having no sound output.

CD Player Troubleshooting Steps

Troubleshooting steps for CD player issues such as discs not playing, partial playback, or operation stopping.

Cassette Deck and Tuner Troubleshooting

Resolving issues with cassette playback volume, ONE TOUCH REC, and noisy radio reception.

Timer and Remote Control Troubleshooting

Diagnosing and fixing problems with timer operations and the remote control unit.

Product Specifications

CD Player and Radio Section Specifications

Technical specifications for the CD player, including frequency response and signal-to-noise ratio.

Tape Deck and General Specifications

Technical details for the tape deck, speakers, power output, and input/output terminals.

Power Requirements and Accessories

Power Requirements and Consumption Details

Details on required power sources, voltage compatibility, and power consumption figures.

Included Accessories List

List of items included in the product package, such as remote control and batteries.

Area Suffix Information

Explanation of area suffixes used to denote regional versions of the product.

Related product manuals