EasyManua.ls Logo

Kaboodle 450mm wall cabinet - User Manual

Default Icon
3 pages
Print Icon
To Next Page IconTo Next Page
Loading...
Wall fixing
(If necessary)
Tools you will need
To put your kaboodle kitchen cabinets together you will need the following tools.
Hardware included
EC DBA
stick on end
caps x 5
28mm
wood screws x 5
door
buffer x 2
shelf
support x 4
50mm
wood screws x 18
Things you need to know
Cordless drill with:
Number 2 screw tip
4mm drill bit
Number 12
countersinking drill bit
Tape
measure
Adjustable
square
65mm
wood screw
Safety
gearPencil
step 1
Follow these
instructions to
build and attach
your cabinet.
All cabinets will need to be attached to the wall using a
minimum of 8 gauge 65mm screws if you have a stud wall.
If your wall is concrete, brick or another surface ask your
hardware specialist for advice on the right fixing method.
Make sure you leave plumbing and electrical work
to qualified trades people. Never try this yourself.
For extra strength use exterior woodworking glue
when assembling cabinets.
To help identify panels, counter sunk holes always
face outwards.
All holes that aren’t already pre-drilled should be drilled prior
to screwing using a No 12 countersinking drill bit.
Make sure you always use safety gear like a mask, ear muffs
and glasses when using tools.
If you have any questions, contact us on:
Australia: 1800 666 078 Monday to Friday between
8:00am and 6:00pm AEST, New Zealand: 0800 522 663
Monday to Friday between 8:00am and 5:00pm NZST
or email: info@kaboodlegroup.com.au.
Spirit level
(900mm recommended)
p. 1Ver. 9
W-51623
Clamps
(quick release)
450mm wall cabinet
Cabinet
Stand
Question and Answer IconNeed help?

Do you have a question about the Kaboodle 450mm wall cabinet and is the answer not in the manual?

Summary

Pre-Assembly Information

Things You Need to Know

Important safety and assembly guidelines for installing your cabinet, including screw types and professional help.

Hardware Included

List of hardware components provided with the cabinet, such as wood screws, shelf supports, and door buffers.

Tools You Will Need

Essential tools required for cabinet assembly, including drills, measuring tools, safety gear, and fixing aids.

Cabinet Assembly Steps

Assembling the Cabinet Frame

Step-by-step visual guide for constructing the main cabinet frame using provided hardware and panels.

Installing the Adjustable Shelf

Instructions for fitting the adjustable shelf into the assembled cabinet using shelf supports.

Joining Multiple Cabinets

Guidance on aligning and securing multiple cabinets together using cabinet supports and clamps.

Fixing Cabinets to the Wall

Critical instructions for securely mounting cabinets to wall studs or other substrates using appropriate screws.

Cabinet Maintenance and Completion

Caring for Your Kaboodle Cabinets

Recommendations for cleaning and maintaining cabinet surfaces to ensure longevity and prevent damage.

Next Steps for Installation

Overview of remaining installation steps including benchtop fitting, doors, and final checks.

Overview

This document serves as an installation and user manual for a Kaboodle 450mm wall cabinet, providing comprehensive instructions for assembly, installation, and maintenance.

Function Description

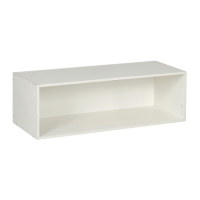
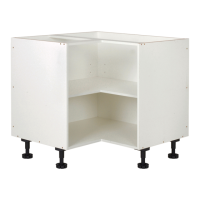
The Kaboodle 450mm wall cabinet is a component of a modular kitchen system designed for storage. It is intended to be assembled from flat-pack components and then mounted to a wall, either individually or as part of a larger cabinet arrangement. The cabinet includes an adjustable shelf, allowing for flexible storage configurations.

Important Technical Specifications

  • Cabinet Dimensions: 450mm (width, as indicated by the title "450mm wall cabinet").
  • Wall Attachment: Requires a minimum of 8 gauge 65mm screws for stud walls. For concrete, brick, or other surfaces, specific hardware advice from a specialist is recommended.
  • Pre-drilling: All holes not pre-drilled should be drilled using a No. 12 countersinking drill bit before screwing.
  • Minimum Distance from Benchtop: AS/NZ standards state that the distance between the benchtop and a wall cabinet needs to be a minimum of 450mm.
  • Hardware Included:
    • 50mm wood screws (x18) - Used for assembling the cabinet frame.
    • 28mm wood screws (x5) - Used for joining cabinets together.
    • Shelf supports (x4) - Used for installing the adjustable shelf.
    • Stick-on end caps (x5) - Used to cover screw holes for a finished look.
    • Door buffers (x2) - Used to cushion door closure.
  • Tools Required:
    • Cordless drill with: Number 2 screw tip, 4mm drill bit, Number 12 countersinking drill bit.
    • Spirit level (900mm recommended).
    • Tape measure.
    • Pencil.
    • Clamps (quick release).
    • Safety gear (mask, ear muffs, glasses).
    • Adjustable square.
    • Wall fixing (if necessary, e.g., specific anchors for concrete/brick).
    • Cabinet Stand (optional, for support during installation).
    • 65mm wood screw (for wall attachment, not included in the "Hardware included" list but mentioned in "Things you need to know").

Usage Features

  • Flat-Pack System: The cabinet is supplied as a flat-pack, requiring assembly by the user.
  • Modular Design: Designed to be integrated into a larger kitchen system, allowing for joining with other cabinets.
  • Adjustable Shelf: Includes an adjustable shelf for customizable storage space.
  • Identification of Panels: Counter-sunk holes on panels always face outwards to aid in correct orientation during assembly.
  • Enhanced Strength: Exterior woodworking glue is recommended for use during assembly for extra strength.
  • Safety Precautions: Emphasizes the importance of using safety gear (mask, ear muffs, glasses) when using tools.
  • Professional Trades: Strongly advises leaving plumbing and electrical work to qualified tradespeople.
  • Customer Support: Provides contact information (phone numbers for Australia and New Zealand, and email) for assistance with questions or advice.

Maintenance Features

  • Cleaning: Cabinets should be cleaned with an all-purpose, non-abrasive cleaner and a damp sponge or cloth.
  • Avoid Harsh Cleaners: Do not use saturated cloth, harsh chemicals, or thinner-based cleaners, as these can damage the melamine surface.
  • Avoid Abrasive Tools: Do not use products that will scratch the surface, such as steel wool or wire brushes. Avoid sharp objects that could scratch, cut, or gouge the melamine surface.
  • Water Resistance: Kaboodle cabinets are water-resistant but not waterproof. Spills should be attended to immediately to prevent swelling of the internal board if the melamine surface is compromised.
  • Damage Repair (Melamine): If the melamine surface is damaged, a furniture repair crayon can be used to cover it, but it's noted that this will not seal the board back to its original finish.

Kaboodle 450mm wall cabinet Specifications

General IconGeneral
BrandKaboodle
Model450mm wall cabinet
CategoryIndoor Furnishing
LanguageEnglish

Related product manuals