Assembly InstructionsWallaby II
18
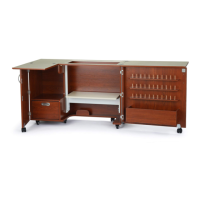
Step 6: Doors
Flush Hinge x3
3x14 Screw x6
Door Plate x2
3.5x14 Screw x4
Caster x1
14mm Wrench x1
Prepare Panel V1 as shown above.
Attach 3 h2 Flush Hinges with s2 Screws.
Attach 2 d3 Door Plates with s1 Screws. NOTE: The rounded edge of d3 Door Plates will overhang the edge of the panel.
Insert t1 Caster into pre-installed caster bracket and tighten with r3 14mm Wrench.
Attach h Handle using b2 Fix Bolts.
Handle x1
4x20 Fix Bolt x2