CW
52
The redefinable codes and default characters used for transmit and receive display are listen here
and in the Commands Manual.
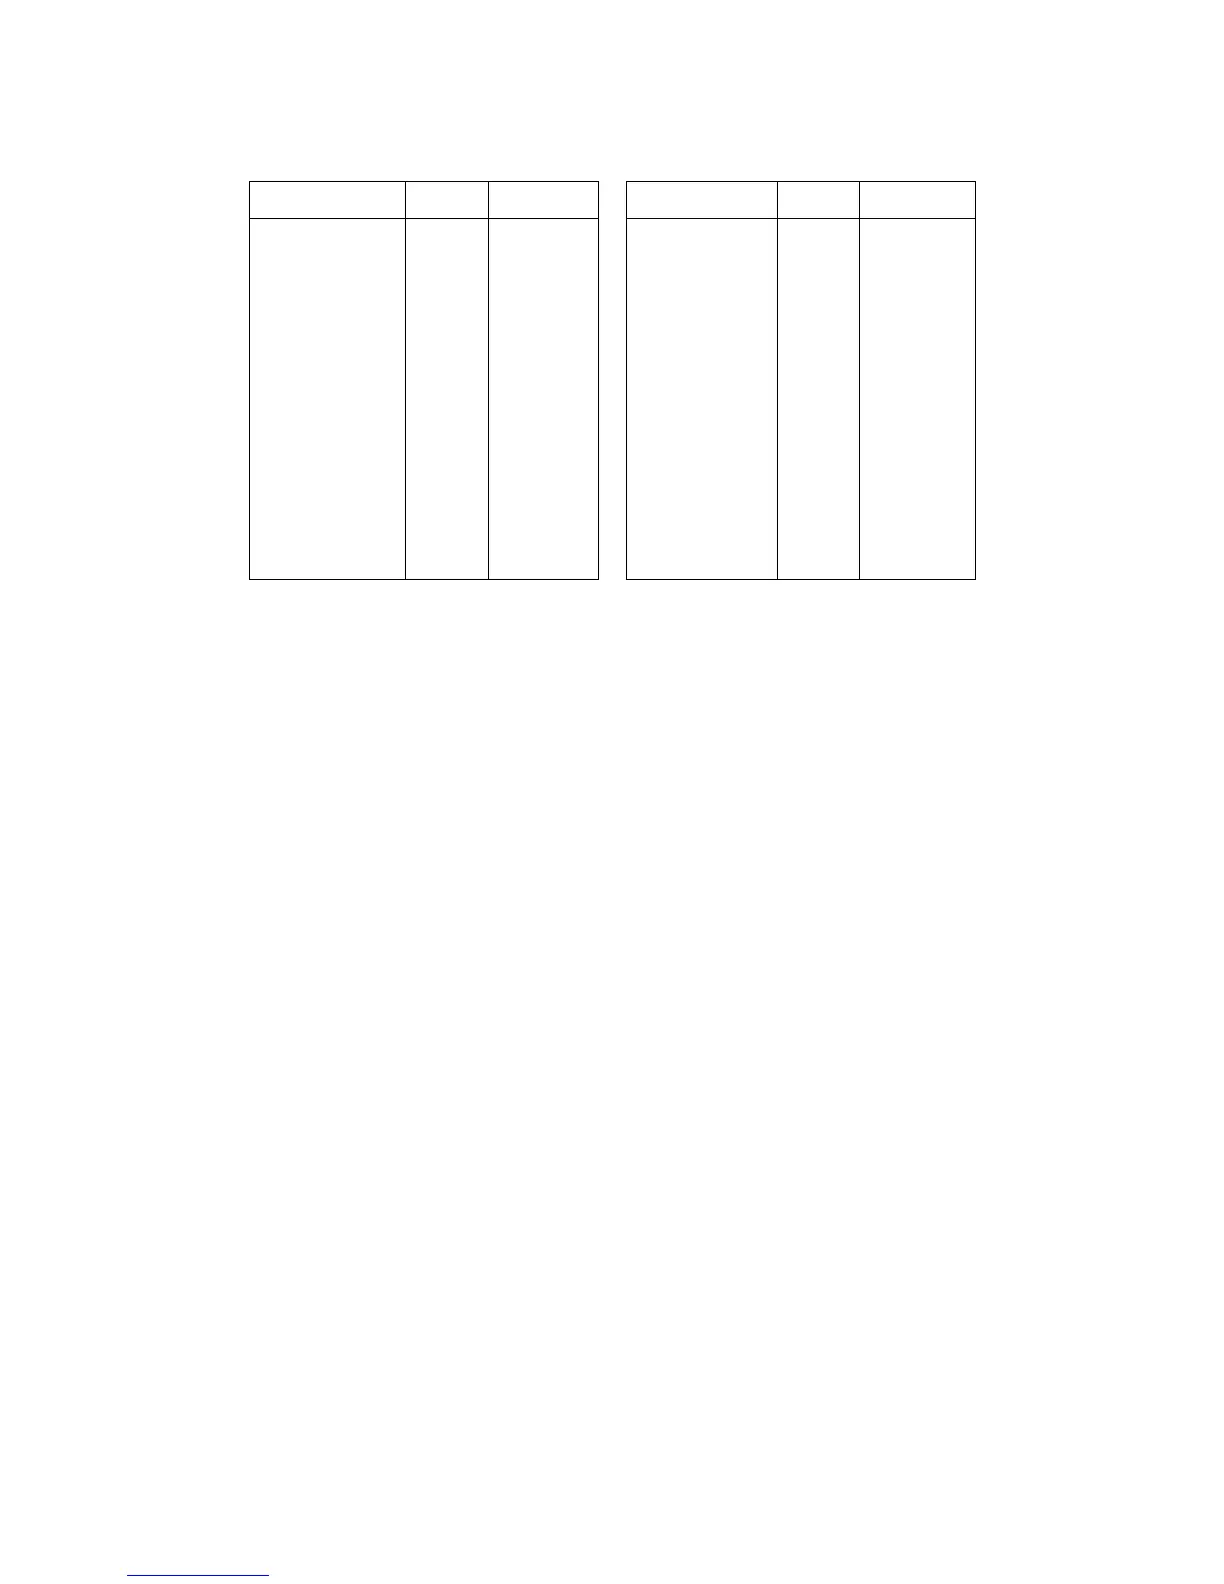
MORSE CODE TX RX MORSE CODE TX RX
**--
--*
***-*
**-*-
*-***
*-*-*
*--**
*---*
-**--
-*-*-
-*---
--*-*
---*-
*-***-
$00
$00
$21(!)
$00
$25(%)
$2B(+)
$00
$00
$00
$26(&)
$00
$00
$00
$00
$00
$00
$534E(SN)
$00
$4153(AS)
$4152(AR)
$00
$00
$00
$4B41(KA)
$00
$00
$00
$00
*-*-
----
**-**
**--*
*-**-
*-*--
*--*-
-**-*
-*-**
-*--*
--**-
--*--
---*-*
$2A(*)
$00
$00
$00
$00
$00
$00
$2F(/)
$00
$28(()
$00
$00
$23(#)
$4141(AA)
$00
$00
$00
$00
$00
$00
$2F(/)
$00
$28(()
$00
$00
$534B(SK)
For instance, the code character *-*- in the above chart can be transmitted by typing the * key
on the keyboard and when the KAM receives the code combination *-*- it will display AA. If you
want to define any special combination from the above list, you would use the MORSE command.
For example, let's say I want to send the code combination ---*- whenever I press the @ key on
my keyboard and when I receive the same combination, I want to display KM. To make this defini-
tion, I would use the command:
MORSE --*- 64 7577
In this example, 64 is the decimal code for the "@" character and 75 is the code for "K" while 77 is
the ASCII for "M". The definition could also be entered in hex if desired. An entry may be deleted
from the special definition by using the command Morse
(code)
00 0000.
When you are ready to return to receive mode, you use the directive Ctrl-C R or Ctrl-C E. These
two directive both will return you to receive mode, but they operate slightly differently. The
Ctrl-C R directive will return you to the receive mode IMMEDIATELY – even if you have data in the
transmit buffer which has not yet been sent. On the other hand, the Ctrl-C E directive will return
you to receive mode after ALL data currently in the transmit buffer has been transmitted.
The final step you need to know about CW operation with the KAM is how to leave the CW Mode
and return your TNC to the command prompt. This is accomplished with the Ctrl-C X directive.
You can use your KAM to practice CW with most HF transceivers on the market today. Set up your
key, keyer or bug connected to your key input of your HF transceiver, and connect the external
speaker jack of your transceiver to the KAM. Next, set your transceiver so that when you press the
key, it will generate a sidetone signal, allowing you to hear what you are sending. You will want to
be sure you are not actually transmitting at this time. Many of the transceivers will allow this by
tuning outside the normal amateur bands since they will not allow transmitting out of band. You
can turn the RF gain on your receiver down, so you will not hear other stations that may be on the
frequency you've chosen. By adjusting the KAM CWTONE command to the frequency of your side-
tone, your KAM will copy what you send and display it on your terminal screen, just by entering
the CW Mode. After a little practice, you'll find your CW sending skills improving.