10 English
3 Selecting operating modes
4 Cleaning
5 Emptying the fresh water tank
6 Emptying the wastewater container
7 Filling the fresh water tank(without detergent), rins-
ing the device
8 Cleaning the fluff filter, cleaning the fresh water filter
9 Allowing the device to dry
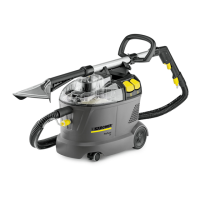
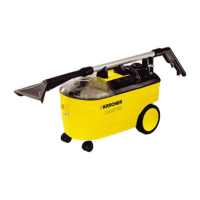
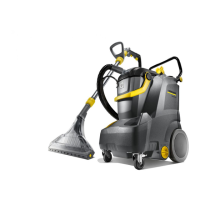
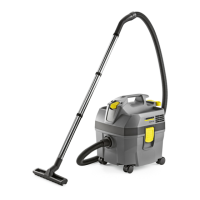
Description of the device
Illustration B
1 Upholstery nozzle
2 Holder for accessories
3 Mains cable
4 Hook for spray/suction hose or cable hook
5 Spray switch
6 Suction switch
7 Casing
8 Type plate
9 Steering roller
10 Spray hose connection
11 Floor nozzle for carpet cleaning (Adv only)
12 Carpet adapter
13 Floor nozzle latch
14 Suction hose connection
15 Cover
16 Fresh water tank
17 Device carrying handle including suction pipe holder
18 Nozzle mouthpiece (red)
19 Union nut
20 Suction pipe (Adv only)
21 Nozzle mouthpiece (green)
22 D-handle (Adv only)
23 Handle (Adv only)
24 Handle lever
25 Lever on the upholstery nozzle
26 Spray hose
27 Suction hose
28 Spray / suction hose
29 Quick Start Guide
30 Wastewater container, removable
31 Wastewater container carrying handle
32 Cover seal
33 Fluff filter
34 Fresh water filter
Table of nozzle mouthpieces
Start-up
1. Check the power cord, extension cable and hoses
for damage before each start-up.
Installing accessories
1. Adv only: Fit the suction pipe onto the floor nozzle
and hand-tighten the union nut on the floor nozzle.
2. Adv only: If necessary, slide the D-handle onto the
suction pipe and hand-tighten in the desired posi-
tion. The D-handle is easier to slide on with the help
of dishwashing detergent or other lubricant.
3. Adv only: Fit the handle onto the suction pipe and
hand-tighten the union nut on the handle.
4. Connect the suction hose to the suction hose con-
nection on the device. Insert the spray hose cou-
pling into the spray hose connection on the device
and latch into place.
5. Connect the suction hose to the upholstery nozzle
or the handle. Connect the spray hose coupling to
the upholstery nozzle or handle and latch into place.
Mixing the cleaning solution
DANGER
Danger from detergents
Risk of injury and damage
Observe all instructions that are included with the deter-
gents used.
Note
Warm water (maximum 50 °C) increases the cleaning
effect. Check the temperature resistance of the surface
to be cleaned.
Note
Use detergents sparingly to conserve the environment.
1. Mix fresh water and detergent in a clean container
(concentration as specified for the detergent). Dis-
solve the detergent in the water.
Filling the fresh water tank
1. Pour the cleaning solution into the fresh water tank.
The filling level must not exceed the "MAX" mark.
Defoaming agent
Note
Foam is generated in the wastewater container when
cleaning previously shampooed carpets. Foaming can
be prevented by adding defoaming agents.
1. Add defoaming agent (special accessory) to the
wastewater container.
Colour Part
number
Flow vol-
ume
Applica-
tion
Approved
for device
Yellow 6.415-
165.0
2.0 l/min Floor noz-
zle
Puzzi 10/2
Green 6.415-
105.0
0.7 l/min Floor noz-
zle
Puzzi 9/1 Bp
Brown 6.415-
166.0
1.0 l/min Floor noz-
zle
Puzzi 10/1
Blue 6.415-
928.0
1.0 l/min Uphol-
stery noz-
zle
Puzzi 8/1,
Puzzi 10/1,
Puzzi 10/2,
Puzzi 30/4
Red 6.415-
097.0
0.55 l/min Uphol-
stery noz-
zle, short
Puzzi 8/1,
Puzzi 9/1 Bp
 Loading...