This document provides assembly instructions for the Kargo Master PRO-III & IV truck rack, designed for trucks without shells. The rack is intended to carry cargo, with a strong emphasis on proper installation, load distribution, and safety to prevent vehicle instability and potential overturning.
Function Description:
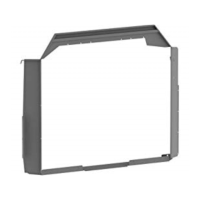
The Kargo Master PRO-III & IV is a heavy-duty truck rack system designed to transport cargo above the truck bed. It consists of multiple components, including front and rear footplates, side channels, front and rear legs, and crossbars, all designed to be assembled and securely attached to the truck bed rails. The rack's primary function is to provide an elevated platform for carrying long or bulky items that would not fit within the truck bed or require additional support. The design incorporates swaged joints, which are sealed with "goop" sealant to prevent moisture ingress and internal rusting of the tubes, thereby extending the life of the rack. The system is engineered to distribute the load, with approximately 75% of the rack load carried by the front legs. Optional bed supports are available for users who anticipate carrying heavy loads, as modern truck beds are often made from thin steel with limited load-bearing capacity.
Important Technical Specifications:
- Parts Included: The assembly uses parts numbered 80000, 80020, and 90000.
- Fasteners: A variety of bolts, washers, nuts, and set screws are used, including:
- Hex Bolts: 1/2" x 3 1/2" (A, 4 ea.)
- Button Head Bolts:
- 1/2" x 2 1/4" (B, 2 ea.)
- 1/2" x 13 x 2 1/2" (S, 6 ea., yellow zinc plated, grade 5)
- 3/8" x 16 x 2 1/2" (T, 2 ea., yellow zinc plated, grade 5)
- 3/8" x 2 1/4" (C, 2 ea.)
- 3/8" x 1 3/4" (D, 8 ea.)
- 5/16" x 2 1/4" (E, 2 ea.)
- 5/16" x 3/4" (F, 8 ea.)
- Carriage Bolts: 5/16" x 3/4" (G, 4 ea.)
- Allen Head Set Screws: 5/16" x 3/8" (P, 4 ea.)
- T-Nuts: 3/8" (Q, 2 ea.)
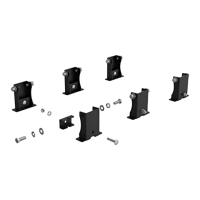
- Bed Rail Clamps: (R, 6 ea.)
- Flat Washers:
- 1/2" SAE (H, 14 ea.)
- 3/8" SAE (J, 22 ea.)
- 5/16" (K, 14 ea.)
- Lock Washers: 3/8" (U, 4 ea., yellow zinc plated, grade 5)
- Nuts:
- 1/2" Jam Nut (L, 6 ea.)
- 3/8" Lock Nut (M, 10 ea.)
- 5/16" Lock Nut (N, 14 ea.)
- Load Capacity: The Kargo Master rack has a load-bearing capacity of 1700 lbs. However, users are strongly advised to consult their vehicle manufacturer for the maximum Gross Axle Weight Rating (GAWR) or Gross Vehicle Weight Rating (GVWR) and never exceed these limits.
- Structural Integrity: The rack's structural integrity is compromised if the REAR CROSS BAR is removed.
- Material: Modern truck beds are noted to be made from thin steel, which can be deformed by heavy loads, necessitating optional bed supports.
Usage Features:
- Assembly Sequence: The instructions emphasize following a step-by-step sequence for ease and speed of assembly.
- Footplate Mounting Options:
- Front Footplates: Can be mounted by aligning pre-drilled holes with the truck's stake pocket, using a T-nut (Q) and bolt (T) to secure it from underneath, and a bed rail clamp (R) with bolt (S) for the rear. Alternatively, users can drill 3/8" holes through the truck bedrail and use fasteners D, K, & M.
- Rear Footplates: Similar mounting options as the front, either using existing stake pockets or drilling 3/8" holes through the bedrail.
- Goop Application: A critical step involves applying an airtight bead of "goop" sealant around every swaged joint to prevent moisture from leaking in and out, which could lead to internal rusting and rusty water discharge. This seal must be maintained throughout the rack's life.
- Leg Orientation: Both front and rear legs must angle outward.
- Adjustments: The rack allows for adjustments during assembly to ensure proper fit and alignment, especially when positioning the front legs based on the distance between front and rear footplate saddles.
- Final Tightening: All nuts and bolts, except those for the leg footplates and center crossbar, should be tightened down in the final step. The center crossbar bolts should be snugged, and care must be taken not to overtighten on double-wall bed construction to avoid deforming the truck's sheet metal.
- Safety Precautions:
- Always secure payloads properly for safe transportation.
- Do not use the rack with the rear crossbar removed.
- Avoid overloading the vehicle; weight carried above the truck bed significantly increases the vehicle's tendency to overturn.
- Keep heavy loads evenly distributed and as low as possible.
- Optional bed supports are recommended for heavy loads to prevent bed wall deformation.
Maintenance Features:
- Goop Sealant: Regular inspection and maintenance of the "goop" sealant at all swaged joints are crucial to prevent moisture ingress, internal rusting, and rusty water leakage. This ensures the longevity and structural integrity of the rack.
- Bolt Tightness: Periodic checks of all nuts and bolts are recommended to ensure they remain tightened, especially after initial use and before carrying heavy loads, as vibrations and load stresses can cause fasteners to loosen over time. The instructions specifically mention tightening all nuts and bolts except for leg footplates and the center crossbar, which should be snugged.
- Lock Pins: For rear mount bolts, ensure lock pins (J) slide in and out smoothly and freely before tightening, indicating proper alignment and function.
The manual also provides contact information for technical support: (916) 638-8703 or (800) 343-7486, available Monday-Friday from 8:00 A.M. to 4:30 P.M. (Pacific time). The company's address is 11253-G Trade Center Drive, Rancho Cordova, CA 95742.