EasyManua.ls Logo

KB Genesis KBAC-27D User Manual

Default Icon
35 pages
To Next Page IconTo Next Page
Page #1 background imageLoading...
Page #1 background image
©2016 KB Electronics, Inc.
(see back cover)
Installation & Operation Manual
KBAC SERIES
Adjustable Frequency Drives for 3-Phase AC Motors
NEMA 4X / IP65
Variable Speed/Soft-Start AC Motor Drive
with Electronic Motor Overload Protection
1
Washdown and Watertight for Indoor and Outdoor Use
Rated for 208 – 230, and 400/460 Volt 50 & 60 Hz
3-Phase & PSC
2
AC Induction Motors from Subfractional thru 10 HP
Operates from 115, 208/230 and 400/460 Volt 50/60 Hz AC Line
3
This Manual Covers Models
KBAC-24D, 27D, 29, 29 (1P), 45, 48, 217, 217S, 217F, 217SF, 416, 416S, 416F, 416SF
Notes: 1. UL approved as an electronic overload protector for motors. 2. Special software
is available – contact our Sales Department. 3. GFCI Operation: Models KBAC-24D, 27D, 29,
29 (1P), 45, 48 require custom software – contact our Sales Department. The KBAC-217, 416
Series are jumper selectable (J12) for standard (G1) and sensitive (G2) GFCIs. 4. Installation
of a CE approved RFI lter is required.
The information contained in this manual is intended to be accurate. However, the manufacturer retains
the right to make changes in design which may not be included herein.
NOTE: THE DRIVE IS FACTORY SET FOR
60 Hz MOTORS. FOR 50 Hz MOTORS, SEE
SECTION 6.4 ON PAGE 24.
See Safety Warning
on Page 6.
4
AC MOTOR SPEED CONTROL
KBAC SERIES • NEMA 4X / IP 65
Hybrid Drive
AC MOTOR SPEED CONTROL
KBAC SERIES • NEMA 4X / IP 65
Hybrid Drive
KBAC SERIES • NEMA 4X / IP65
AC MOTOR SPEED CONTROL
Hybrid Drive

Table of Contents

Question and Answer IconNeed help?

Do you have a question about the KB Genesis KBAC-27D and is the answer not in the manual?

KB Genesis KBAC-27D Specifications

General IconGeneral
BrandKB Genesis
ModelKBAC-27D
CategoryDC Drives
LanguageEnglish

Summary

QUICK-START INSTRUCTIONS

1.1 AC Line Input Connection

Wire the AC Line input to Terminal Block TB1. See Section 5.1 on pages 19 and 20.

1.3 Ground Connection

Connect the ground wire (earth) to the ground screw, as shown in Figures 10-12.

1.4 Motor Connection

Wire the motor to Terminal Block TB1 Terminals U, V, W, as shown in Figures 10-12.

1.7 Jumper Settings

All jumpers have been factory set for most applications. Some jumpers may need to be set.

1.8 Trimpot Settings

All trimpots have been factory set for most applications. Some require adjustment.

SAFETY WARNING

General Safety and Hazard Information

Covers electrical and operational hazards, installation requirements, and safe handling practices.

INTRODUCTION

3.3 PROTECTION FEATURES

Lists motor overload, inrush current limit, short circuit, regeneration, and voltage protection.

TRIMPOT ADJUSTMENTS

Current Limit (CL) Trimpot

Sets the current limit (overload) which limits the maximum current to the motor.

IMPORTANT APPLICATION INFORMATION

4.2 Electronic Motor Overload Protection

Explains the drive's I²t Overload Protection, Current Limit (CL), and Power Start™.

WIRING INSTRUCTIONS

5.1 AC Line Input Connection

Wire the AC Line input to Terminal Block TB1. See Section 5.1 on pages 19 and 20.

5.2 Ground Connection

Connect the Ground Wire (Earth) to the Green Ground Screw. See Figures 10-12.

5.3 Motor Connection

Wire the motor to Terminal Block TB1 Terminals U, V, W. See Figures 10-12.

SETTING SELECTABLE JUMPERS

6.1 Line Input Voltage Selection (J1)

How to set Jumper J1 for 208/230V or 115V AC line input.

6.2 Motor Horsepower Selection (J2)

Set Jumper J2 to the corresponding motor horsepower rating. See Figure 22.

Motor Frequency and Output Frequency Selection (J4, J5)

Setting jumpers J4 and J5 for motor frequency and output frequency selection.

DRIVE OPERATION

Drive Start-Up Procedure

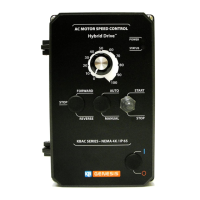
Guides through the initial setup and power-on sequence for the drive.

Restarting Drive After Fault

Explains how to restart the drive after faults like undervoltage or overload.

Diagnostic LEDs Overview

Trimpot Adjustment Guide

Motor Overload Protection (I²t & CL)

Sets current limit to prevent burnout and nuisance trips. Factory set to 160%.

Related product manuals