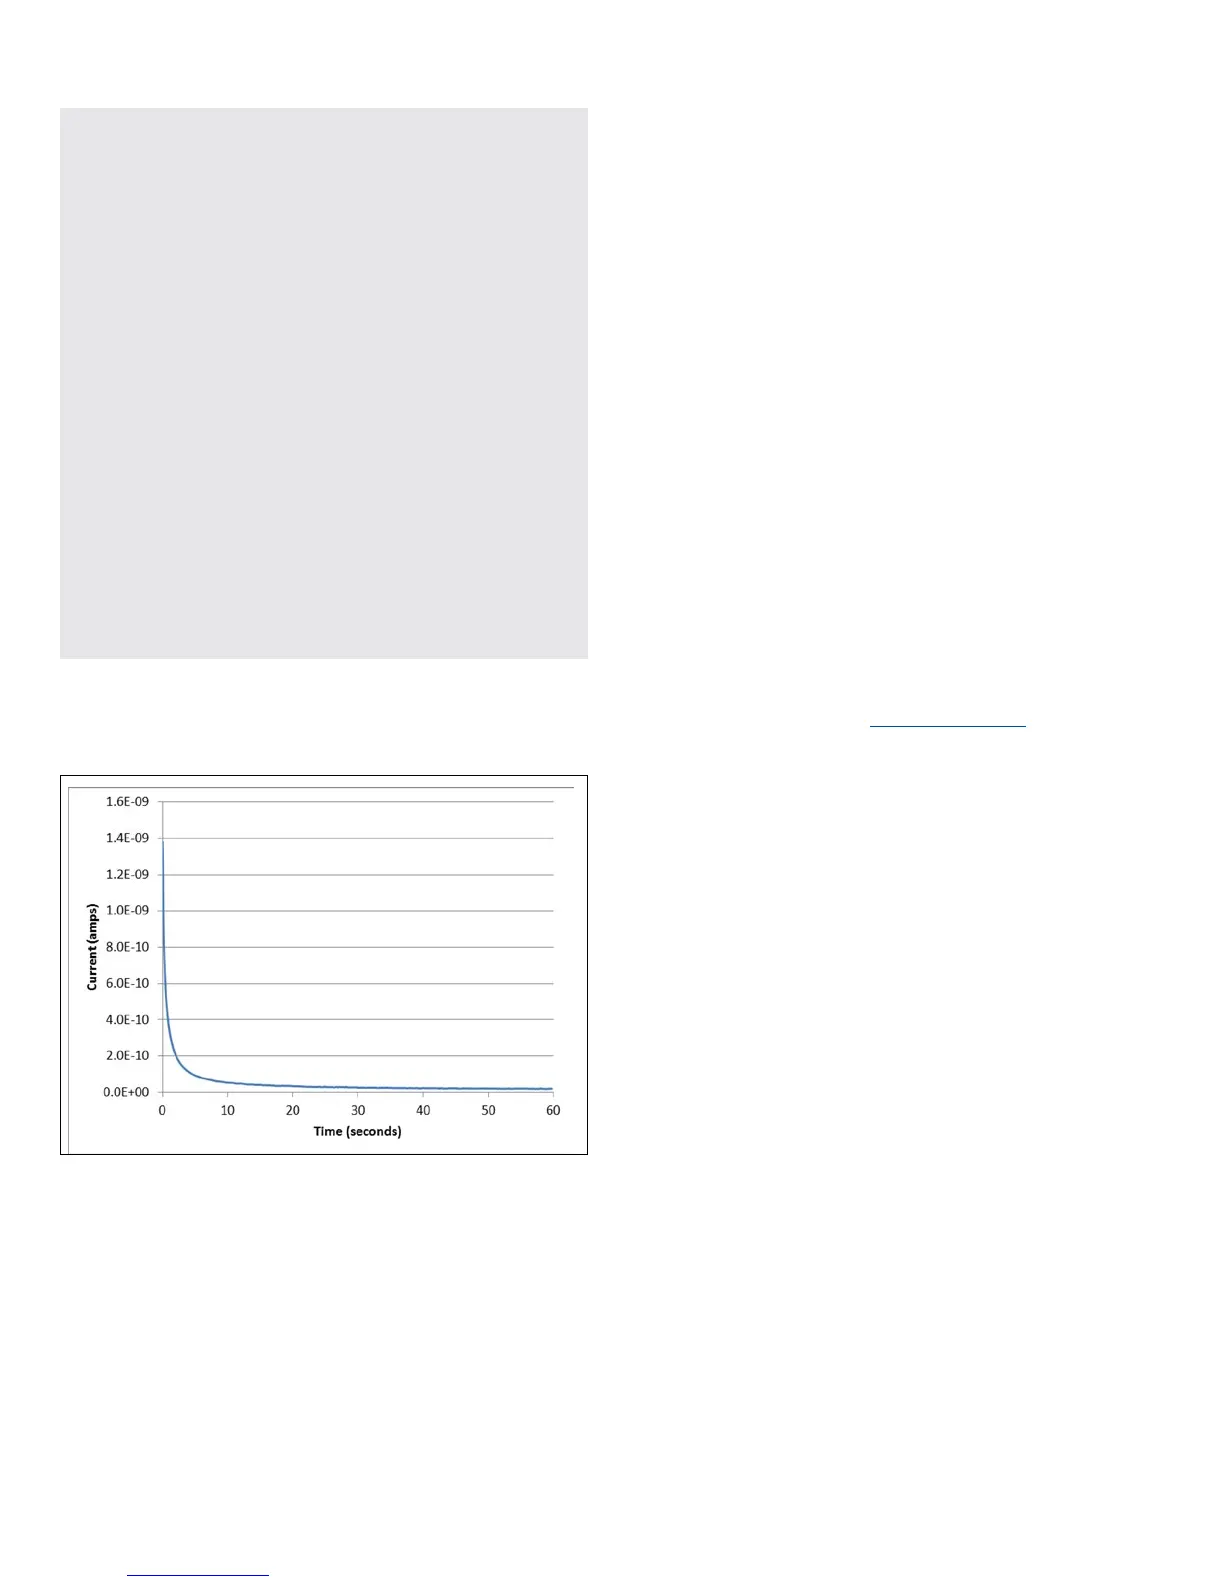
The graph in the
Figure 6
shows the results of this
application. Notice the exponential current response of the
capacitor as it charges up to 20 V over time.
Figure 6. Leakage current test results.
Measuring insulation resistance
The following applications demonstrate how to use the Model
2450 to measure insulator resistance. The applications shows
how to use the front-panel interface, the remote interface using
the SCPI command set, and the remote interface using the Test
Script Processor (TSP
®
) command set.
You make insulation resistance measurements between traces
on a printed circuit board and between conductors in cables and
connectors.
This application sets the Model 2450 to source 20 V and
makes 10 resistance readings with a 100 ms interval time. Once
the measurements are made, the output is turned off.
For this test, you will:
• Reset the instrument
• Set the instrument to read the rear terminals
• Select the source voltage function and measure
resistance function
• Set the magnitude of the voltage source output
• Turn on autoranging
• Use the Simple Loop trigger model template to set the
numbers of readings and interval time
• Turn on the source output
• Make readings
• Turn off the source output
Set up the insulation resistance
application using the front panel
To set up the application from the front panel:
1. Connect the device under test (DUT) to the rear panel of the
Model 2450, as described in Device connections.
2. Reset the Model 2450.
3. Press the MENU key.
4. Under System, select Manage.
5. Select System Reset, and then select OK.
6. Press the TERMINAL FRONT/REAR switch to set the
instrument to use the rear-panel terminals (R is displayed to
the left of the switch).
7. Press the HOME key.
8. Press the FUNCTION key.
9. Under Source Voltage and Measure, select Resistance.
10. Select the button next to Source (at the bottom of the screen).
11. Enter 20 V (or other applicable test voltage) and select OK.
12. Press the MENU key.
13. Under Trigger, select Templates.
14. Next to Templates, select SimpleLoop.
15. Set Count to 10 and select OK.
16. Set Delay to 0.1 seconds and select OK.
17. Press the HOME key.
18. Press the OUTPUT ON/OFF switch to enable the output.
19. Press the TRIGGER key to begin taking readings. The
resistance measurements appear in the measure area (top
half) of the Home screen.
20. Press the OUTPUT ON/OFF switch to turn off the output
when you are done making measurements.
-- Reset the instrument, which also clears the buffer.
reset()
-- Set up the source function. smu.source.func = smu.
FUNC_DC_VOLTAGE smu.source.ilimit.level = 10e-3 smu.
source.level = 20
-- Set up measure function. smu.measure.func = smu.
FUNC_DC_CURRENT smu.measure.terminals = smu.TERMINALS_
REAR smu.measure.autorange = smu.ON smu.measure.nplc =
1
-- Turn on the output and initiate readings.
smu.source.output = smu.ON trigger.model.
load(“DurationLoop”, 60, 0.2) trigger.model.initiate()
-- Wait for the trigger model to complete.
waitcomplete()
-- Parse index and data into three columns. print(“Rdg
#”, “Time (s)”, “Current (A)”) for i = 1, defbuffer1.n
do
print(i, defbuffer1.relativetimestamps[i],
defbuffer1[i])
end
-- Discharge the capacitor to 0 V and turn off the
output. smu.source.level = 0
delay(2)
smu.source.output = smu.OFF
 Loading...