- 9 -
GB
USER MANUAL
PLEASE READ CAREFULLY THESE INSTRUCTIONS BEFORE USING THE EQUIPMENT. REFER TO THIS MANUAL WHEN
NECESSARY.
The appliance must not be tampered. The installation and the adjustment carried out at the plant must not be mo-
died. It can be dangerous trying to modify, remove parts or use components dierent from those recommended.
The appliance must be used by competent personnel and in compliance with safety regulations in force.
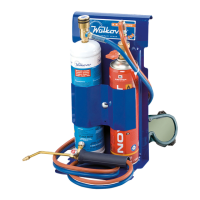
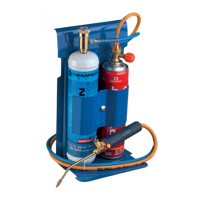
Our appliances are supplied complete with one oxygen cartridge and one gas cartridge both charged and ready
for use.
Recommendations:
- It is strongly recommended to use only original KEMPER items (see table at the beginning).
- Using dierent types of gas containers can be dangerous
- Switching on the device only after having prepared the material to be welded
- Work with a correct mixing of oxygen and gas in order to optimize consumption
- Do not connect containers before reading instruction and recommendation mentioned on them.
- If you work in close proximity to other people, point out the working area
- DO NOT smoke during all the operations of preparation, use, and maintenance.
- Connect the containers in a well-ventilated area, free from ames or re sources, and away from other people.
Before connecting containers:
º Place the equipment in a stable position and appropriate in order to avoid falls.
º Check that the seals of the connecting joint, if are present, are placed correctly and are not damaged
º Ensure that exible hoses are not damaged
º Do not use a machine with any damage or has damaged components
º Close the valves of the device before connecting containers
º
HOW TO CONNECT AND USE THE EQUIPMENT
1. Verify that welding torch stopcocks are safely closed before starting:
> for oxygen ensure that:
on models 555C – 555D – 555H200 – 555K: regulator is completely tightly closed by turning the adjusting
screw anticlockwise.
on models 555KM - 555H200M (with manometers) 555BM: regulator is completely tightly closed by turning
the adjusting screw clockwise.
> for GAS (on all the models): regulator is tightly closed by turning the orange adjusting screw clockwise.
2. Screw the two reducers on related cartridges (clockwise rotation), after they have been removed from the
support; replace the cartridges when operation took place;
CAUTION: It is recommended to screw the regulator of gas on the GAS cartridge without forcing tightening.
The two seals (one positioned on the cartridge and one on the adaptor) guarantee a perfect seal without ef-
fort. An excessive tightening involve a deformation of the valve with consequent resulting missing emission of
gas. Fig A and B, in condition B the cartridge is no longer usable)
3. On models 555C – 555D – 555H200 – 555K: open the oxygen, by turning clockwise, to its end point, the
adjustment handwheel placed on the oxygen cylinder. Turn on the gas, by turning anticlockwise, the orange
handwheel placed on the gas cylinder;
On models 555KM - 555H200M(with manometers) – 555BM: open by turning counter-clockwise, to its end
both the valve regulator of adapter located on oxygen cylinder and also the orange regulator of adapter loca-
ted on gas cylinder.
4. At this point, open the torch screw with the word “GAS”, bring the lance close to a ame and adjust it so that the
ame that comes out from the spout remains attached to it.
5. Slowly open the oxygen screw until the ame becomes light blue. An excessive emission of oxygen can cause
the ame to detach. If this happens, close the oxygen and gas stopcocks and repeat steps from point (4).
IMPORTANT NOTE: before turning on the ame ensure all necessary parts have been properly connected. Check
for hose leaks by using appropriate bubble detectors (see items no. 1726) or a solution of water and soap (DO NOT
CHECK FOR LEAKS BY USING A FLAME). Repeat this check procedure every time a cylinder is replaced. Do not use
GB
 Loading...