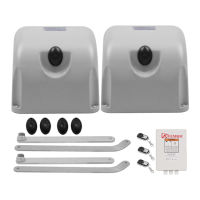
14
Note: Ensure the power is OFF before the connecting of the control board.
Note: You should use the five core cable with PVC sheath to connect the articulated arm to the
main control board. Wires in the five core cable used to connect the motor should be greater than
1mm
2
(16AWG). Wires in the five core cable used to connect the limit switches should be greater
than 0.3mm
2
(22AWG).
Arm 1 (Installing in the left side)
Use the five core cable to connect the arm to the control board. The MOTOR+ terminal of the arm should
be connected to the MOTOR1- terminal of the control board. The MOTOR- terminal should be connected to
the +MOTOR1 terminal of the control board. The DN terminal should be connected to the DLT1 terminal of
the control board. The COM terminal should be connected to the COM terminal of the control board. The
UP terminal should be connected to the ULT1 terminal of the control board.
Arm 2 (Installing in the right side)
Use another five core cable to connect the arm 2 to the control board. The MOTOR+ terminal of the arm
should be connected to the +MOTOR2 terminal of the control board. The MOTOR- terminal should be
connected to the MOTOR2- terminal of the control board. The DN terminal should be connected to the
ULT2 terminal of the control board. The COM terminal should be connected to the COM terminal of the
control board. The UP terminal should be connected to the DLT2 terminal of the control board.
NOTE: It is recommended that ARM 1 is installed in the Master Gate, and ARM 2 is installed in the Slave
Gate.
Alarm Lamp (optional)
The red wire of the alarm lamp should be inserted into either LAMP (#11) terminal, the white wire into the
other one (#12).
Back-up Battery (optional)
The “24V+” of the battery should be wired to the BAT+ (#13) terminal, “24V-” should be wired to “BAT-”
(#14) terminal.
Recommend strongly to use the controller KNL118 (WA4004
)
to connect Battery with battery’s
Terminal of control board if the battery is used as the primary power supply in system (such as SOL
PLUS KIT). Please refer to the user manual of control KNL 118
(
WA4004
)
separated.
Photocell Beam System (PBS) (optional)
Use a 2-core cable to connect the “- ~” terminal of the photocell’s emitter to the “14” terminal, the “+ ~”
terminal to the “9” terminal. Also the “- ~” and “+ ~” terminals of the photocell’s receiver should be
connected to the “16” and “17” terminals in parallel.
Use another 2-core cable to connect the “COM” terminal of the receiver to the “17” terminal, the “NC”
terminal to the “18” terminal.
Push Button (optional)
The red wire should be inserted into either O/S/C terminal, the white wire into the other one.
Loop Detector (optional)
First insert the LOOP DETECTOR BOARD into the CONTROL BOARD, and then connect the LOOP
DETECTOR to the control board. Detailed instruction please refers to the manual instruction of LOOP
DETECTOR separated.
Exit Wand (optional)
First insert the EXIT WAND BOARD into the CONTROL BOARD, and then connect the EXIT WAND to the
control board. Detailed instruction please refers to the manual instruction of EXIT WAND separated.
Electric Lock (optional)
The electric lock should be wired to the “LOCK” terminal.
External Receiver (optional)