11
10
Measurement
& Icon Units
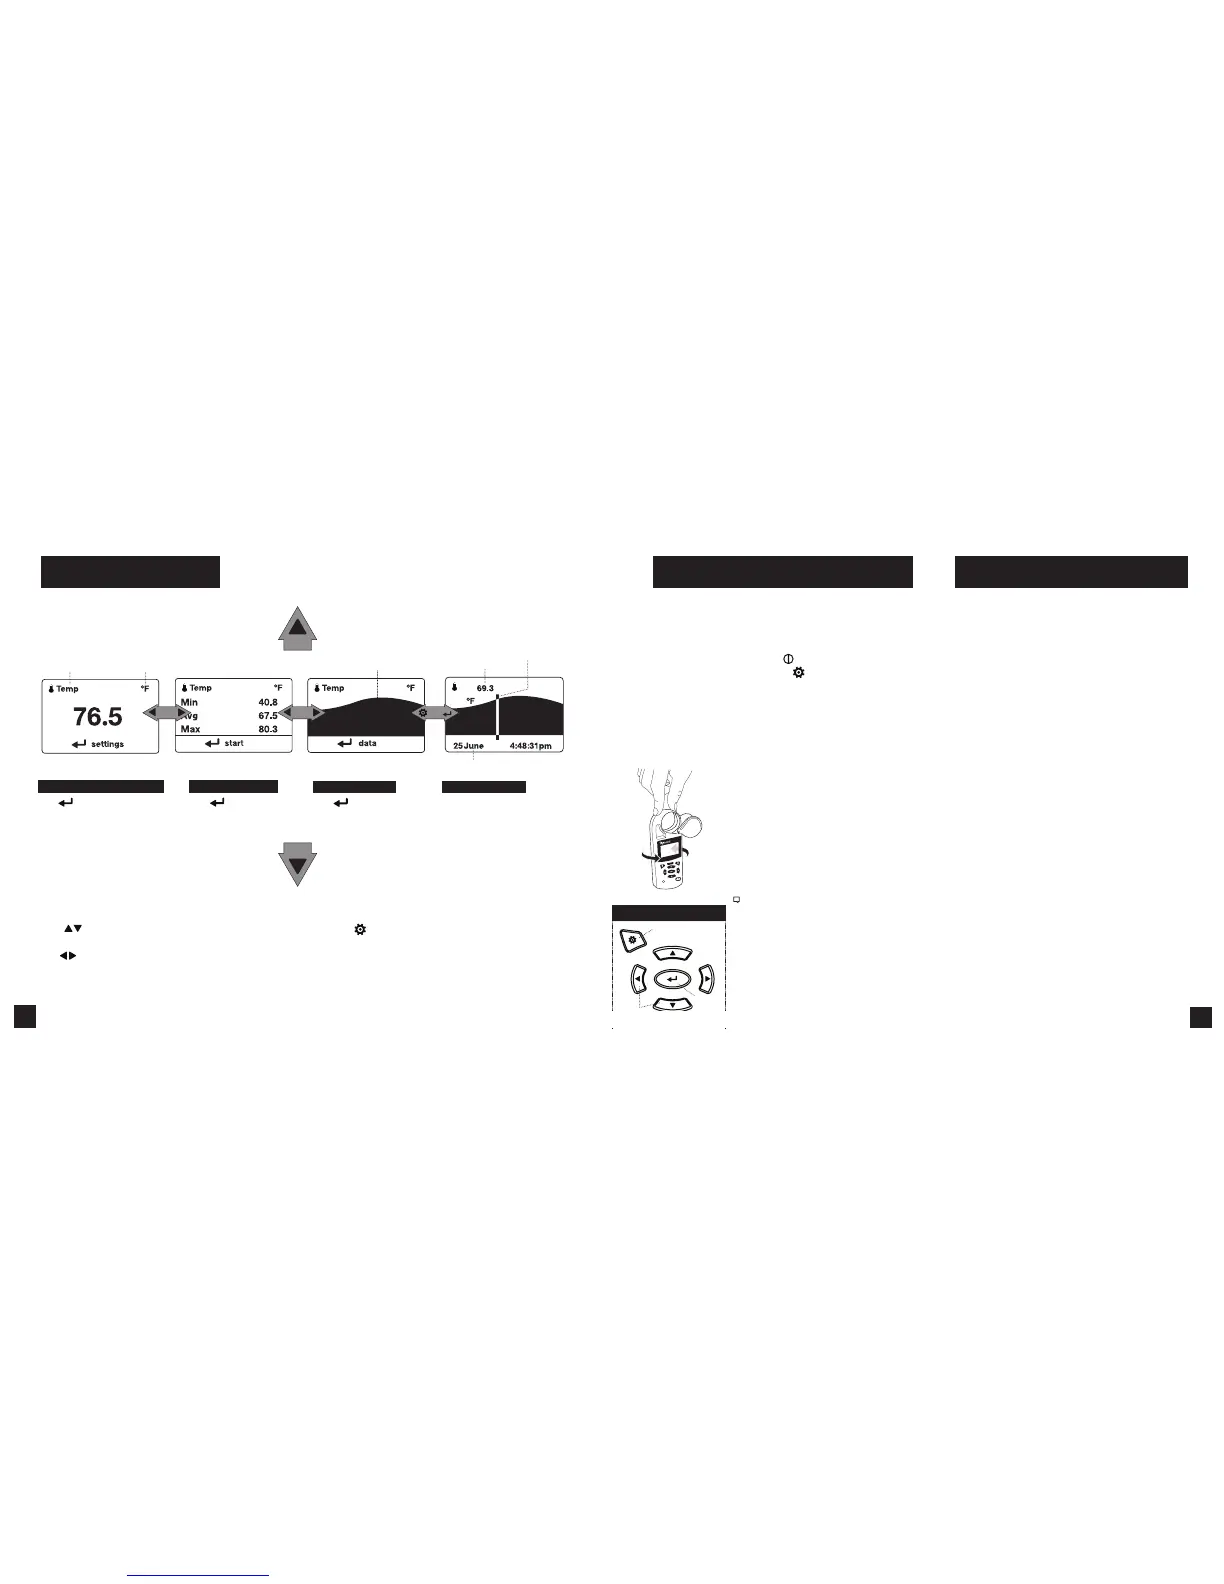
WEATHER MODE SCREENS
Graph of Stored Data Log
Data Point Value
Data Point Scroll Bar
Current Measurement Screen
Press
SELECT to enter settings
menu for that measurement.
Min Ave Max Screen
Press
SELECT to start, stop
and clear the Min/Avg/Max
tracking.
Data Graph Screen
Press
SELECT to enter
the Data Log Detail Screen to
view logged data points.
Data Points Screen
Press LEFT/RIGHT to scroll through
data points. Press OPTIONS to exit
Data Log Details Screen.
MORE MEASUREMENTS
MORE MEASUREMENTS
Data Point Time Stamp
» The UP/DOWN buttons navigate between all weather
measurements set to “On” in Options|Measurements.
» The
LEFT/RIGHT buttons scroll between the three
display screens for the measurement.
» The
OPTIONS button exits the settings submenu
and Data Log Detail Screen.
1. INSTALL BATTERY. Slide the battery door latch and
open door. Insert the provided AA lithium battery
as indicated by the label. Replace the battery door,
ensuring it “clicks” fully into place.
2. POWER ON KESTREL. Press
to power on Kestrel.
3. ENTER OPTIONS MENU. Press
to enter the Options
Menu.
4. CALIBRATE THE COMPASS. Scroll to and select
System. Scroll to and select Compass Cal. Follow the
on-screen instructions:
» Place the base of the Kestrel on a
at surface at least 3 feet from any
large metal objects.
» Start the calibration routine.
Rotate the Kestrel around its
vertical axis 3 times, keeping the
unit as vertical as possible and
taking approximately 10 seconds
per full rotation. You may need to
restart the routine a few times until
you get the timing correct.
Note! When taking compass readings,
keep the Kestrel as vertical as possible for
maximum accuracy.
5. EXIT OPTIONS MENU.
GETTING STARTED
All additional settings are accessed from the
options menu.
1. SET AUTO SHUTDOWN. Scroll to and select
Display. Scroll to Auto Shtdwn and choose a
time window after which the Kestrel will shut
down without any button presses.
2. SET BACK LIGHT. Scroll to and select Display.
Scroll to Backlight and set to either standard
White or night vision preserving Red.
3. SET DATE AND TIME. Scroll to and select System.
Scroll to and select Time & Date. Adjust the time
and date.
4. TURN ON/OFF MEASUREMENT SCREENS.
Scroll to and select System. Scroll to and select
Measurements. Set each measurement screen
to either On or O as desired.
5. SET UNITS. Scroll to and select System. Scroll
to and select Units. To change all units select
Global, then set Global to Imperial or Metric,
and then scroll to Apply and select Go. To set
units individually, scroll to each measurement
type in the Units submenu and set to the desired
units. Units can also be set in the Settings menu
for each measurement.
3x
Scroll/Adjust
Select
BUTTON QUICK KEY
Options/Exit
ADDITIONAL SETTINGS
Shop for Quality products online at:
1.888.610.7664
www.
 Loading...