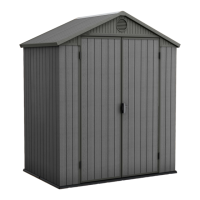
Do you have a question about the Keter DARWIN 6x4 and is the answer not in the manual?
Ensures a level ground surface for stable shed assembly.
Advice on building a base using wood or concrete for the shed.
Guidance on maintaining sufficient space around the assembly area for external access.
Provides the external measurements of the shed's floor.
Instruction to review safety and care guidelines before proceeding with assembly.
Lists the necessary tools for assembling the shed.
States that the assembly process requires two individuals for safety and efficiency.
Information about extra small parts included in the packaging for potential spares.
Instruction to unpack and lay out all shed parts on a clean surface for identification.
Identifies the components that constitute the shed's floor.
Identifies the components that constitute the shed's walls.
Identifies the components that constitute the shed's roof.
Identifies the components specifically for the shed doors.
Identifies the metal components used in the shed assembly.
Lists and illustrates small components and all types of screws used.
Illustrates the first step of floor assembly using two DRLF parts.
Illustrates the second step of floor assembly using sc12t screws.
Illustrates the third step of wall assembly using one DRCP part.
Continues wall assembly by connecting wall panels with DRCP.
Continues wall assembly by attaching a DRPS part.
Continues wall assembly by securing a panel with a sc12t screw.
Continues wall assembly with another DRCP part.
Continues wall assembly by securing a panel with a sc12t screw.
Continues wall assembly with another DRPS part.
Continues wall assembly by securing a panel with a sc12t screw.
Continues wall assembly by attaching a DRWCP part.
Continues wall assembly by securing a panel with a sc12t screw.
Continues wall assembly by attaching another DRPS part.
Continues wall assembly by securing a panel with a sc12t screw.
Continues wall assembly by connecting another DRCP part.
Continues wall assembly by securing a panel with a sc12t screw.
Continues wall assembly by attaching another DRPS part.
Continues wall assembly by securing a panel with a sc12t screw.
Continues wall assembly by connecting another DRCP part.
Continues wall assembly by securing a panel with a sc12t screw.
Illustrates roof assembly steps involving DRLFG, DRSFG, and sc12t screws.
Illustrates roof assembly steps involving DRMTF and sc12t screws.
Illustrates roof assembly steps involving DRDML and DRDMR parts.
Visual instruction for fitting the roof apex.
Illustrates roof assembly using sc12t screws to secure the apex.
Illustrates roof assembly using sc12t screws to secure the main structure.
Illustrates roof assembly steps involving DRLRG, DRSFG, and sc12t screws.
Visual instruction for attaching roof panels to the main structure.
Illustrates roof assembly using sc12t screws to secure roof panels.
Illustrates roof assembly steps involving DRCB and sc12t screws.
Illustrates roof assembly steps involving DRPM parts for trim.
Illustrates roof assembly steps involving DRCC and sc12t screws for trim.
Illustrates roof assembly steps involving DRPT parts for the final panels.
Illustrates roof assembly using sc12t screws to secure roof panels.
Illustrates roof assembly using sc12t screws to secure roof panels.
Illustrates roof assembly steps involving DRMD T parts for support beams.
Illustrates roof assembly steps involving DRPT parts for final panels.
Illustrates roof assembly using sc12t screws to secure roof panels.
Illustrates roof assembly using sc12t screws to secure roof panels.
Illustrates roof assembly using sc36 screws to secure roof overlaps.
Illustrates roof assembly using sc12t screws to secure roof panels.
Illustrates roof assembly using sc12t screws to secure roof panels.
Illustrates roof assembly using sc7t screws to secure roof panels.
Illustrates roof assembly using sc12t screws for final panel securing.
Illustrates roof assembly steps involving DRWMP and sc12t screws for trim.
Illustrates roof assembly using sc12t screws to secure roof trim.
Illustrates roof assembly steps involving D6BP and sc12t screws for vent cover.
Illustrates securing the shed base to the ground using sc36 screws.
Illustrates securing the shed base to the ground using sc36 screws.
Illustrates door assembly steps involving DRPD parts to assemble the door frame.
Illustrates door assembly steps involving DR6D and DRPD parts to attach panels.
Illustrates door assembly steps involving DRMA and DRMW parts for support bars.
Illustrates door assembly using sc12t screws to secure door panels.
Illustrates door assembly using sc12t screws to secure door panels.
Visual instruction for preparing door panels before installation.
Illustrates door assembly steps involving DRHG and sw15d screws for hinges.
Illustrates door assembly using sw15d screws to attach hinges.
Illustrates door assembly steps involving DRLH, DRLM, and sw15d screws for handles/locks.
Illustrates door assembly using D6L and sw15d screws to install door handles.
Visual representation of option A for shed assembly.
Visual representation of option B for shed assembly.
Instructions on using shims to level the shed or door if uneven.
Instructions on how to securely attach the shed to a foundation using screws.
States the shed is for storage only and not for habitation.
Recommends anchoring the shed to an object or ground for stability.
Advises against assembly on windy or cold days and recommends periodic checks.
Covers careful handling of parts, using correct tools, and power tool safety.
Guidance on cleaning, and warnings against storing hot items or volatile chemicals.
Cautions against heavy wall loads, keeping the roof clear, and wind direction impact.
Prohibits standing on the roof and advises checking local permit requirements.
Details the warranty period, material quality, and defect definition.
Lists conditions like wear, misuse, and natural events not covered by the warranty.
Explains how improper assembly, use, or alterations can void the warranty.
Outlines Keter's liability limits and the procedure for submitting warranty claims.
Instructions for contacting Keter customer service for missing or broken parts.
| Material | Resin |
|---|---|
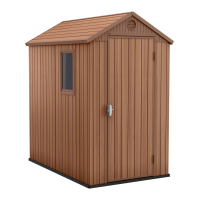
| Color | Brown |
| Floor | Yes |
| Lockable | Yes |
| Weather Resistant | Yes |
| Assembly Required | Yes |
| Dimensions | 6 x 4 feet |