Do you have a question about the KETRON SD1 and is the answer not in the manual?
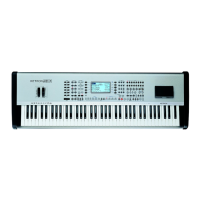
Access to crucial function menus via eight push buttons on the left side of the control panel.
Controls for accessing various functions and modes, arranged on the right side of the control panel.
Buttons used for display navigation, parameter entry, and procedure confirmation.
Overview of the main display screen and how function keys interact with parameters.
Twelve buttons for selecting musical styles, organized by genre and pages.
Two rows of eight buttons for selecting instrument timbres (Voices) by family and type.
Controls for real-time manipulation of the automatic accompaniment section.
Explanation of symbols and conventions used throughout the manual for clarity.
How to access various parameter groups and menus from the main display page.
Details on the function keys and their role in selecting commands and parameters.
Methods for entering and modifying parameter values using various buttons and controls.
Guide to playing back standard MIDI and Karaoke files from floppy or hard disk.
Real-time controls for song playback, including start, stop, pause, and tempo adjustments.
Procedure for creating temporary sequences of MIDI files to play consecutively.
Steps for recording songs using the built-in sequencer or song record function.
Explanation of the automatic accompaniment system, styles, and variations.
How to select and access instrument sounds (Voices) using dedicated buttons.
Creating layered sounds by adding a second timbre to the lead section.
Programming and saving custom instrument sounds in user memory locations.
Understanding the components and parameters involved in shaping instrument sounds.
Adjusting microphone input gain, levels, and effects for optimal sound.
Managing effects on microphone input to prevent interference during speech.
Steps for physically connecting a MIDI accordion to the SD1.
Activating and configuring the SD1 for MIDI accordion input.
Managing preset and custom registrations stored in memory for instant recall.
Loading and saving individual registrations from disk for personalized setups.
Automating file loading based on matching registration names.
Combining multiple timbres for complex sounds in the lead section.
Steps to edit and customize existing Program settings.
Detailed explanation of parameters available within Program editing.
Procedures for saving and loading Program settings to memory or disk.
Creating and managing quick access lists of preferred timbres.
Procedures for loading audio files (.WAV, .MSP) into RAM memory.
Steps to remove audio files previously loaded into RAM.
Grouping audio files into Sound Blocks for automatic loading.
Basic steps for recording and saving audio samples using the instrument's sampler.
Overview of functions available within the sampler menu for file management.
Adjusting start, end, and loop points for sampled audio.
Assigning multiple samples across the keyboard to create complex sounds.
Loading existing multi-samples for editing or modification.
Step-by-step process for creating new multi-samples from audio files.
Modifying organ sounds using drawbars and associated parameters.
Selecting and playing preset or user-defined drum kits on the keyboard.
Understanding and utilizing the advanced Live Drum technology for realistic rhythms.
Adjusting volume, reverb, and pan for individual drum groups.
Step-by-step guide to creating and editing custom drum kits.
Controls for real-time manipulation of the Arranger, including variations and fills.
Associating specific timbres with styles for quick recall during performance.
Applying vocal harmonization effects to the lead part based on chords.
Accessing and configuring various Arranger modes and parameters.
Modifying timbres, volumes, effects, and panning for individual Arranger tracks.
Changing instrument sounds assigned to Arranger tracks for different sections.
Adjusting settings for the Lower 1 and Lower 2 parts of the accompaniment.
Initial screen for accessing style editing functions and parameters.
Recording and reproducing individual tracks within a style's section.
Recording sequences directly from external MIDI devices.
Synchronizing audio loops with style tempo for advanced rhythmic arrangements.
Creating a new style from scratch using the Pattern Edit functions.
Step-by-step guide to loading MIDI files from a floppy disk for playback.
Procedures for loading MIDI files from the internal hard disk drive.
Making playlists of MIDI files for continuous playback.
Adjusting keyboard and MIDI file timbre volumes for balanced playback.
Techniques for efficiently finding MIDI files by title or number.
Overview of controls and parameters for managing MIDI file playback.
Editing volume, reverb, chorus, and pan for individual MIDI file tracks.
Using Karaoke files with lyrics and text files for display during playback.
Linking text file page changes to MIDI playback for basic lyric synchronization.
Adjusting microphone input gain, levels, and effects for optimal sound.
Managing effects on microphone input to prevent interference during speech.
Steps to enable and use the vocal harmonization and effects features.
Explanation of different vocal harmonization modes like Automatic Chord and Keyboard Harmony.
Detailed settings for programming and customizing vocal effects.
Storing customized Vocalizer settings in memory for quick recall.
Archiving entire banks of Vocalizer settings onto disk for backup.
Retrieving stored Vocalizer settings from disk storage.
Configuring the SD1 to load a specific Vocal Set automatically on startup.
Linking Vocal Sets with Registrations for streamlined performance setups.
Overview of the main Effects menu structure.
Modifying and customizing algorithms for Reverb, Chorus, Delay, and Distortion.
Applying real-time effects to the Right section and using the Rotor effect.
Managing preset and custom registrations stored in memory for instant recall.
Loading and saving individual registrations from disk for personalized setups.
Automating file loading based on matching registration names.
Accessing and configuring basic utility settings like Transpose and Aftertouch.
Managing video output, pianist modes, keyboard output assignments, and MIDI setups.
Configuring advanced utility settings including voice modes, passwords, and song playback.
Steps for physically connecting a MIDI accordion to the SD1.
Activating and configuring the SD1 for MIDI accordion input.
Utilizing the SD1's General MIDI tone generator for external MIDI control.
Adjusting parameters for individual General MIDI parts received via MIDI.
Configuring MIDI transmit and receive channels for different SD1 sections.
Saving and recalling MIDI configuration settings for specific setups.
Transferring MIDI files from floppy disk to the Demo & Hit folder.
Copying MIDI files from hard disk folders into the Demo & Hit folder.
Activating and using the Demo & Hit function for quick song selection.
Managing and reorganizing MIDI files within the Demo & Hit function.
Overview of hard disk file management principles and structure.
Understanding and utilizing the Master Folder for simplified file organization.
Step-by-step guide to navigating and using the Master Folder feature.
Essential rules for operating the disk functions and understanding the display.
Navigating and selecting files within folders on the disk.
Managing and navigating through folders on the disk drive.
Detailed functions for managing files and folders on the hard disk.
Functions available for managing files and folders on the floppy disk drive.
Procedure for updating the SD1's firmware using a floppy disk.
Restoring the instrument to its factory default settings using reset files.
Information on additional styles provided with the instrument.
Assigning a name to a recorded sequence using the keyboard or edit window.
Setting and modifying the playback speed (tempo) for sequences.
Defining the musical division (time signature) for sequences.
Indicating the current playback position within a sequence.
Managing the sixteen available tracks within a sequence, including naming and selection.
Assigning MIDI channels for playback of individual tracks.
Aligning recorded events to a precise musical grid for improved timing.
Modifying individual notes, controls, and events within a sequence.
Guide to converting styles from MS and X series for use on the SD1.
Assigning audio samples and loops to MIDI files for enhanced playback.
Transferring audio files from floppy disk to the SD1's hard disk.
Preparing audio loops using the sampler before assigning them to styles.
Loading processed audio loops into the instrument's RAM for immediate use.
Copying styles to Pattern Edit for modification and customization.
Enabling loop synchronization with style sections for rhythmic accuracy.
Utilizing styles with loop synchronization for enhanced musical arrangements.
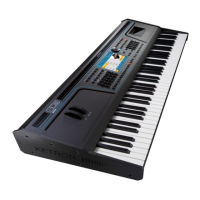
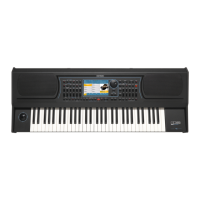
| Type | Arranger Workstation |
|---|---|
| Keyboard | 61 keys |
| MIDI | In, Out, Thru |
| Touch Response | Yes |
| Effects | Reverb, Chorus, Delay, Equalizer |
| Sequencer | 16 tracks |
| Storage | Floppy Disk Drive, Internal Hard Disk |
| Display | Color TFT |
| Outputs | Stereo Out, 4 Individual Outs |
| Inputs | Mic (6.3mm), line in (6.3mm) |
| Keys | 61 |
| Connections | USB |
| Power Supply | External Power Supply |
| Dimensions | 140 mm |
| Preset Sounds | Over 1000 sounds |