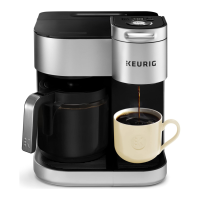
MAX
Remove pcking tpe from brewer nd frother,
nd plug into grounded outlet. Lower the
frother bse on the side of the brewer.
Plce lrge mug (10oz minimum) on the
drip try.
Remove the water reservoir lid, then lift the reservoir
straight up to remove it.
Rinse reservoir with fresh water and fill to the
MAX fill line.
Replace water reservoir, making sure the lock tabs
engage with the brewer. Replace lid.
NOTE: Do not use distilled water.
Press power button - the green power light will
illuminate.
The brewer will automatically begin heating the
water. This will take about 4 minutes. Once the
heating sound stops, the brewer is ready.
Remove the lid and whisk from inside the frother. Wash
the interior of the frother, lid, and whisk with warm,
soapy water. Dry all parts thoroughly using a soft, non-
abrasive cloth, then reassemble.
NOTE: Frother is not dishwasher safe. Do not submerge frother in water. Only
use non-abrasive cleaning materials to prevent damage to the inner surface
of the frother. Dry interior of frother and base with a soft cloth after cleaning.
Lift and lower the handle. Do not insert a K-Cup® pod.
The three brew buttons and SHOT button will blink.
Press the 6oz button to start a cleansing brew. Pour the
hot water into the sink.
The one-time setup process is now complete and you are
ready to brew!
NOTE:
Between brew cycles, the brewer may take about a minute to reheat.
1
4
3
2
5
Before You Brew
Add Water
10
8
6
oz
SHOT
oz
oz
LATTE
Plug & Place Rinse & Fill
Power On
Clean the Frother
Cleansing Brew
Add Water
10
8
6
oz
SHOT
oz
oz
LATTE
10
8
6
oz
SHOT
oz
oz
LATTE
4
Add Water
10
8
6
oz
SHOT
oz
oz
LATTE
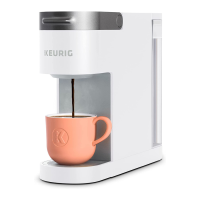
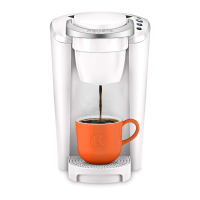
Place Mug & Pod
Place a mug on the drip tray. Lift the
handle and place any K-Cup® pod in the
K-Cup® pod holder. Lower the handle
completely to close the lid.
Do not remove the foil lid on the
K-Cup® pod.
1
2
Make Your First Latte
Fill Frother
Remove lid and add chilled milk to the MAX line
marked in the frother. Replace the lid and place
the frother on the frother base.
Press the power button on the frother.
The button will illuminate while heating –
approximately 3 minutes. Frothing is complete
when the button flashes and then turns off.
TIP: Having trouble frothing? We’re here to help.
Give us a call at 1-866-901-BREW (2739).
CAUTION:
Frother is not microwave or dishwasher safe.
NOTE: Do not under or overfill frother. Do not operate before adding milk.
10
8
6
oz
SHOT
oz
oz
LATTE
Add Water
Remove the frother from the base. Remove
the lid and pour the frothed milk over your
shot of coffee.
NOTE: Clean frother immediately after use. For
cleaning instructions, see Caring for your Brewer
section in this guide.
The three brew buttons and SHOT button will blink.
Press the SHOT button. Brewing is complete when the
SHOT button is no longer illuminated. Lift the handle
and dispose of the used K-Cup® pod.
NOTE: After 60 seconds, the brew buttons will be disabled. To
re-activate, lift and lower the handle completely.
CAUTION: While brewing, there is extremely hot water in the
K-Cup® pod holder. To avoid injury, do not lift the handle during the
brewing process.
3
4
Brew a Shot
Add Water
10
8
6
oz
SHOT
oz
oz
LATTE
Create Your Latte
6
oz

 Loading...