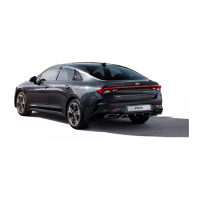
Smart Trunk Operation*
For vehicles equipped with a Smart Key and Smart Trunk, when the Smart Key fob is in your
possession and you are within close proximity to the back of the vehicle, the hazard warning
lights will blink and a chime will sound for about 3 seconds to alert you that the Smart Trunk*
is about to open.
Then the alert system will blink and chime two additional times before opening the Smart Trunk.
The Smart Trunk feature is OFF by default. To enable the Smart Trunk, go to User Settings
in the LCD Instrument Cluster modes or Vehicle Settings* in the infotainment system (vehicles
with navigation system).
If you unlocked your vehicle or opened the trunk by pressing the unlock button on your Smart
Key (even though it is not necessary to do so), be sure to press the lock button on the Smart Key
before walking away to ensure your entire vehicle is locked again.
The Smart Trunk function can be deactivated by pressing any button of the Smart Key during
the Detect and Alert stage.
Raising the Windshield Wiper Arms
To lift the wipers in order to clean the windshield, replace wiper blades, or to raise wipers in
snow/ice conditions, the blades need to be moved to the service position. To move wiper blades
to this position:
With the ignition ON, turn the ignition OFF, and within 20 seconds move the wiper switch to
the MIST position and hold the switch for more than 2 seconds until the wiper blades are in the
fully up position.
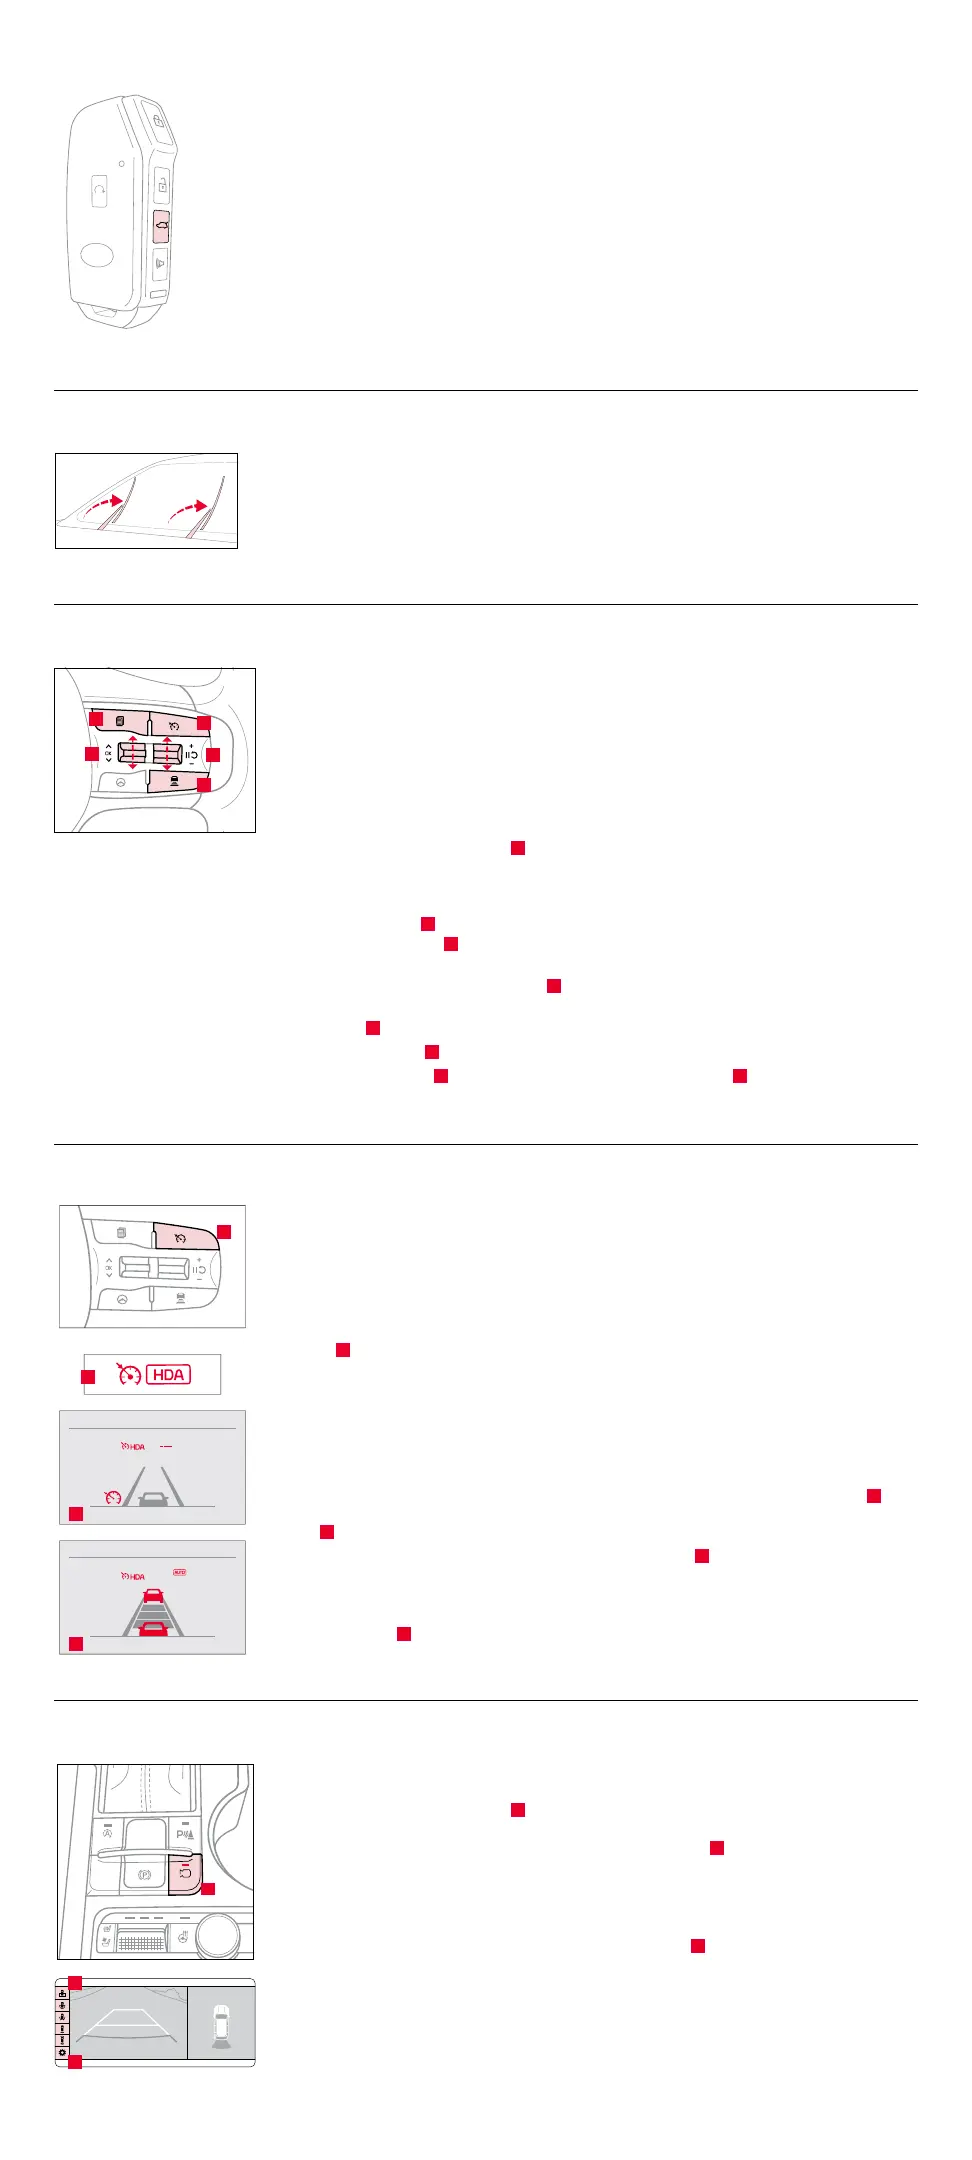
Smart Cruise Control (SCC) with Stop and Go System*
7
SCC is designed to maintain a predetermined distance from vehicles detected ahead by
automatically adjusting the driving speed as needed. When traffic is detected, the vehicle
will slow down to maintain a set distance behind traffic without depressing the accelerator
or brake pedal.
With SCC on and activated and the vehicle distance set, when the system detects a vehicle
slowing or stopping, the system can bring the vehicle to a complete stop. When the vehicle ahead
starts to move forward, SCC re-engages. If the vehicle ahead stops for more than 3 seconds, the
accelerator pedal or the RES+ button must be pressed to start moving the vehicle.
To set/adjust the SCC speed:
• Press the Driving Assist button
A
to turn system ON and set speed. The CRUISE indicator
will illuminate on the Instrument Cluster and the set speed will automatically activate at the
vehicle’s current speed.
• Accelerate/decelerate to the desired speed.
• Press the button
B
inward to pause/resume the cruise control.
• Press the +/- button
B
up/down to increase/decrease the set speed. The SET indicator light,
set speed, and vehicle distance will illuminate on the Instrument Cluster’s LCD screen.
To set the vehicle-to-vehicle distance: Press the Vehicle Distance button
C
on the steering wheel. Scroll through the selections
and the vehicle-to-vehicle distance image changes and displays on the LCD Instrument Cluster.
To pause/resume SCC operation: Press button
B
.
To turn SCC system OFF: Press the Driving Assist button
A
. The CRUISE indicator on the Instrument Cluster will turn OFF.
To adjust the sensitivity of SCC: Press the mode button
D
on the steering wheel. With the OK button
E
, select Driver Assistance,
then SCC Response. Then select Fast, Normal, or Slow.
Highway Driving Assist (HDA)*
8
HDA is designed to adjust the speed of the vehicle when driving on limited-/controlled-access
highways. The system can adjust the vehicle’s speed based on available highway speed information.
The automatic speed setting mode is designed to set the speed automatically by adjusting to
the current speed limits of the highway the vehicle is traveling on.
To enable/disable HDA, go to User Settings in the Instrument Cluster, or the Vehicle Settings*
in the infotainment system. Go to Driver Assistance > Driving Assist > Highway Driving Assist.
To activate HDA, turn Smart Cruise Control (SCC)* on by pressing the Driving Assist (Cruise)
button
A
on the steering wheel controls.
HDA will operate only when these conditions are met:
• When the SCC speed is set to current posted highway speed or slower.
• The vehicle is traveling slower than 110 mph.
• When driving on limited-/controlled-access highways, such as Interstate, Federal and
State freeways.
• When SCC is on and operating.
When HDA is activated and the conditions are met, the Instrument Cluster indicator light
B
will
illuminate GREEN. If the conditions are not met, HDA will be in standby mode and the indicator
light
B
will illuminate WHITE.
When in operation, and if both lanes are recognized, a display
C
will show the lanes illuminated
WHITE and the steering wheel indicator illuminated GREEN.
If HDA is activated, conditions are met, and the SCC speed is set by the driver (at the posted
highway speed limit), HDA will enter the automatic speed setting mode. The set speed and AUTO
will be displayed
D
in GREEN and an audible alert will sound.
Surround View Monitor (SVM)*
1,7
SVM is a parking support system that shows the areas around the front, rear, left, and right sides
of the vehicle via four cameras displayed onto the infotainment system.
• Press the Parking/View button
A
to turn on SVM. Press the button again to turn OFF
the function.
• Other view modes can be selected by touching the view icons
B
on the SVM screen.
• Surround View Monitor Auto On: With Driver Assistance > Parking Safety > Surround View
Monitor Auto On selected from the Settings menu in the infotainment system screen,
the front parking assist view screen is displayed when Parking Distance Warning warns
the driver while driving in D (Drive).
To change the SVM settings, press the onscreen settings icon
C
while SVM is operating.
A
B
C
D
E
AUTO
HOLD
OFF
DRIVE
MODE
VIEW
A
AUTO
HOLD
OFF
DRIVE
MODE
VIEW
A
A
B
C
mph
60
mph
A
B
C
D
(Type B steering wheel controls)
HOLD
HOLD
(Buttons located on right side of steering wheel)

 Loading...