Do you have a question about the KitchenAid Double Oven and is the answer not in the manual?
Important pre-installation checks, safety warnings, and carpentry instructions.
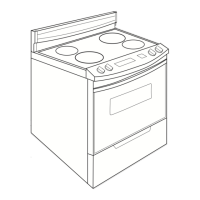
Specifies cabinet opening and installation dimensions for the 30-inch single oven.
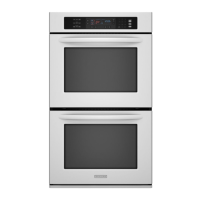
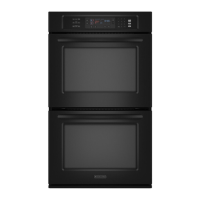
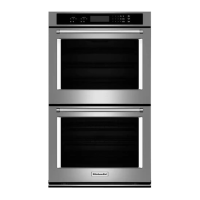
Specifies cabinet opening and installation dimensions for the 30-inch double oven.
Lists the necessary tools and parts supplied for the oven installation.
Details voltage, frequency, fuse requirements, and critical electrical safety guidelines.
Step-by-step instructions for making the electrical connection to the oven.
Specific instructions for connecting the oven to a four-wire electrical system.
Guides for physically placing, securing, and completing the oven installation.
Instructions to test the bake element and control panel operations.
Instructions to test the broil element and control panel operations.
Basic checks to perform if the oven does not operate after installation.
Information on contacting KitchenAid for operational assistance or service.
This document provides comprehensive installation instructions for KitchenAid Electric Built-in 30" Thermal Single and Double Ovens, as well as 30" Thermal Convection Single and Double Ovens. It emphasizes the importance of reading and saving these instructions for both the installer and homeowner, and for local electrical inspector's use. The manual also includes troubleshooting tips, assistance contact information, and service details.
The KitchenAid built-in ovens are designed for baking, broiling, and in convection models, convection baking. These appliances are intended for permanent installation within kitchen cabinetry, providing a seamless and integrated look. The single oven models offer a single cooking cavity, while the double oven models provide two independent cooking cavities, allowing for simultaneous preparation of different dishes at varying temperatures. The thermal models utilize conventional heating elements, while the convection models incorporate a fan to circulate hot air, ensuring more even cooking and faster results. The ovens feature electronic controls for precise temperature management and various cooking functions.
The ovens are equipped with user-friendly control panels, which vary slightly between thermal single, thermal convection single, and double oven models. These panels typically include buttons for BAKE, BROIL, CLEAN, START/ENTER, CANCEL/OFF, and a clock display. Convection models will also feature a CONVECTION BAKE option.
To operate the oven, users first turn on the power supply, which should display "88:88" on the clock. The clock can be set by pressing the "CLOCK SET" button, entering the correct time using the number pads, and then pressing "START/ENTER."
For baking, users select the "BAKE" pad and enter the desired temperature (e.g., "350"). Pressing "START/ENTER" initiates the baking process. The display will show "Lo°" along with symbols indicating the active heating elements (Bake Element, Outer Broil Element) and the Oven Cavity. For convection baking, users select "CONVECTION BAKE" and enter the desired temperature (e.g., "325"), then press "START/ENTER." The display will show "Lo°" along with symbols for ON, Convection Element, and Convection Fan. After a few minutes, the bottom element should glow red, indicating the oven is heating. The upper element will also become hot. To stop any cooking function, the "CANCEL/OFF" pad is pressed.
For broiling, users press the "BROIL" pad once. The display will show "500" and "MAXI BROIL" (if applicable). Pressing "START/ENTER" begins the broiling operation. The ON, Inner and Outer Broil Elements, and Oven Cavity symbols will light up. Within 1-2 minutes, the upper element should glow red. The broil function can be stopped by pressing "CANCEL/OFF."
The ovens are designed for convenient use, with clear instructions for setting various cooking modes. The double oven configurations enhance flexibility, allowing users to bake and broil simultaneously or prepare multiple dishes at different temperatures, optimizing kitchen efficiency. The electronic controls provide precise temperature settings and timing, contributing to consistent cooking results.
The manual emphasizes several maintenance aspects, particularly regarding installation and initial setup, which are crucial for the long-term performance and safety of the appliance.
Proper installation is paramount. The instructions detail specific cabinet opening dimensions for both single and double ovens, including height, width, and depth, ensuring a snug and secure fit. The oven support surface must be solid, level, and flush with the bottom of the cabinet opening. The recessed installation area must completely enclose the recessed portion of the oven. All openings in the wall or floor where the oven is installed must be sealed to prevent drafts.
Electrical requirements are thoroughly outlined, stressing the need for a qualified electrician to ensure proper grounding and adherence to the National Electrical Code (ANSI/NFPA 70) and local ordinances. The appliance requires a dedicated electrical circuit with specific voltage and frequency, and appropriate fuse sizes are provided in a chart. The oven must be connected with solid copper wire only. The manual provides three wiring diagrams for different electrical systems: grounded neutral, ungrounded neutral, and a four-wire electrical system, guiding the installer through the correct connection of appliance wires to the junction box. It is crucial to disconnect power to the junction box before making electrical connections.
The physical installation process involves removing shipping materials and racks from inside the oven. For self-cleaning ovens, a nail or equivalent (5/32" diameter item) is inserted into the hinge holes to close the door as far as possible, allowing the door to be lifted off. For non-self-cleaning ovens, the door is opened to the broil "stop" position and lifted upwards. Two or more people are needed to move and safely install the oven due to its weight and size. Before moving the oven across the floor, it should be on its shipping base or slid onto cardboard or hardboard to prevent damage to the floor covering.
After the oven is moved close to its final position, the shipping base is removed, and the appliance cable is fed through the cabinet opening for electrical connection. The oven is then centered into the cabinet cutout and secured with screws (four for single ovens, eight for double ovens) through the mounting holes in the front frame, taking care not to overtighten them. Finally, the air grille is placed below the oven opening, ensuring the flange is at the bottom, and attached to the cabinet with three black or chrome metal screws. The oven racks are replaced, and the oven door(s) are reinstalled by fitting the corners over the hinge ends and ensuring they close properly.
The manual includes a "If the range does not operate..." section, advising users to check the circuit breaker or house fuse. For further troubleshooting, users are directed to the Use & Care Guide.
For assistance with operating or maintaining the oven, the KitchenAid Consumer Assistance Center is available 24/7 via a toll-free number. When calling, users should have the oven model and serial numbers ready, which are located on the serial/rating plate behind the oven door (upper oven for double models).
In case service is needed, users are advised to contact the dealer from whom the appliance was purchased or a KitchenAid-authorized service company. These companies are listed in the Yellow Pages under "Appliances - Household - Major - Service or Repair." The Consumer Assistance Center can also provide the name and number of the nearest authorized service company.
The document concludes by recommending that users read their KitchenAid Use & Care Guide to get the most efficient use from their new oven and to keep both the Installation Instructions and Guide for easy reference. This comprehensive approach ensures that users have all the necessary information for safe installation, effective operation, and reliable maintenance of their KitchenAid built-in oven.
| Oven Type | Double Oven |
|---|---|
| Fuel Type | Electric |
| Number of Racks | 4 |
| Convection Cooking | Yes |
| Self-Cleaning | Yes |
| Precision Cooking System | Yes |
| Even-Heat True Convection | Yes |
| Interior Oven Light | Yes |
| Electronic Oven Control | Yes |
| Stainless Steel Finish | Yes |
| Width | 30 inches |