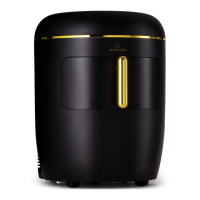
The device described in this manual is a household beer cooler, specifically the "Passau" model, designed for dispensing and cooling beer. It features a high-quality tap and a unique design, utilizing an air pump to dispense beer. The primary functions include cooling and preserving beer, aiming to bring it to an optimal cold storage temperature of 3 °C to 4 °C within 16-21 hours. However, it is recommended to pre-chill the beer keg in a refrigerator for at least 12 hours before placing it in the beer cooler for best results.
Technical Specifications:
- Article Numbers: 10041520, 10041521
- Power Supply: 220-240 V ~ 50 Hz
- Available Capacity: 6-liter beer kegs
- Nominal Power: 65 W
- Cooling Capacity: The minimum barrel temperature is 3 - 12 °C (at an ambient temperature of 22 - 24 °C).
- Noise Level: ≤ dB (A) (with ambient noise ≤ 25 dB (A)).
- Dimensions: 495 mm (W) * 290 mm (D) * 475 mm (H).
- Net Weight: 5.3 ± 0.3 kg.
Usage Features:
The beer cooler is designed for use with sealed 6-liter universal drums. Users must carefully read the entire instruction manual before operation.
Safety Instructions:
- Always ensure the voltage matches the rating plate and the outlet is properly grounded.
- If the power cord is damaged, it must be replaced by the manufacturer, its service agent, or a similarly qualified person.
- Do not plug or unplug the mains plug with wet hands.
- Place the beer cooler on a dry, horizontal surface.
- Ensure at least 10 cm clearance on each side for good ventilation.
- Never expose the beer cooler to direct sunlight or cover it during operation.
- The device should be placed in a location protected from weather elements like wind, rain, splashing, or dripping water.
- Disconnect power before any cleaning or maintenance to avoid electrocution.
- Do not immerse the beer cooler or its plug in water or other liquids.
- Avoid using coarse cloths or abrasive cleaners.
- This appliance is not intended for use by persons (including children) with reduced physical, sensory, or mental capabilities, or lack of experience and knowledge, unless supervised or instructed by a responsible person. Children should be supervised to prevent them from playing with the device.
- Do not store explosive substances, such as aerosol cans with flammable propellant, in the device.
- This device is intended for household use and similar applications, including staff kitchens, farmhouses, hotels, motels, bed-and-breakfast environments, and catering.
Barrel Selection and Handling:
- Only use sealed 6-liter universal drums.
- Check the barrel for damage and ensure it does not contain expired beer before purchase.
- Protect the top of the barrel from damage to prevent issues with the suction pipe.
- Store the barrel in a cool (not too cold) place, such as a refrigerator, for 12 hours before use.
- An opened beer keg has a shelf life of 30 days.
- Ensure the device is in operation when placing the beer keg inside. If the device will be out of operation for an extended period, store the beer keg in the refrigerator.
- Do not freeze the beer keg, as this will destroy it.
- Never shake the barrel before use.
- To prevent explosions, do not expose the beer keg to direct sunlight or temperatures above 30 °C.
- Store the beer keg at a low temperature and in a stable environment; do not open it before use.
- When the keg is under pressure, do not damage the upper connecting part. Using a damaged barrel can harm the device.
- Use only the wine valve that matches the machine; other non-approved tap valves should not be used.
- The maximum operating pressure of the barrel is 1.5 bar.
- Do not stack barrels during storage.
Assembly:
- Remove the beer cooler from its packaging and place it on a stable, horizontal surface, ensuring at least 10 cm clearance on all sides for ventilation.
- Install the tap handle and connect the tap, ensuring both ends fit perfectly.
- Insert the drip tray into its designated recess.
- Check the infrared detection LED (located on the top left and right inside the cooling drum) for dirt or damage. If the beer keg is not inserted or is removed, the device will display "OP" on the control panel and not operate normally.
- Remove the protective cover and the beer hose from the keg.
- Align the beer outlet valve device vertically with the connection part at the top center of the beer keg and press it in. A click indicates correct attachment. Place the beer keg in the cooling keg after valve installation.
- Plug the quick release connector of the beer line into the air inlet connector of the beer valve device. A slight click confirms a successful connection.
- Insert the beer outlet connector at the end of the beer line into the metal connection opening of the beer valve device and turn it clockwise to fix it.
- Cover the top with the top cover. Set the power switch to "-" to start operation. To cut power, set the switch to "o". Ensure hands are dry before pressing the power switch.
Operation:
- It takes 19-21 hours to cool the beer to 3-4 °C at an ambient temperature of 22-24 °C.
- The control panel allows monitoring durability (days remaining for storage), beer content, and temperature.
- Storage days: When a new keg is placed, the device registers the number of days the beer is stored, starting a countdown from 30. When it reaches 0, the barrel must be replaced. To reset storage days or increase them for an opened keg, press "+" or "-" for 3 seconds.
- Temperature adjustment: The refrigerator temperature corresponds to the previously set temperature. Pressing "+" or "-" buttons adjusts the temperature by one degree. The screen displays the current beer temperature. Press any button to display the set temperature and return to current temperature after 3 seconds. Pressing "+" and "-" simultaneously switches between Fahrenheit and Celsius. The cooling temperature is adjustable between 3-12 °C (37-54 °F).
- The beer cooler has a switch-off memory function; it retains the set temperature after being switched off.
- Dispensing beer: When the tap handle is closed vertically, pull it forward 45 degrees to open the tap.
- Caution: Before drinking, rinse the glass with cold water. High glass temperature or high beer temperature will cause many bubbles.
- When serving, tilt the glass towards the tap outlet and fully open the tap handle. If the handle is not fully open, many bubbles will appear. It's best to pour half a glass, pause, then continue pouring. Do not immerse the beer outlet in a full glass of beer to avoid strong bubbles. Close the tap when finished.
- It is normal to have more bubbles when pouring the first 3 beers.
- A short stream from the tap mouth is normal when the beer keg is empty. Release and close the tap handle.
Maintenance Features:
Replacing the Beer Keg:
- Open the top cover of the beer cooler.
- Push down the quick connector at the end of the beer line on the tap, simultaneously turn the connector anti-clockwise from the engagement position of the tap valve, and then pull out the connector.
- Press and hold the white button of the air inlet socket.
- Remove the empty beer keg with its beer valve from the appliance.
- Press the left and right buttons on the beer valve device to pull it out of the empty beer keg.
- Take a new beer keg and repeat steps 5-9 from the "Installation and Use" section.
Cleaning the Beer Line and the Valve Device:
- For first-time use or after a long period (weekly cleaning is recommended), clean the entire appliance with a dry cloth.
- Clean the beer line from the tap and the valve device from the keg with warm water.
- To remove the beer hose assembly:
- Press and hold the button on the back of the tap, and the beer line assembly and the removable top cover of the tap will automatically pop out together.
- Pull the handle forward 45 degrees to open the tap and pull out the beer hose. The beer hose assembly can be reinstalled in reverse order.
- Note: Do not put the tap or other parts in the dishwasher for cleaning. Do not use cleaning agents; only pure water.
Troubleshooting:
The manual provides a table for common problems, possible causes, and solutions:
- Tap not working/cannot pour beer:
- Poorly connected beer hose: Connect correctly.
- No keg or beer in keg: Replace with a new one.
- Incorrectly installed fast air inlet connection: Connect the quick connector for the air inlet.
- Too many bubbles when pouring:
- Beer poured incorrectly: Quickly turn the tap on full. Ensure correct distance (2-2.5 cm) between glass and tap. Normal bubbles should be thick and cream-colored.
- High beer temperature (better at 3-5 °C): Cool the beer to 3-5 °C.
- Barrel shaken before use: Set aside until no more bubbles.
- Almost no beer left in keg: Replace with a new one.
- Beer flows out too slowly:
- Foreign body in outlet hose: Remove for cleaning or replace hose.
- Leaking connection or outlet hose: Check for leaks and replace if necessary.
Disposal Considerations:
- In Germany, consumers are legally obliged to dispose of electrical and electronic waste (Altgeräte), batteries, and accumulators separately from household waste. The crossed-out wheeled bin symbol indicates such devices.
- Batteries, accumulators, and lamps that can be removed without destruction must be separated from the old device before disposal.
- Certain lamps and light sources are also subject to the Electrical and Electronic Equipment Act. Incandescent and halogen lamps should be disposed of with household waste unless they bear the WEEE symbol.
- Consumers are responsible for deleting personal data from electronic devices.
- Take-back obligation for distributors: Retailers with a sales area of at least 400 square meters for electrical and electronic equipment, or food retailers with a total sales area of at least 800 square meters who offer electrical and electronic equipment several times a year, are obliged to:
- Take back an old device of the same type that performs essentially the same functions as a new device, free of charge, at the point of sale or in its immediate vicinity.
- Take back old devices with no external dimension greater than 25 centimeters, free of charge, at the retail store or in its immediate vicinity, upon request from the end-user. This take-back is not tied to the purchase of a new device and is limited to three old devices per device type.
- Old devices can be handed in free of charge at municipal collection points or at collection points set up by distributors.
- Batteries and accumulators that are not permanently installed in the old device must be removed before disposal.
- Consumers are responsible for deleting personal data from the old device.
- The manufacturer is Chal-Tec GmbH, Wallstraße 16, 10179 Berlin, Germany.
- The importer for Great Britain is Berlin Brands Group UK Ltd, PO Box 1145, Oxford, OX1 9UW, United Kingdom.